
.png
)


About
Topics
Measurement of length and timeDescription
Play with the Micrometer Model. Test what you've learned by trying the input field.Micrometers use the principle of a screw to amplify small distances that are too small to measure directly into large rotations of the screw that are big enough to read from a scale. The accuracy of a micrometer derives from the accuracy of the thread form that is at its heart. The basic operating principles of a micrometer are as follows:
The amount of rotation of an accurately made screw can be directly and precisely correlated to a certain amount of axial movement (and vice-versa), through the constant known as the screw's lead. A screw's lead is the distance it moves forward axially with one complete turn (360°). (In most threads [that is, in all single-start threads], lead and pitch refer to essentially the same concept.)
With an appropriate lead and major diameter of the screw, a given amount of axial movement will be amplified in the resulting circumferential movement.
The micrometer has most functional physical parts of a real micrometer.
Frame (Orange)
The C-shaped body that holds the anvil and barrel in constant relation to each other. It is thick because it needs to minimize expansion, and contraction, which would distort the measurement. The frame is heavy and consequently has a high thermal mass, to prevent substantial heating up by the holding hand/fingers. has a text 0.01 mm for smallest division of instrument has a text 2 rounds = 100 = 1.00 mm to allow association to actual micrometer
Anvil (Gray)
The shiny part that the spindle moves toward, and that the sample rests against.
Sleeve / barrel / stock (Yellow)
The stationary round part with the linear scale on it. Sometimes vernier markings.
Lock nut / lock-ring / thimble lock (Blue)
The knurled part (or lever) that one can tighten to hold the spindle stationary, such as when momentarily holding a measurement.
Screw
(not seen) The heart of the micrometer It is inside the barrel.
Spindle (Dark Green)
The shiny cylindrical part that the thimble causes to move toward the anvil.
Thimble (Green)
The part that one's thumb turns. Graduated markings.
Ratchet (Teal)
(not shown ) Device on end of handle that limits applied pressure by slipping at a calibrated torque.
This applet has an object (Black)
with slider on left top to control the y-motion of the object into the anvil and spindle (jaws), the graphics also allows drag action.
with slider on left bottom to control the x-size of the object into the anvil and spindle (jaws).
On the left bottom slider is the zero error control to allow of exploring with if the micrometer has either +0.15 mm (max) or -0.15mm (min) zero error. The are check boxes:
hint: guide lines and arrows to indicate the region of interest plus the accompanying rationale for the answer.
answer: shows the measurement d = ??? mm
lock: allows simulating of the lock function in real micrometer which disable changes to the position of the spindle then by the measurement is unchangeable.
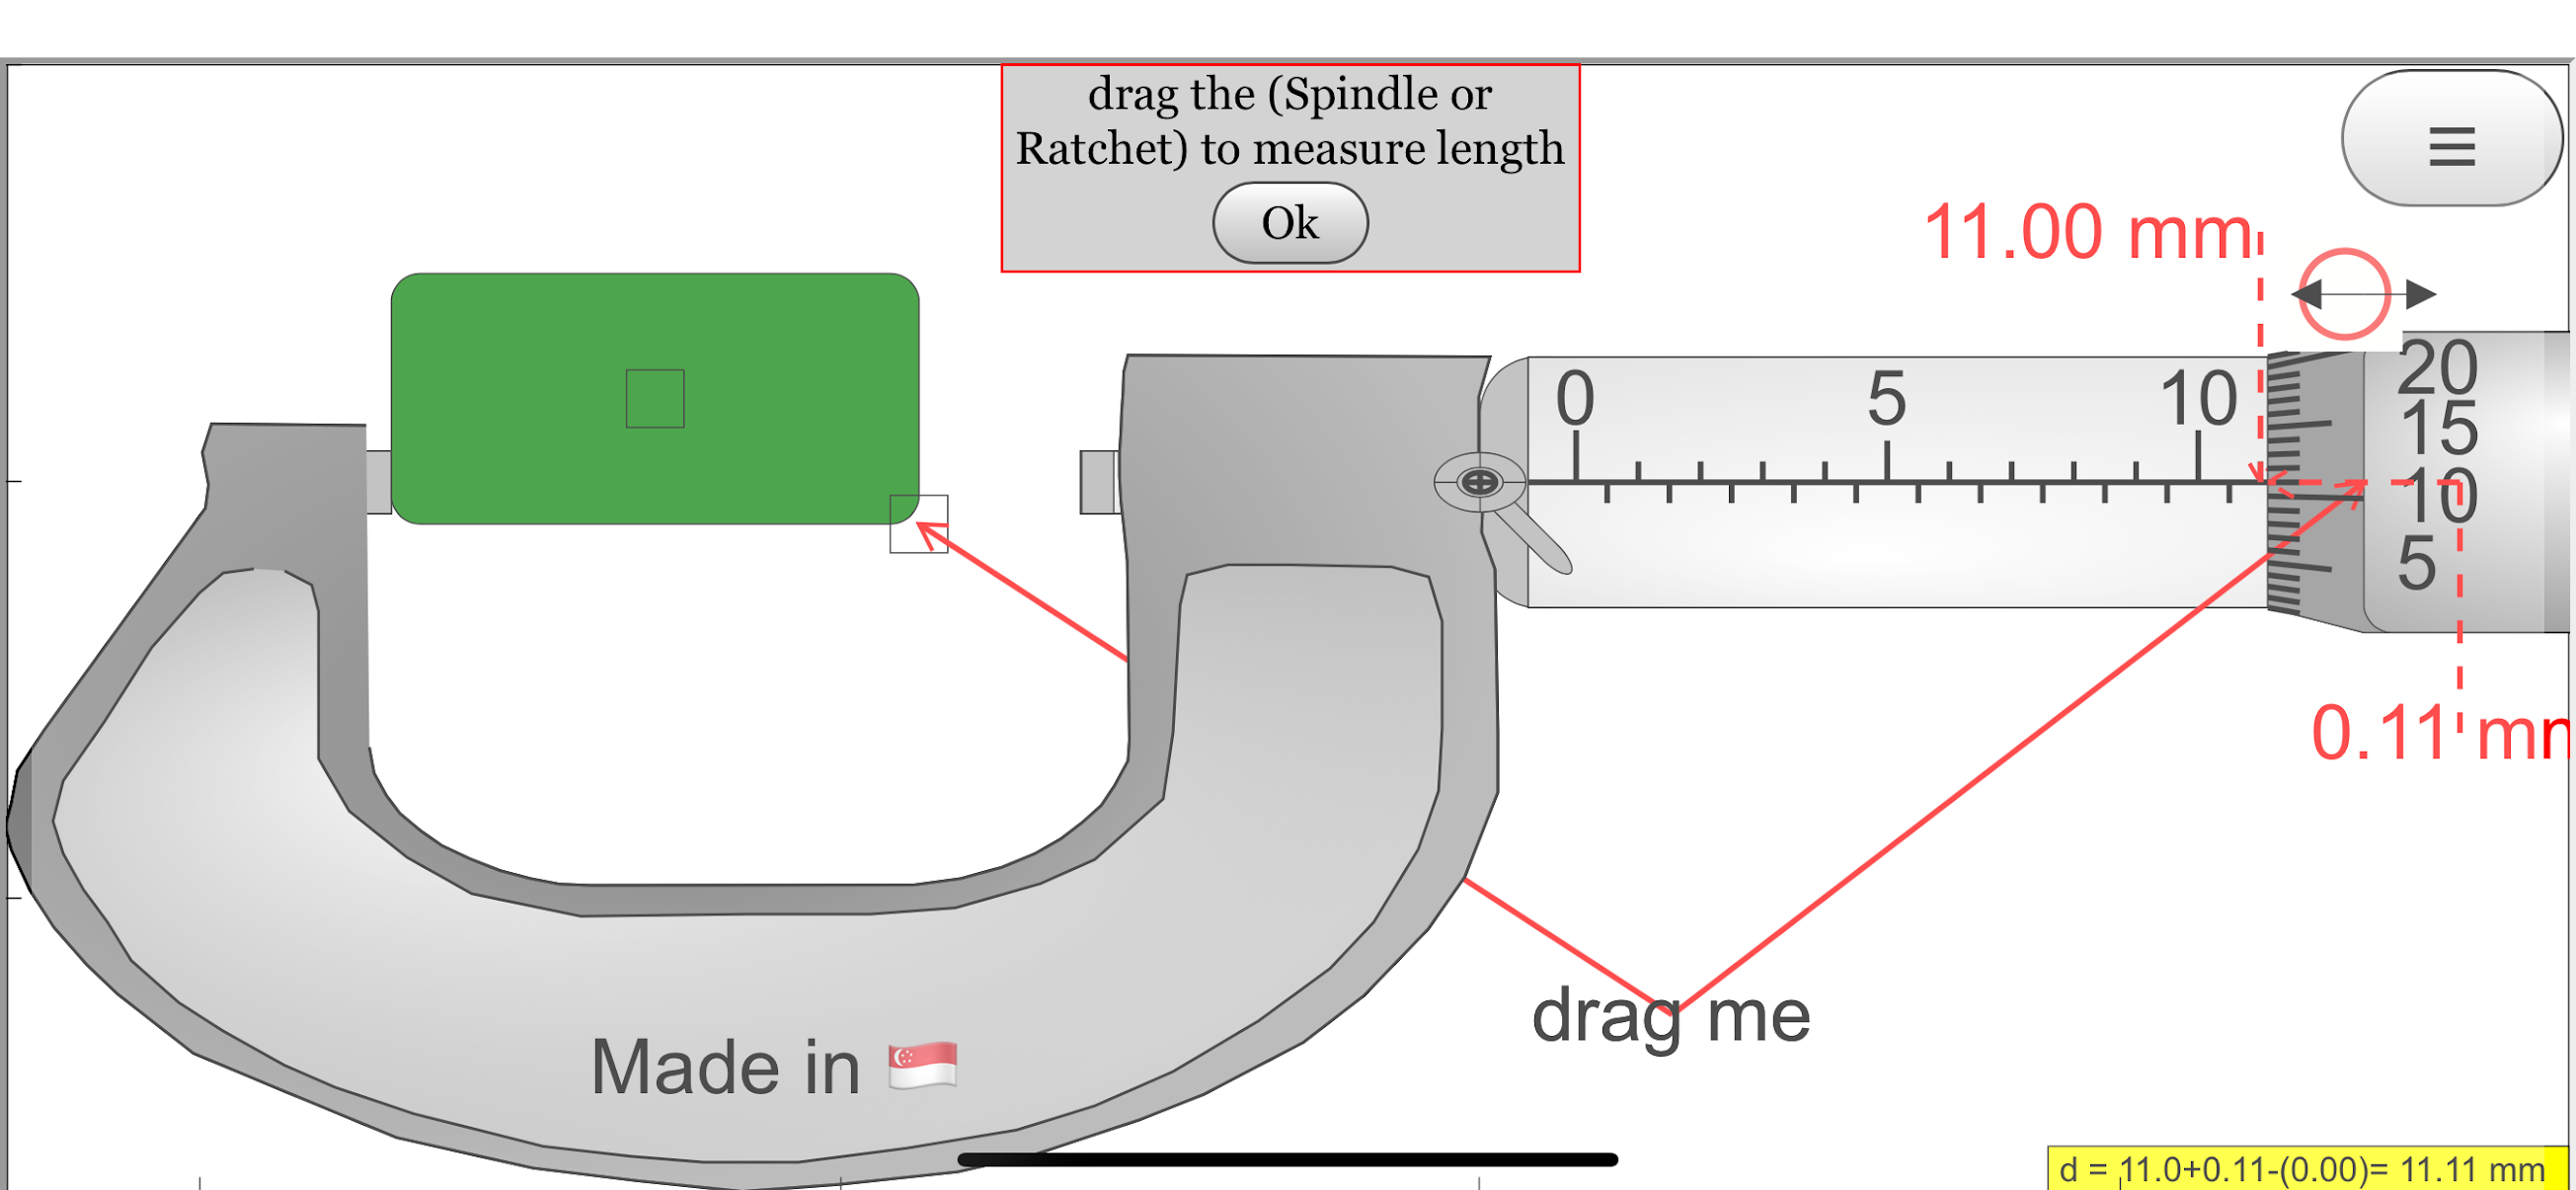
On the bottom there is a green slider to control the position of the spindle, drag on any part of the view also drags the spindle.
There is 2 buttons left and right fine control to allow for single incremental change of the measurement, to allow learners to sense the rotation simulation of the spindle with the many lines to simulate the coarse pattern to increase friction between fingers and on the thimble and ratchet.
The reset button restores learning environment to default setting
Research
arXiv:1408.3803 [pdf]Vernier caliper and micrometer computer models using Easy Java Simulation and its pedagogical design feature-ideas to augment learning with real instruments
Loo Kang Wee, Hwee Tiang Ning
Comments: 8 pages, 8 figures, Physics Education journal
Subjects: Physics Education (physics.ed-ph); Instrumentation and Detectors (physics.ins-det)
https://youtu.be/jHoA5M-_1R4
https://youtu.be/I-RZxhyZVio
Sample Learning Goals
(g) describe how to measure a variety of lengths with appropriate accuracy by means of tapes, rules, micrometers and calipers, using a vernier scale as necessary.Version:
- http://weelookang.blogspot.sg/2015/07/ejss-micrometer-model.html?m=1
- http://weelookang.blogspot.sg/2010/06/ejs-open-source-micrometer-java-applet.html
- http://iwant2study.org/lookangejss/01_measurement/ejs/ejs_model_Micrometer02.jar
- http://www.phy.ntnu.edu.tw/ntnujava/index.php?topic=567.msg2364#msg2364
- http://www.phy.ntnu.edu.tw/ntnujava/index.php?topic=683.msg2451#msg2451
Translations
| Code | Language | Translator | Run | |
|---|---|---|---|---|
 |
||||
Credits


![]() Fu-Kwun Hwang; lookang; Wolfgang Christian
Fu-Kwun Hwang; lookang; Wolfgang Christian
Main Themes:
- Interactive Learning of Micrometer Principles: The central theme is providing an interactive platform for users, primarily students, to learn how a micrometer works and how to take measurements. The description explicitly states: "Play with the Micrometer Model. Test what you've learned by trying the input field." This hands-on approach aims to make the abstract principles of micrometer operation more concrete and understandable.
- Simulation of a Real Micrometer: The applet is designed to mimic the functional physical parts of a real micrometer. The documentation details these parts: "The micrometer has most functional physical parts of a real micrometer." including the Frame, Anvil, Sleeve/barrel/stock, Lock nut, Screw, Spindle, Thimble, and Ratchet. This allows users to become familiar with the instrument's components and their roles.
- Understanding the Screw Principle: A key concept highlighted is the underlying principle of the micrometer: "Micrometers use the principle of a screw to amplify small distances that are too small to measure directly into large rotations of the screw that are big enough to read from a scale." The explanation further elaborates on the "screw's lead" and its correlation to axial movement, which is fundamental to how the micrometer achieves its precision.
- Pedagogical Design for Enhanced Learning: The inclusion of features like sliders to control the object size and position, a zero error control, hints, an answer display, and a lock function demonstrates a focus on pedagogical effectiveness. The "hint" checkbox provides "guide lines and arrows to indicate the region of interest plus the accompanying rationale for the answer," offering support to learners. The ability to introduce and account for "zero error" is crucial for understanding real-world measurement challenges.
- Accessibility and Compatibility: The use of HTML5 ensures broad accessibility across various devices and operating systems: "Android/iOS including handphones/Tablets/iPads, Windows/MacOSX/Linux including Laptops/Desktops, ChromeBook Laptops." The embed code provided further facilitates integration into web pages.
- Integration with Educational Resources: The resource is linked to learning objectives from the Singapore A-Level Physics curriculum, specifically related to "measurement of length and time" and understanding "errors, uncertainties, precision and accuracy through practical work." Links to worksheets created by educators from Sharjah University also indicate its use in formal educational settings.
- Open Source and Collaborative Development: The project is part of the Open Educational Resources / Open Source Physics @ Singapore initiative, with credits given to developers like Fu-Kwun Hwang, lookang, and Wolfgang Christian. The mention of the Easy JavaScript Simulation (EJS) toolkit highlights the open-source nature of the development.
Most Important Ideas and Facts:
- Micrometer Operation: Micrometers employ a precise screw mechanism where the rotation of the thimble corresponds to a minute linear movement of the spindle. The "screw's lead" (distance moved axially per complete turn) is the fundamental principle.
- Components and Functions: Understanding the different parts of the micrometer (Frame, Anvil, Sleeve, Lock nut, Screw, Spindle, Thimble, Ratchet) and their respective functions is essential for using the instrument correctly. The frame's robustness to minimize thermal expansion/contraction is a critical design consideration.
- Reading the Micrometer Scale: A micrometer reading involves two parts: the main scale reading on the sleeve and the thimble scale reading. These are added together to obtain the measurement. The example provided clearly illustrates this process: "First part of the measurement: Look at the image above, you will see a number 5 to the immediate left of the thimble. This means 5.0 mm. Notice that there is an extra line below the datum line, this represents an additional 0.5 mm. So the first part of the measurement is 5.0 + 0.5 =5.5 mm." followed by the thimble reading.
- Zero Error: The simulation allows exploration of zero error, a common issue with measuring instruments. The explanation clarifies how to identify and correct for positive and negative zero errors: "Zero error: + 0.01 mm (positive because the zero marking on the thimble is below the datum line) Measurement without zero error: 1.76 – ( + 0.01 ) =1.75 mm".
- Learning Features of the Applet: The applet includes several features designed to aid learning, such as:
- Visual controls (sliders, drag functionality) for manipulating the simulated object and spindle.
- "Hint" and "answer" checkboxes for guided learning and self-assessment.
- A "lock" function to simulate holding a measurement.
- Fine control buttons for incremental adjustments.
- A "zero error control" to explore its effects.
- A "reset" button to return to the default setting.
- Options for quick answers via combo boxes or manual input via a keyboard.
- Educational Context: The resource is designed for secondary and junior college levels, aligning with topics like "Measurement of length and time" and emphasizing the understanding of errors and uncertainties in practical work. The provided "Sample Learning Goals" explicitly mention the ability to "describe how to measure a variety of lengths with appropriate accuracy by means of tapes, rules, micrometers and calipers, using a vernier scale as necessary."
- Availability of Resources: The page provides numerous links to different versions of the applet (JavaScript, Java), related blog posts, research papers (arXiv:1408.3803), video tutorials (YouTube links), and downloadable worksheets, indicating a comprehensive suite of learning materials.
Quotes:
- "Micrometers use the principle of a screw to amplify small distances that are too small to measure directly into large rotations of the screw that are big enough to read from a scale."
- "The micrometer has most functional physical parts of a real micrometer."
- "Play with the Micrometer Model. Test what you've learned by trying the input field."
- "To obtain the first part of the measurement: Look at the image above, you will see a number 5 to the immediate left of the thimble. This means 5.0 mm. Notice that there is an extra line below the datum line, this represents an additional 0.5 mm. So the first part of the measurement is 5.0 + 0.5 =5.5 mm."
- "Zero error: + 0.01 mm (positive because the zero marking on the thimble is below the datum line) Measurement without zero error: 1.76 – ( + 0.01 ) =1.75 mm"
- "(g) describe how to measure a variety of lengths with appropriate accuracy by means of tapes, rules, micrometers and calipers, using a vernier scale as necessary."
Conclusion:
The Micrometer Manual use JavaScript HTML5 Applet Simulation Model is a valuable open educational resource for teaching and learning about micrometer screw gauges. Its interactive nature, accurate simulation of the instrument's parts and principles, inclusion of pedagogical features, broad accessibility, and integration with educational objectives make it a powerful tool for students and educators alike. The accompanying resources further enhance its utility in various learning environments.
Micrometer Study Guide
Quiz
Answer the following questions in 2-3 sentences each.
- What is the fundamental principle behind how a micrometer works to measure small distances?
- Describe the purpose of the frame of a micrometer and why it is designed with specific characteristics.
- What are the two main scales found on a standard micrometer, and where are they located?
- Explain the function of the thimble and how its markings contribute to the overall measurement.
- What is the purpose of the ratchet mechanism on a micrometer, and what does it prevent?
- In the context of a micrometer, what is meant by the term "screw's lead"?
- Describe how to obtain the total measurement using a micrometer screw gauge based on the readings from its scales.
- What is "zero error" in the context of micrometer measurements, and how can it affect the accuracy of a reading?
- Explain the function of the lock nut (or lock-ring) on a micrometer.
- How does the provided simulation model enhance the learning process about using a micrometer?
Quiz Answer Key
- A micrometer uses the principle of a screw to amplify small linear distances into larger rotations that can be easily read from a scale. This amplification is based on the precise and constant relationship between the screw's rotation and its axial movement, known as the screw's lead.
- The frame of a micrometer is the C-shaped body that holds the anvil and barrel in a fixed relationship. It is made thick and heavy to minimize expansion and contraction due to temperature changes, which could distort the measurement.
- The two main scales on a micrometer are the linear scale on the sleeve (or barrel) and the rotating vernier scale on the thimble. The sleeve scale provides the larger units and subdivisions, while the thimble scale offers finer measurements.
- The thimble is the part of the micrometer that is turned by the user, causing the spindle to move. It has graduated markings around its circumference, which are used in conjunction with the sleeve scale to obtain precise measurements beyond the smallest division of the sleeve.
- The ratchet is a device at the end of the micrometer handle that limits the amount of pressure applied to the object being measured. It works by slipping at a calibrated torque, ensuring consistent and accurate readings by preventing over-tightening.
- The screw's lead is the axial distance that the micrometer's spindle moves forward or backward with one complete rotation (360°) of the screw. This constant relationship between rotation and linear movement is fundamental to the micrometer's operation.
- To obtain the total measurement, you first read the main scale on the sleeve to determine the whole and half-millimeter increments. Then, you read the coinciding division on the thimble's rotating scale with the datum line on the sleeve, which represents the fraction of a millimeter. Finally, you add these two readings together.
- Zero error occurs when the micrometer reads a non-zero value when the anvil and spindle are in contact. This error can be positive (zero marking on the thimble below the datum line) or negative (zero marking above), and it must be accounted for by adding or subtracting it from the measured value to obtain the actual measurement.
- The lock nut, or lock-ring, is a knurled part on the micrometer that can be tightened to hold the spindle in a fixed position. This is useful for temporarily securing a measurement before reading it, preventing accidental changes.
- The simulation model provides an interactive way to learn about the parts and operation of a micrometer without needing a physical instrument. It allows users to manipulate virtual components, practice taking readings, and explore concepts like zero error in a controlled environment with immediate feedback.
Essay Format Questions
- Discuss the importance of accuracy and precision in measurement, and explain how the design and operation of a micrometer screw gauge contribute to achieving these qualities compared to other measuring instruments like a standard ruler.
- Explain the relationship between the screw's lead and the resolution of a micrometer. How does the amplification of small distances through the screw mechanism enhance the precision of length measurements?
- Describe the potential sources of error in using a micrometer, including systematic and random errors. Discuss how features like the ratchet and the understanding of zero error help to minimize these uncertainties in practical measurements.
- Analyze the pedagogical benefits of using a virtual simulation, like the one described, for learning about the principles and practical application of a micrometer. How does interactive engagement compare to traditional methods of instruction in developing a student's understanding of measurement tools?
- Compare and contrast the uses of a micrometer with another precision measuring instrument, such as a vernier caliper. Discuss the specific situations where one instrument might be preferred over the other, considering factors like range, resolution, and ease of use.
Glossary of Key Terms
- Accuracy: The degree to which a measured value conforms to the true or accepted value of a quantity.
- Anvil: The fixed, shiny surface against which the spindle moves and the object to be measured is placed.
- Barrel (Sleeve/Stock): The stationary cylindrical part of the micrometer with a linear scale engraved on it.
- Datum Line: The reference line on the sleeve (barrel) that is used in conjunction with the thimble scale to take precise readings.
- Frame: The C-shaped body of the micrometer that holds the anvil and barrel in a constant relationship.
- Lead (Screw's Lead): The axial distance a screw moves forward or backward with one complete rotation (360°). In single-start threads, it is essentially the same as the pitch.
- Lock Nut (Lock-Ring/Thimble Lock): A component that can be tightened to hold the spindle in a fixed position, preserving a measurement.
- Micrometer: A precision measuring instrument used to measure small distances with high accuracy, based on the principle of a calibrated screw.
- Pitch: The distance between adjacent threads on a screw. In single-start threads, the pitch is equal to the lead.
- Precision: The degree to which repeated measurements of the same quantity agree with each other. It reflects the reproducibility of a measurement.
- Ratchet: A mechanism on the thimble that limits the applied pressure on the object being measured by slipping at a calibrated torque, ensuring consistent readings.
- Resolution: The smallest change in the measured quantity that can be detected by the instrument. For a micrometer, it is typically 0.01 mm or even finer with a vernier scale.
- Screw: The internal threaded component within the barrel that is rotated by the thimble, causing the spindle to move linearly.
- Spindle: The shiny, cylindrical part that moves towards the anvil as the thimble is rotated.
- Thimble: The rotating part of the micrometer that the user turns. It has a graduated circular scale that is used to read fractions of the smallest division on the sleeve.
- Vernier Scale: An auxiliary scale used to obtain more precise measurements than can be read directly from the main scale. Some micrometers may incorporate a vernier scale on the sleeve or thimble.
- Zero Error: The reading obtained from a measuring instrument when the measured quantity is zero. In a micrometer, this occurs when the anvil and spindle are in contact. It can be positive or negative.
Check out Digital Micrometer 0-25mm Electronic Digital Outside Micrometer 0.001mm High Precision Depth Micrometer Micro Caliper. Get it on Shopee now! https://shope.ee/2L8dZ2WXCY?share_channel_code=1
20231003 Update on WEBEJS: https://macmath.inf.um.es/
- more worksheets:
 Physics_lab_Sharjah_
University_Tahani_Alsarayreh - Worksheet 📖 ejss_model_Micrometer02 Tahani Ibrahim Ragheb AL Sarayreh physics department :Sharjah University : UAE measurment of density.docx 06 June 2020
- Worksheet 📖 ejss_model_Micrometer02 Tahani Ibrahim Ragheb AL Sarayreh physics department :Sharjah University : UAE measurment of density.pdf 06 June 2020
- Worksheet 📖 :ejss_model_Micrometer02_measurments of density 1 Nawal Nayfeh, Physics instructor at university of sharjah, UAE.pdf 25 May 2020
- Worksheet 📖 :ejss_model_Micrometer02_measurments of density 1 Nawal Nayfeh, Physics instructor at university of sharjah, UAE.docx 20 May 2020
Learnng Objectives https://sites.google.com/moe.edu.sg/a-level-physics-tlg/foundations-of-physics
Errors, uncertainties, precision and accuracy through practical work
Learning Outcomes:
-
H2: 1(f), 1(g)
Curriculum Emphasis:
-
Ways of Thinking and Doing
Can uncertainty be reduced or even eliminated? How do measurement uncertainties propagate to derived quantities?
Identify and discuss how errors and uncertainties arise in specific measurements and experiments that students carry out, and discuss ways to reduce the errors and uncertainties. It is also possible to discuss the concepts of precision and accuracy using the data collected.
This is a way of building on existing practical work throughout the year to reinforce students' understanding of error and uncertainty through experiential learning.
Resources:
Apps
![]()

https://itunes.apple.com/us/app/micrometer-simulator/id1164367611?mt=8
Topics
Measurement of length and time
Description
Play with the Micrometer Model. Test what you've learned by trying the input field.
Micrometers use the principle of a screw to amplify small distances that are too small to measure directly into large rotations of the screw that are big enough to read from a scale. The accuracy of a micrometer derives from the accuracy of the thread form that is at its heart. The basic operating principles of a micrometer are as follows:
The amount of rotation of an accurately made screw can be directly and precisely correlated to a certain amount of axial movement (and vice-versa), through the constant known as the screw's lead. A screw's lead is the distance it moves forward axially with one complete turn (360°). (In most threads [that is, in all single-start threads], lead and pitch refer to essentially the same concept.)
With an appropriate lead and major diameter of the screw, a given amount of axial movement will be amplified in the resulting circumferential movement.
The micrometer has most functional physical parts of a real micrometer.
Frame (Orange)
The C-shaped body that holds the anvil and barrel in constant relation to each other. It is thick because it needs to minimize expansion, and contraction, which would distort the measurement. The frame is heavy and consequently has a high thermal mass, to prevent substantial heating up by the holding hand/fingers. has a text 0.01 mm for smallest division of instrument has a text 2 rounds = 100 = 1.00 mm to allow association to actual micrometer
Anvil (Gray)
The shiny part that the spindle moves toward, and that the sample rests against.
Sleeve / barrel / stock (Yellow)
The stationary round part with the linear scale on it. Sometimes vernier markings.
Lock nut / lock-ring / thimble lock (Blue)
The knurled part (or lever) that one can tighten to hold the spindle stationary, such as when momentarily holding a measurement.
Screw
(not seen) The heart of the micrometer It is inside the barrel.
Spindle (Dark Green)
The shiny cylindrical part that the thimble causes to move toward the anvil.
Thimble (Green)
The part that one's thumb turns. Graduated markings.
Ratchet (Teal)
(not shown ) Device on end of handle that limits applied pressure by slipping at a calibrated torque.
This applet has an object (Black)
with slider on left top to control the y-motion of the object into the anvil and spindle (jaws), the graphics also allows drag action.
with slider on left bottom to control the x-size of the object into the anvil and spindle (jaws).
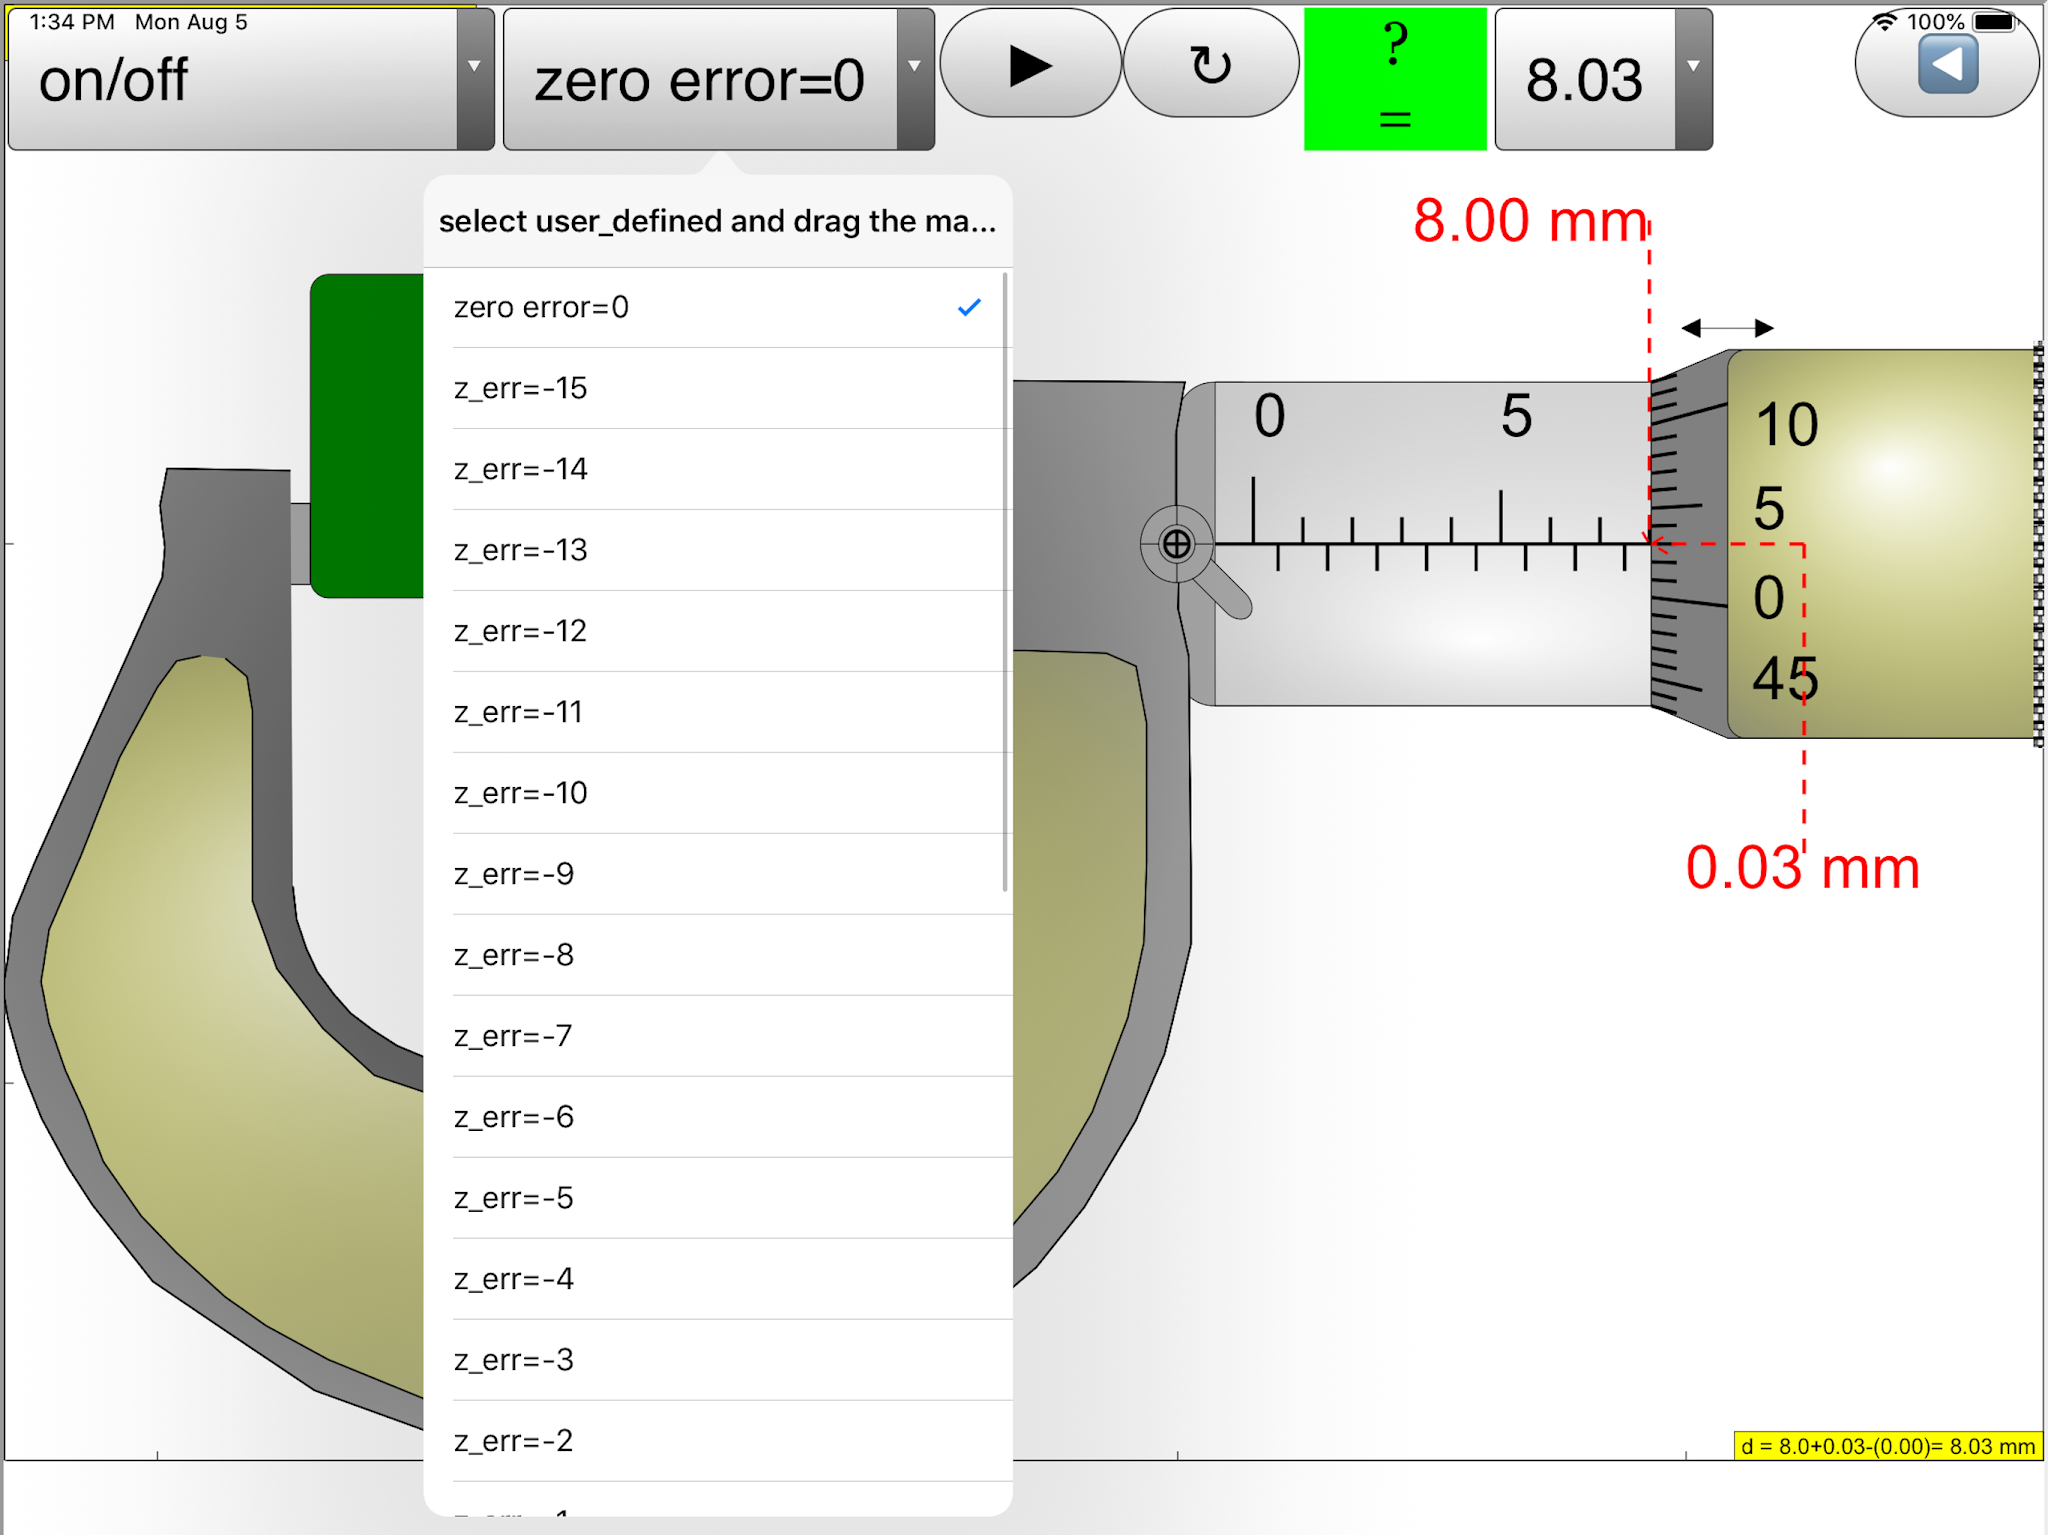
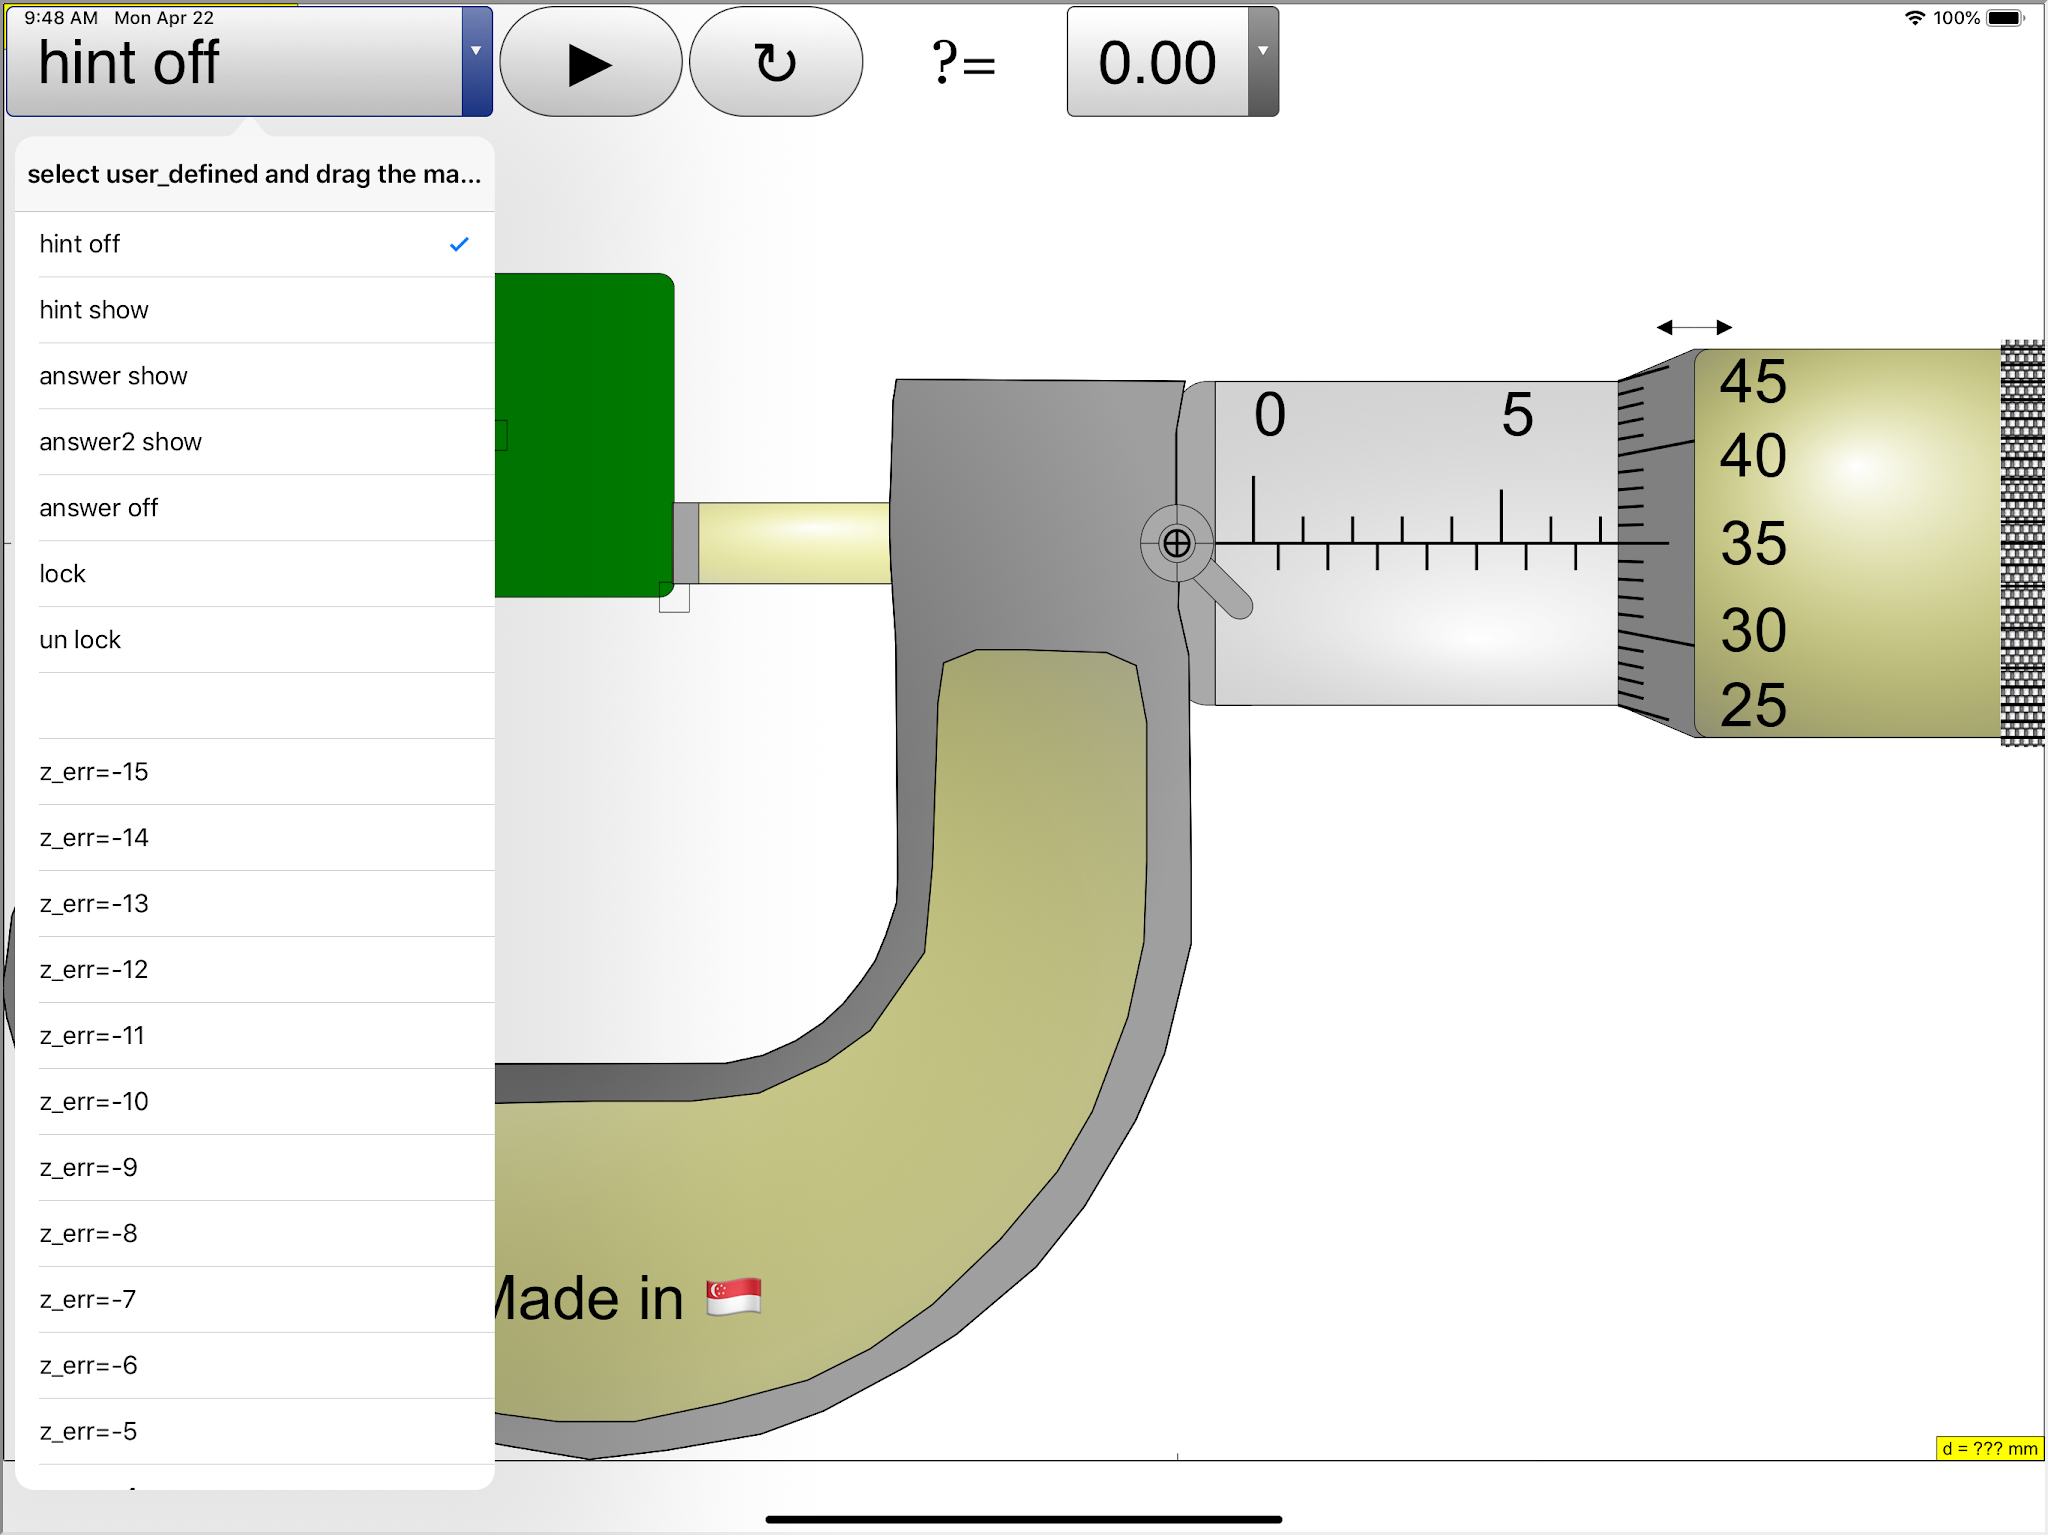
On the left bottom slider is the zero error control to allow of exploring with if the micrometer has either +0.15 mm (max) or -0.15mm (min) zero error. The are check boxes:
hint: guide lines and arrows to indicate the region of interest plus the accompanying rationale for the answer.
answer: shows the measurement d = ??? mm
lock: allows simulating of the lock function in real micrometer which disable changes to the position of the spindle then by the measurement is unchangeable.
On the bottom there is a green slider to control the position of the spindle, drag on any part of the view also drags the spindle.
There is 2 buttons left and right fine control to allow for single incremental change of the measurement, to allow learners to sense the rotation simulation of the spindle with the many lines to simulate the coarse pattern to increase friction between fingers and on the thimble and ratchet.
The reset button restores learning environment to default setting
For Teachers
- http://weelookang.blogspot.sg/2012/01/mirror-here-httpssites.html
- https://sites.google.com/site/lookang/002-micrometer?pli=1
For Students
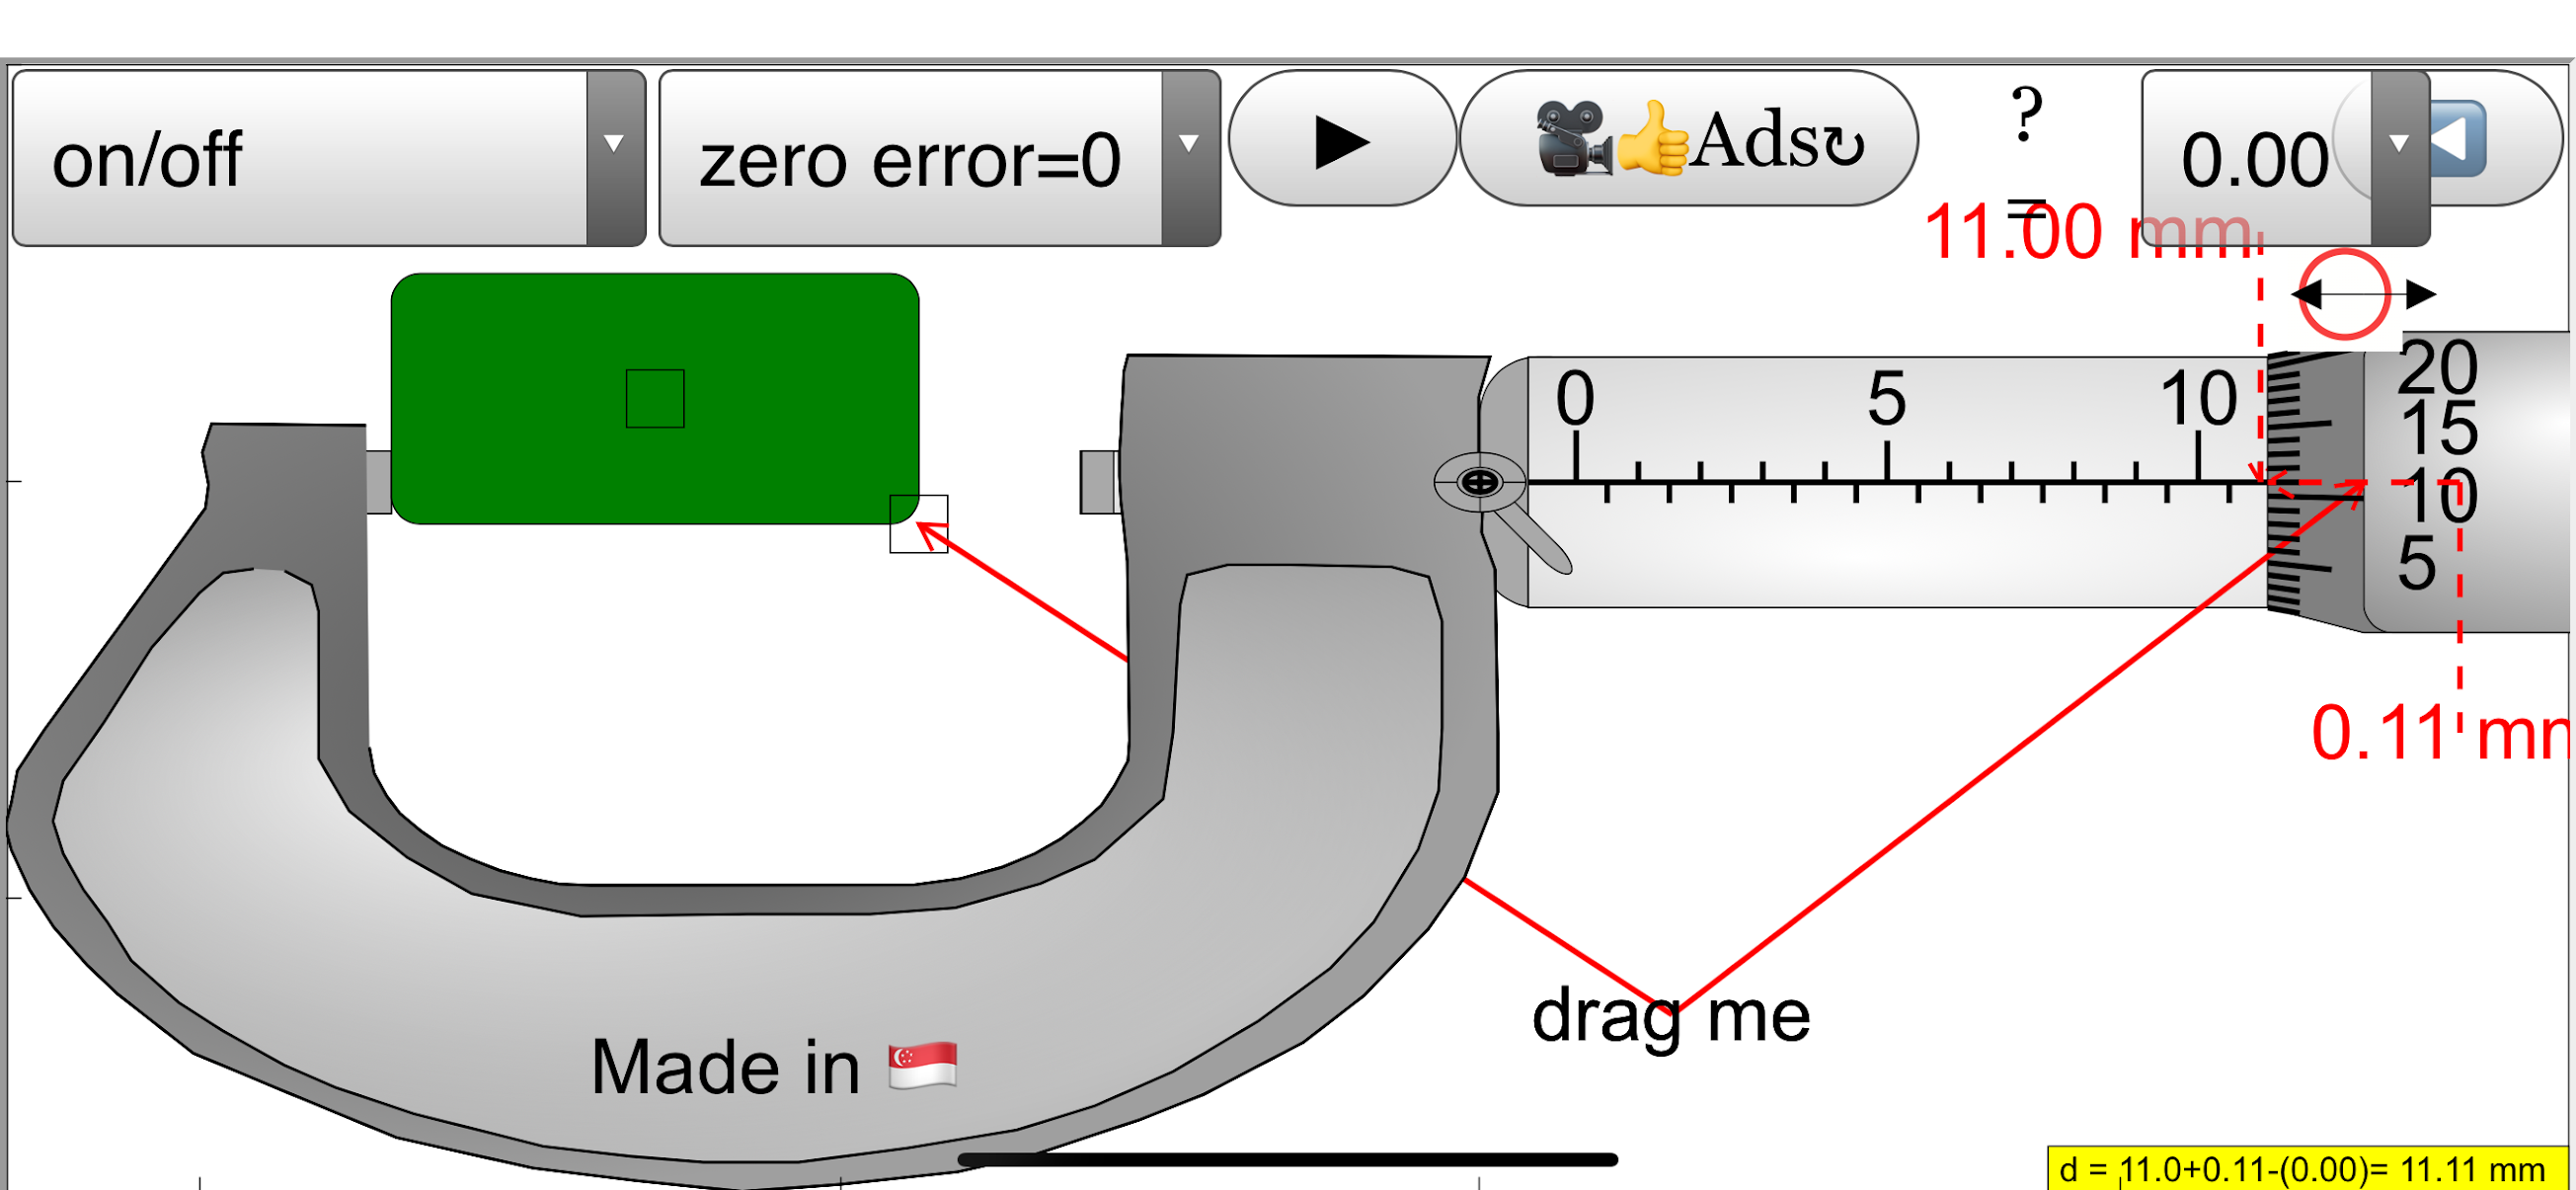
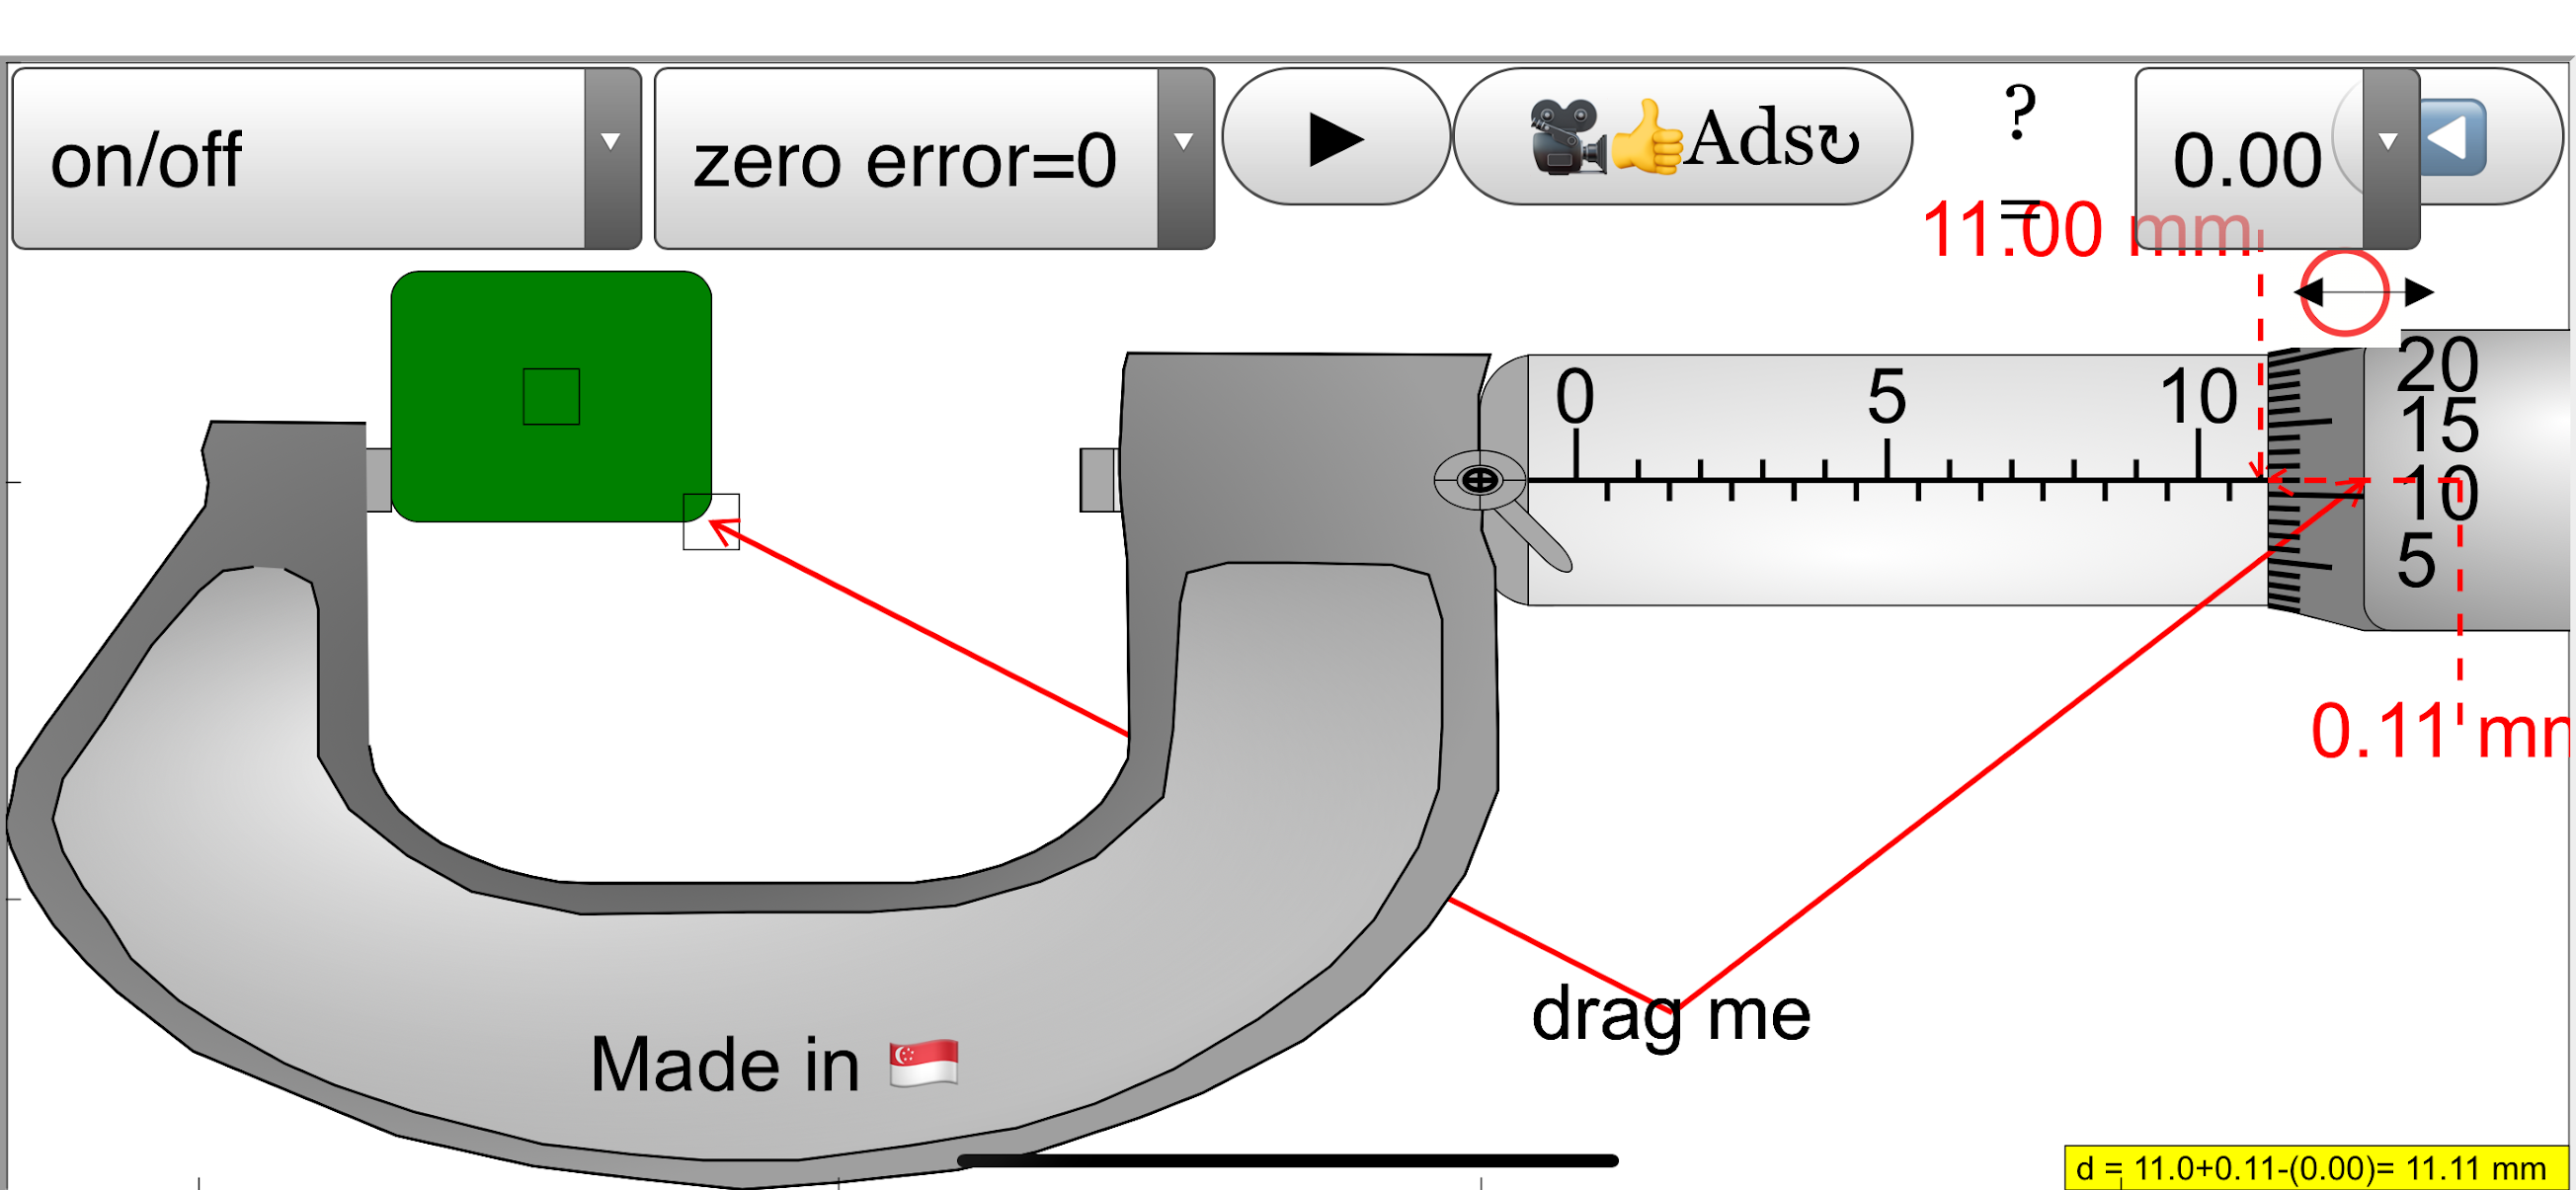
- the first part is contributed by the main scale on the sleeve
- the second part is contributed by the rotating vernier scale on the thimble
The 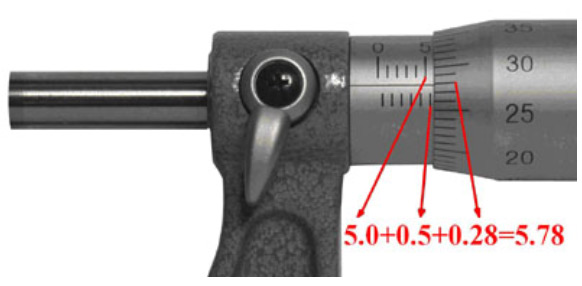
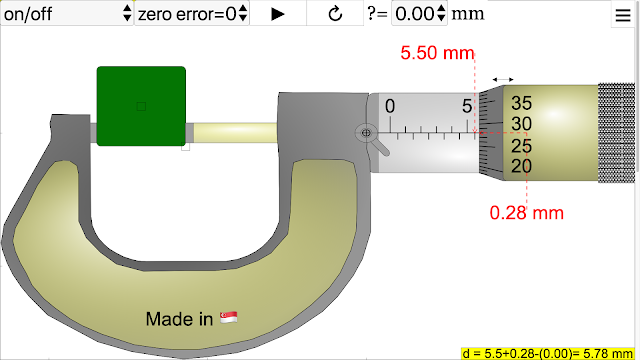 image shows a typical micrometer screw gauge and how to read it. Steps:
- To obtain the first part of the measurement: Look at the image above, you will see a number 5 to the immediate left of the thimble. This means 5.0 mm. Notice that there is an extra line below the datum line, this represents an additional 0.5 mm. So the first part of the measurement is 5.0+0.5=5.5 mm.
- To obtain the second part of the measurement: Look at the image above, the number 28 on the rotating vernier scale coincides with the datum line on the sleeve. Hence, 0.28 mm is the second part of the measurement.
You just have to add the first part and second part of the measurement to obtain the micrometer reading: 5.5+0.28=5.78 mm.
To ensure that you understand the steps above,
here’s one more example: 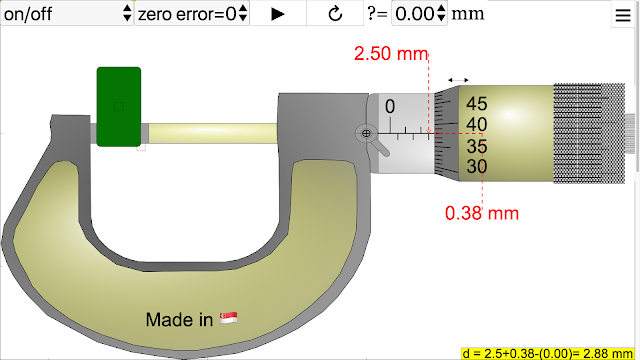
First part of the measurement: 2.5 mm
Second part of the measurement: 0.38 mm
Final measurement: 2.88 mm
Now, we shall try with zero error. 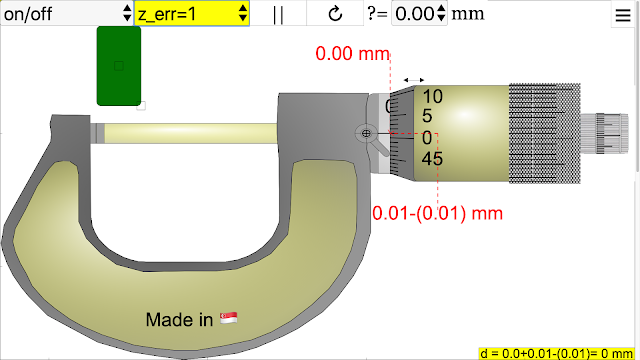
The reading on the bottom is the measurement obtained and the reading at the top is the zero error. Find the actual measurement. (Meaning: get rid of the zero error in the measurement or take into account the zero error)
Measurement with zero error: 1.76 mm 
Zero error: + 0.01 mm (positive because the zero marking on the thimble is below the datum line)
Measurement without zero error: 1.76–(+0.01)=1.75 mm
iCTLT2016 ePosterGuide Example
Video iCTLT2016 Sample of ePoster by lookang lawrence wee
Research
arXiv:1408.3803 [pdf]
Vernier caliper and micrometer computer models using Easy Java Simulation and its pedagogical design feature-ideas to augment learning with real instruments
Loo Kang Wee, Hwee Tiang Ning
Comments: 8 pages, 8 figures, Physics Education journal
Subjects: Physics Education (physics.ed-ph); Instrumentation and Detectors (physics.ins-det)
https://youtu.be/jHoA5M-_1R4
Worksheet
- more worksheets: Physics_lab_Sharjah_
University_Tahani_Alsarayreh - Worksheet 📖 ejss_model_Micrometer02 Tahani Ibrahim Ragheb AL Sarayreh physics department :Sharjah University : UAE measurment of density.docx 06 June 2020
- Worksheet 📖 ejss_model_Micrometer02 Tahani Ibrahim Ragheb AL Sarayreh physics department :Sharjah University : UAE measurment of density.pdf 06 June 2020
- Worksheet 📖 :ejss_model_Micrometer02_measurments of density 1 Nawal Nayfeh, Physics instructor at university of sharjah, UAE.pdf 25 May 2020
- Worksheet 📖 :ejss_model_Micrometer02_measurments of density 1 Nawal Nayfeh, Physics instructor at university of sharjah, UAE.docx 20 May 2020
Screenshots
Micrometer iOS App 6.5 inch, probably the world's best!
 |
| First default screen after clicking the expand menu button https://sg.iwant2study.org/ospsg/index.php/6-micrometer02 Fullscreen App version Direct link https://sg.iwant2study.org/ospsg/index.php/1005-micrometer02manualversion Manual version Direct link |
 |
| default screen after clicking the expand menu button https://sg.iwant2study.org/ospsg/index.php/6-micrometer02 Fullscreen App version Direct link https://sg.iwant2study.org/ospsg/index.php/1005-micrometer02manualversion Manual version Direct link |
 |
| default screen after clicking the expand menu button https://sg.iwant2study.org/ospsg/index.php/6-micrometer02 Fullscreen App version Direct link https://sg.iwant2study.org/ospsg/index.php/1005-micrometer02manualversion Manual version Direct link |
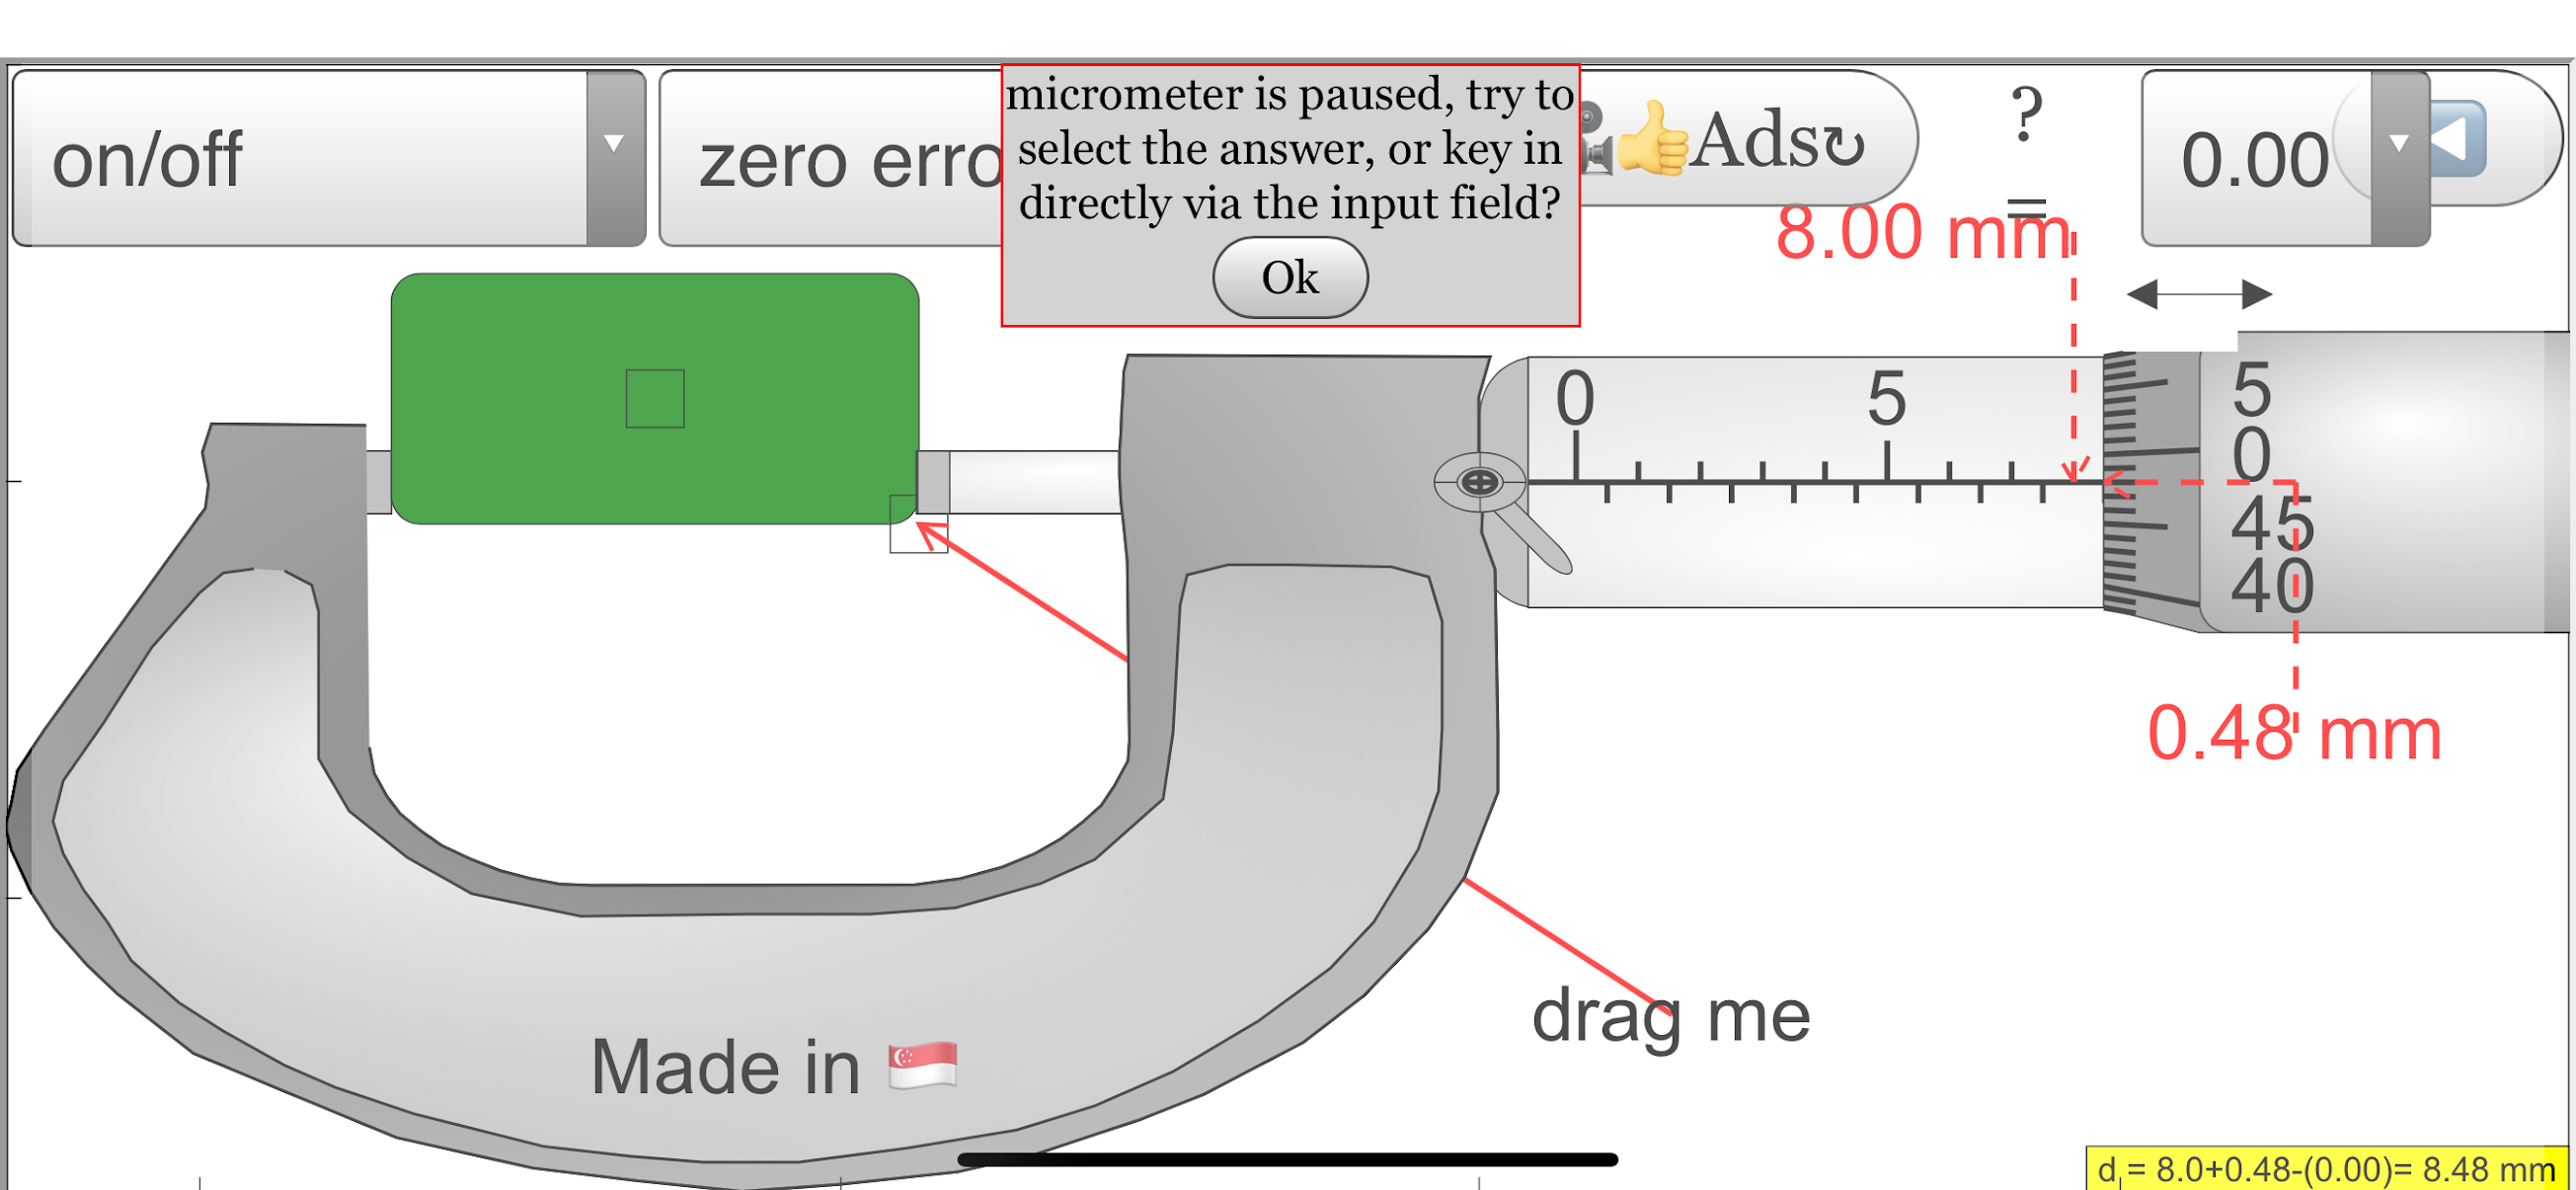 |
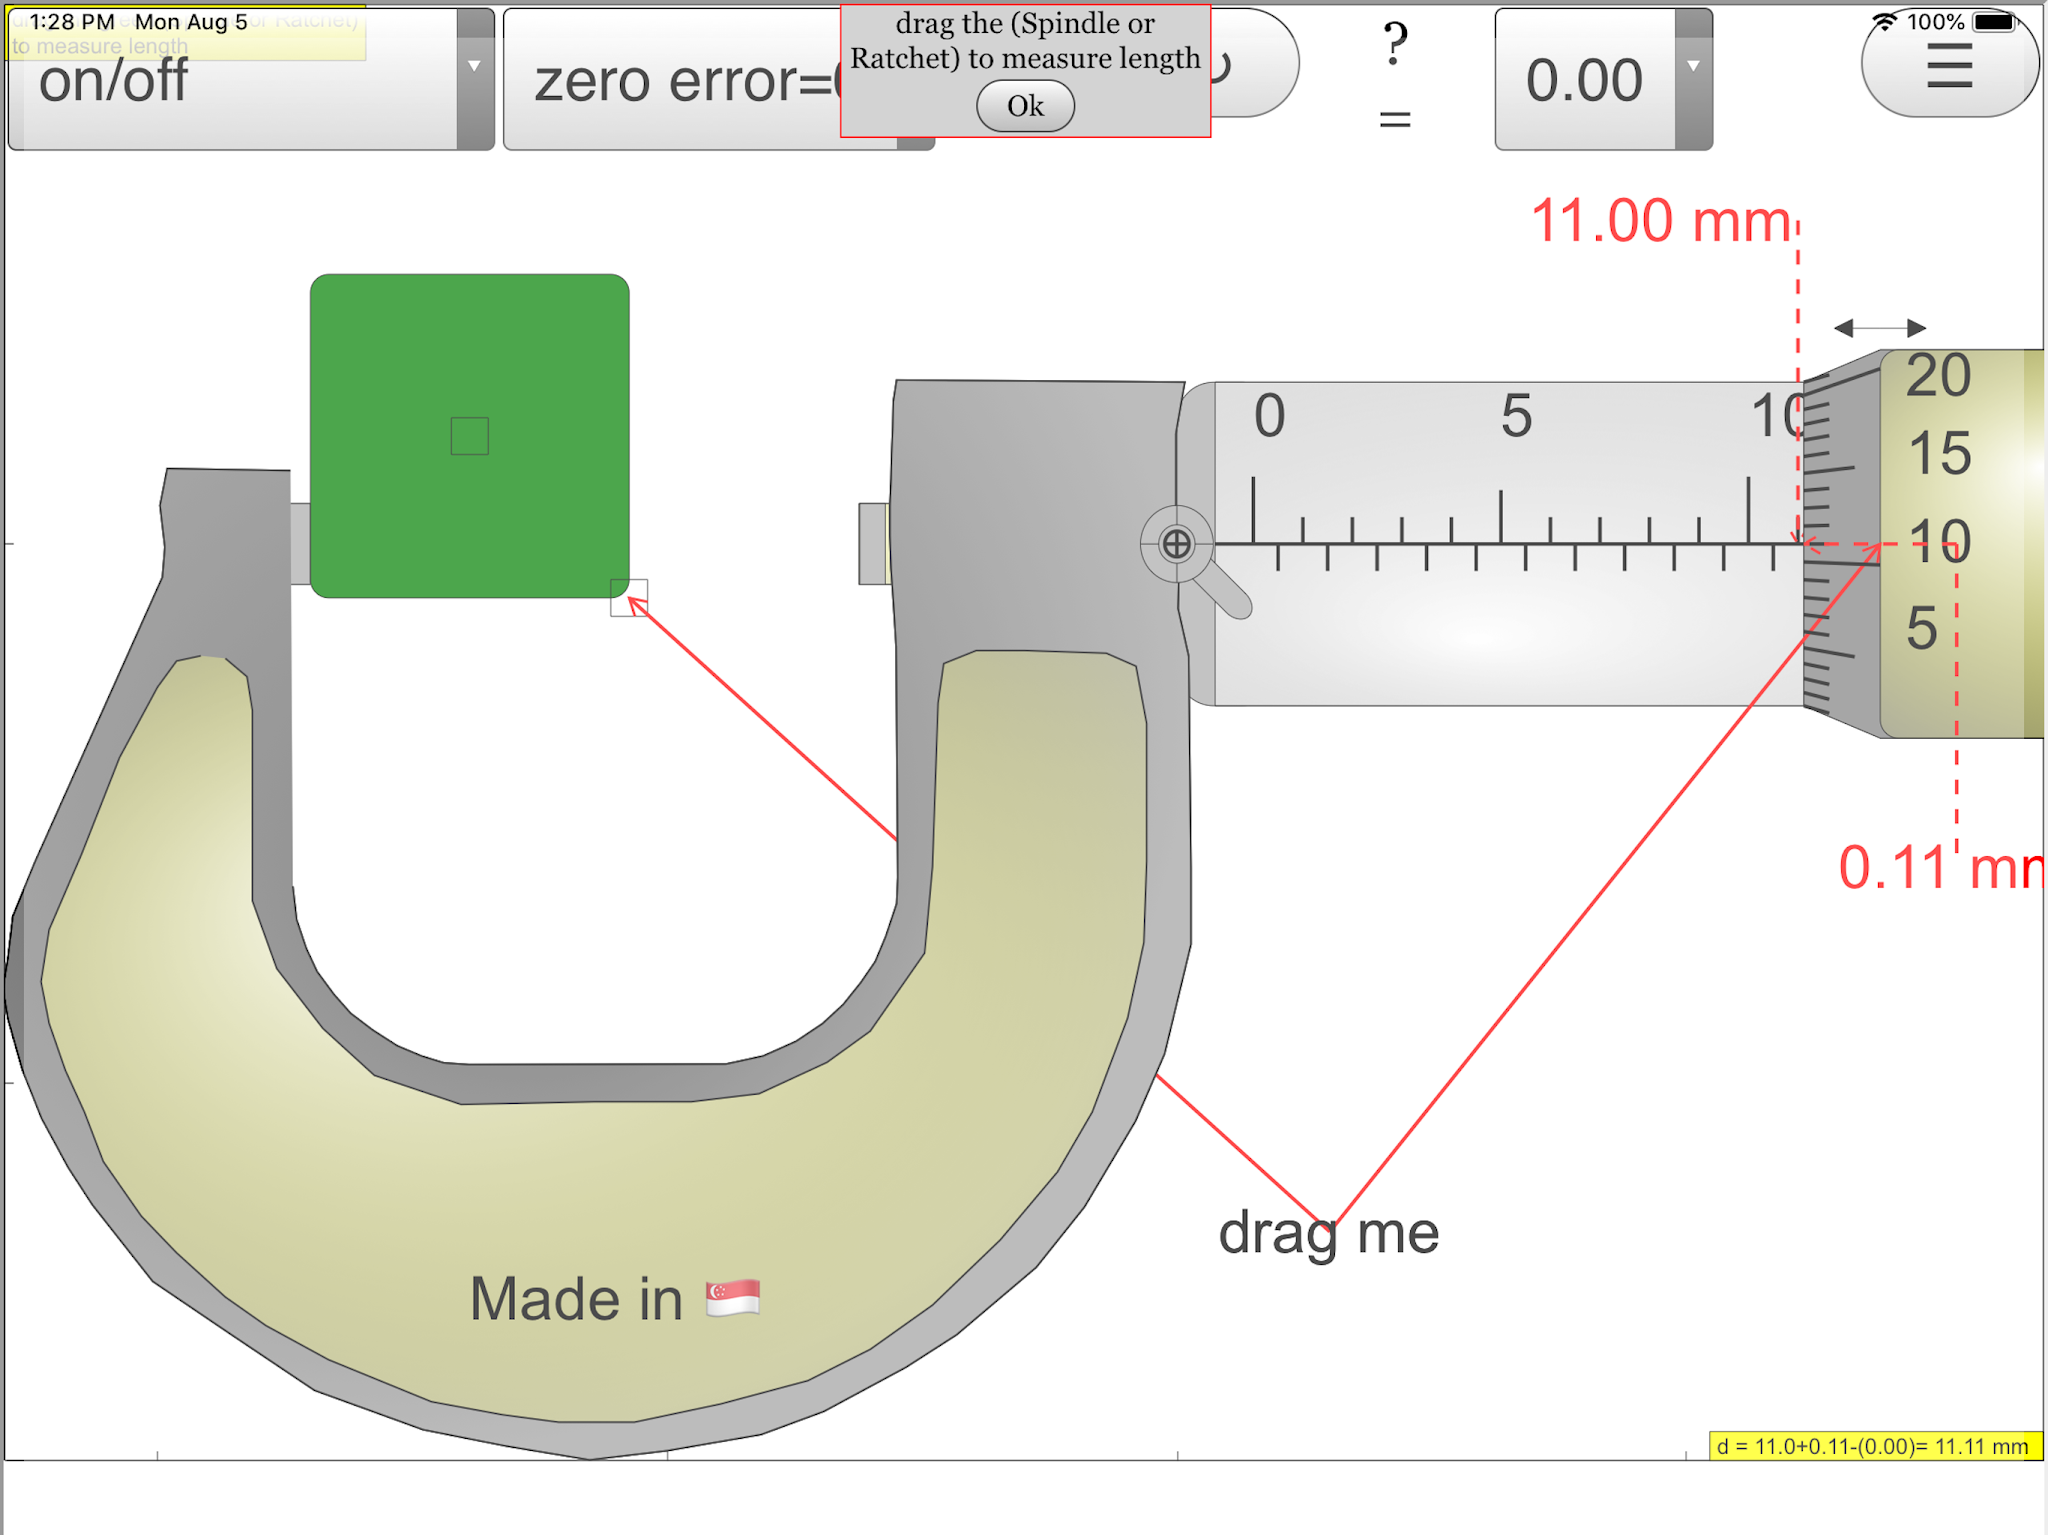
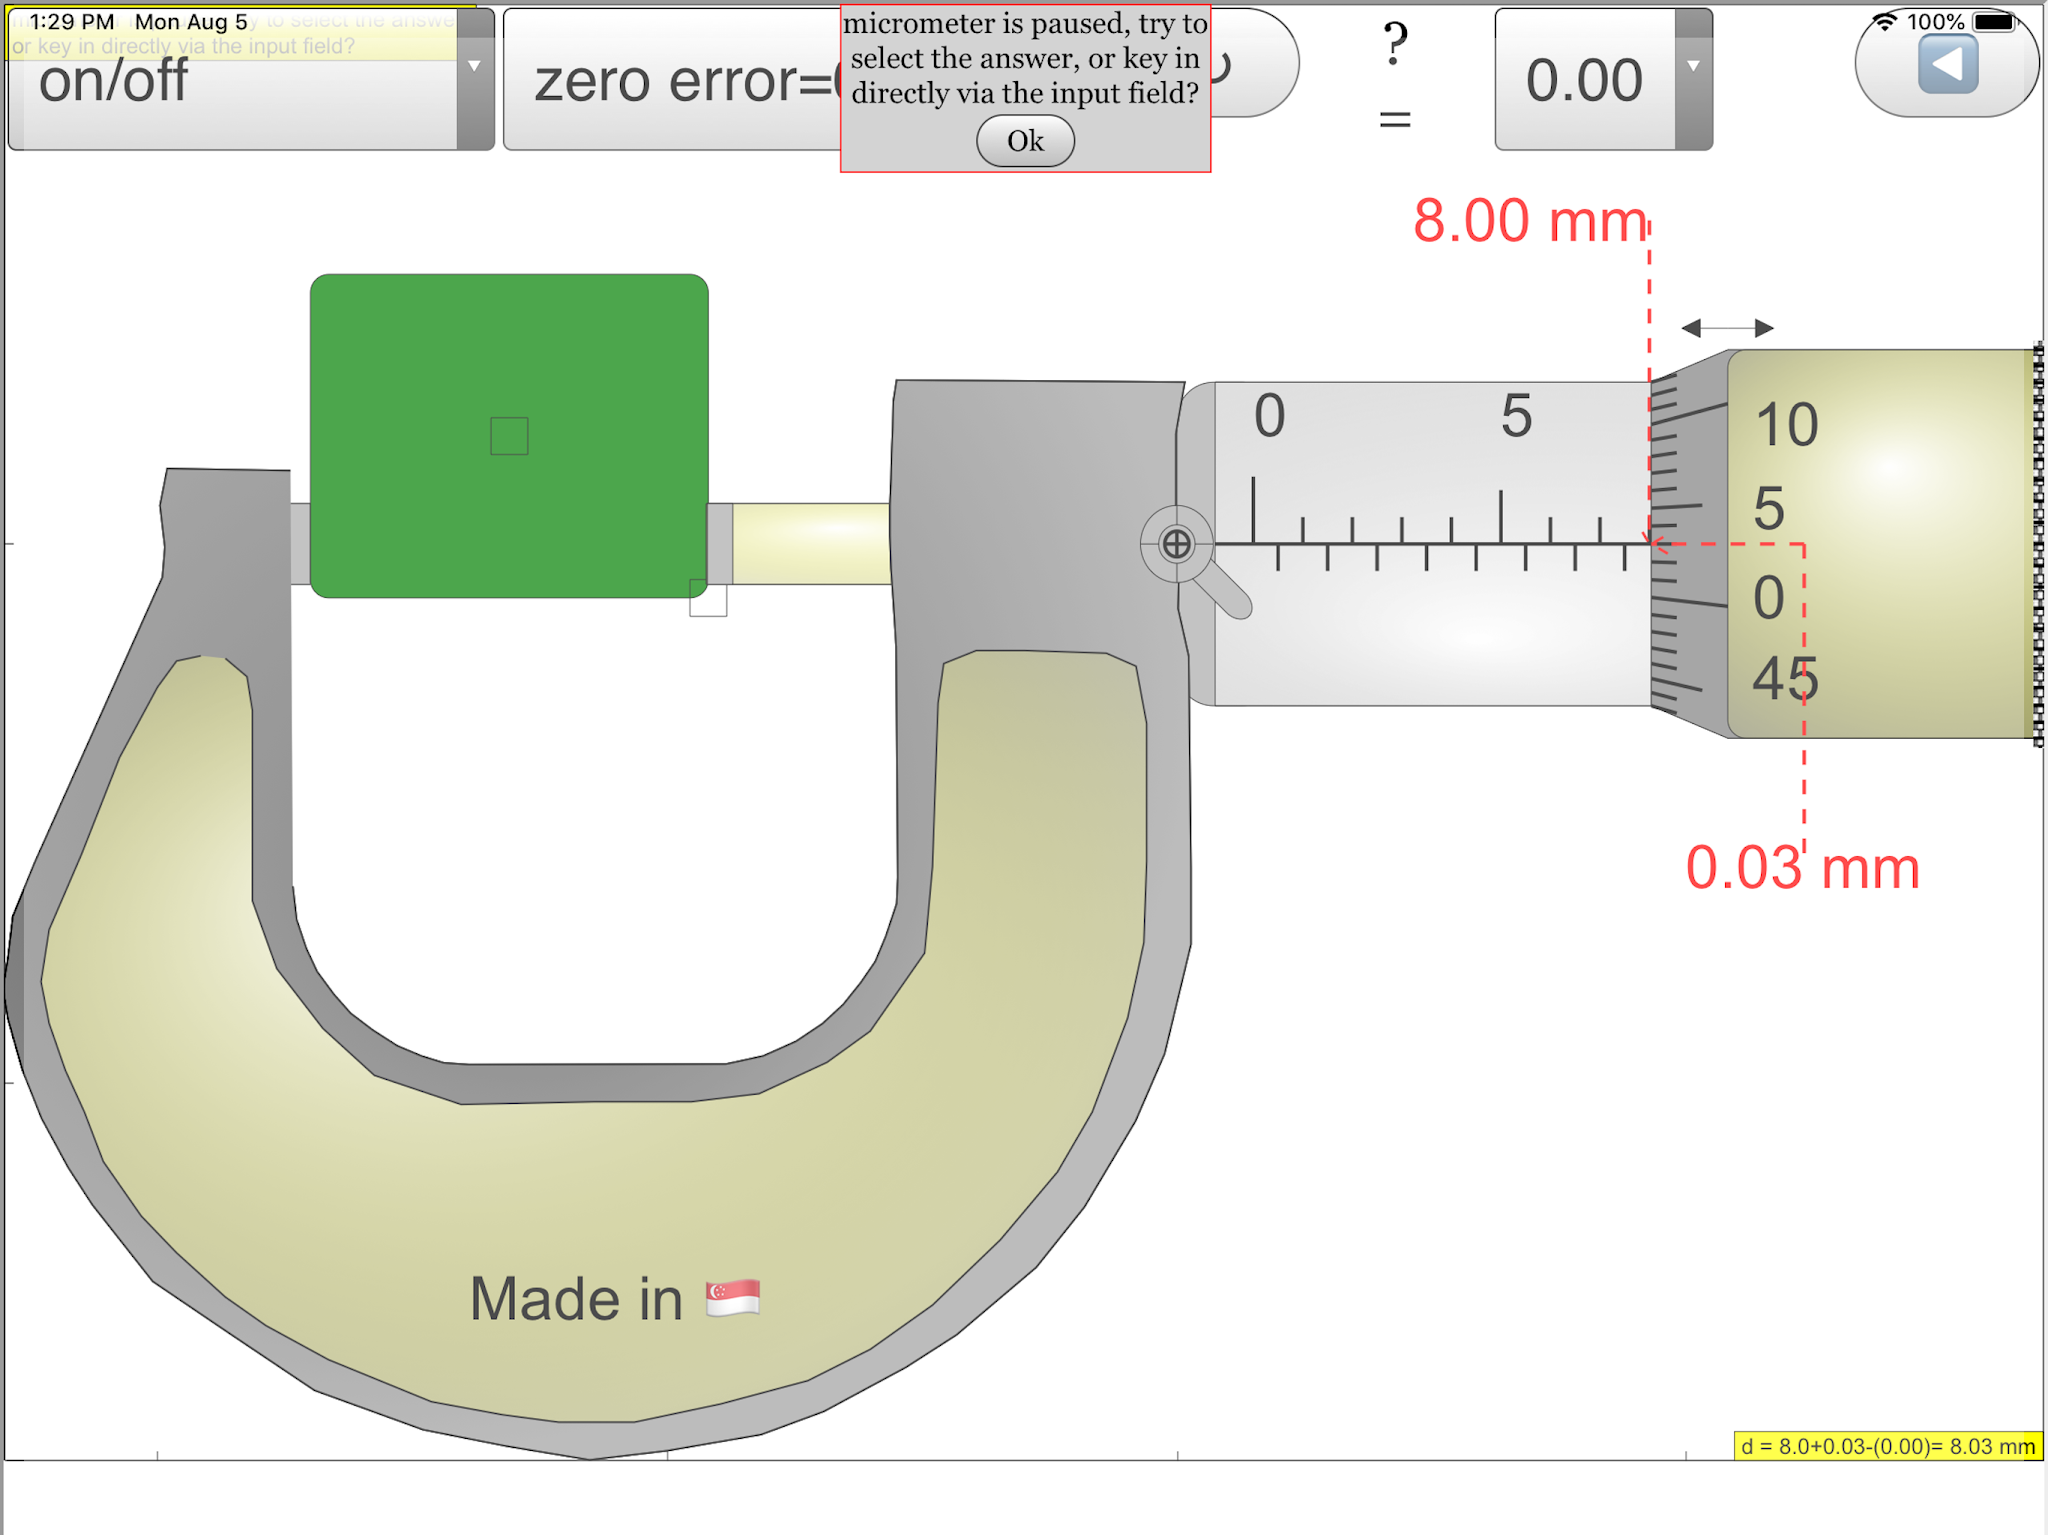
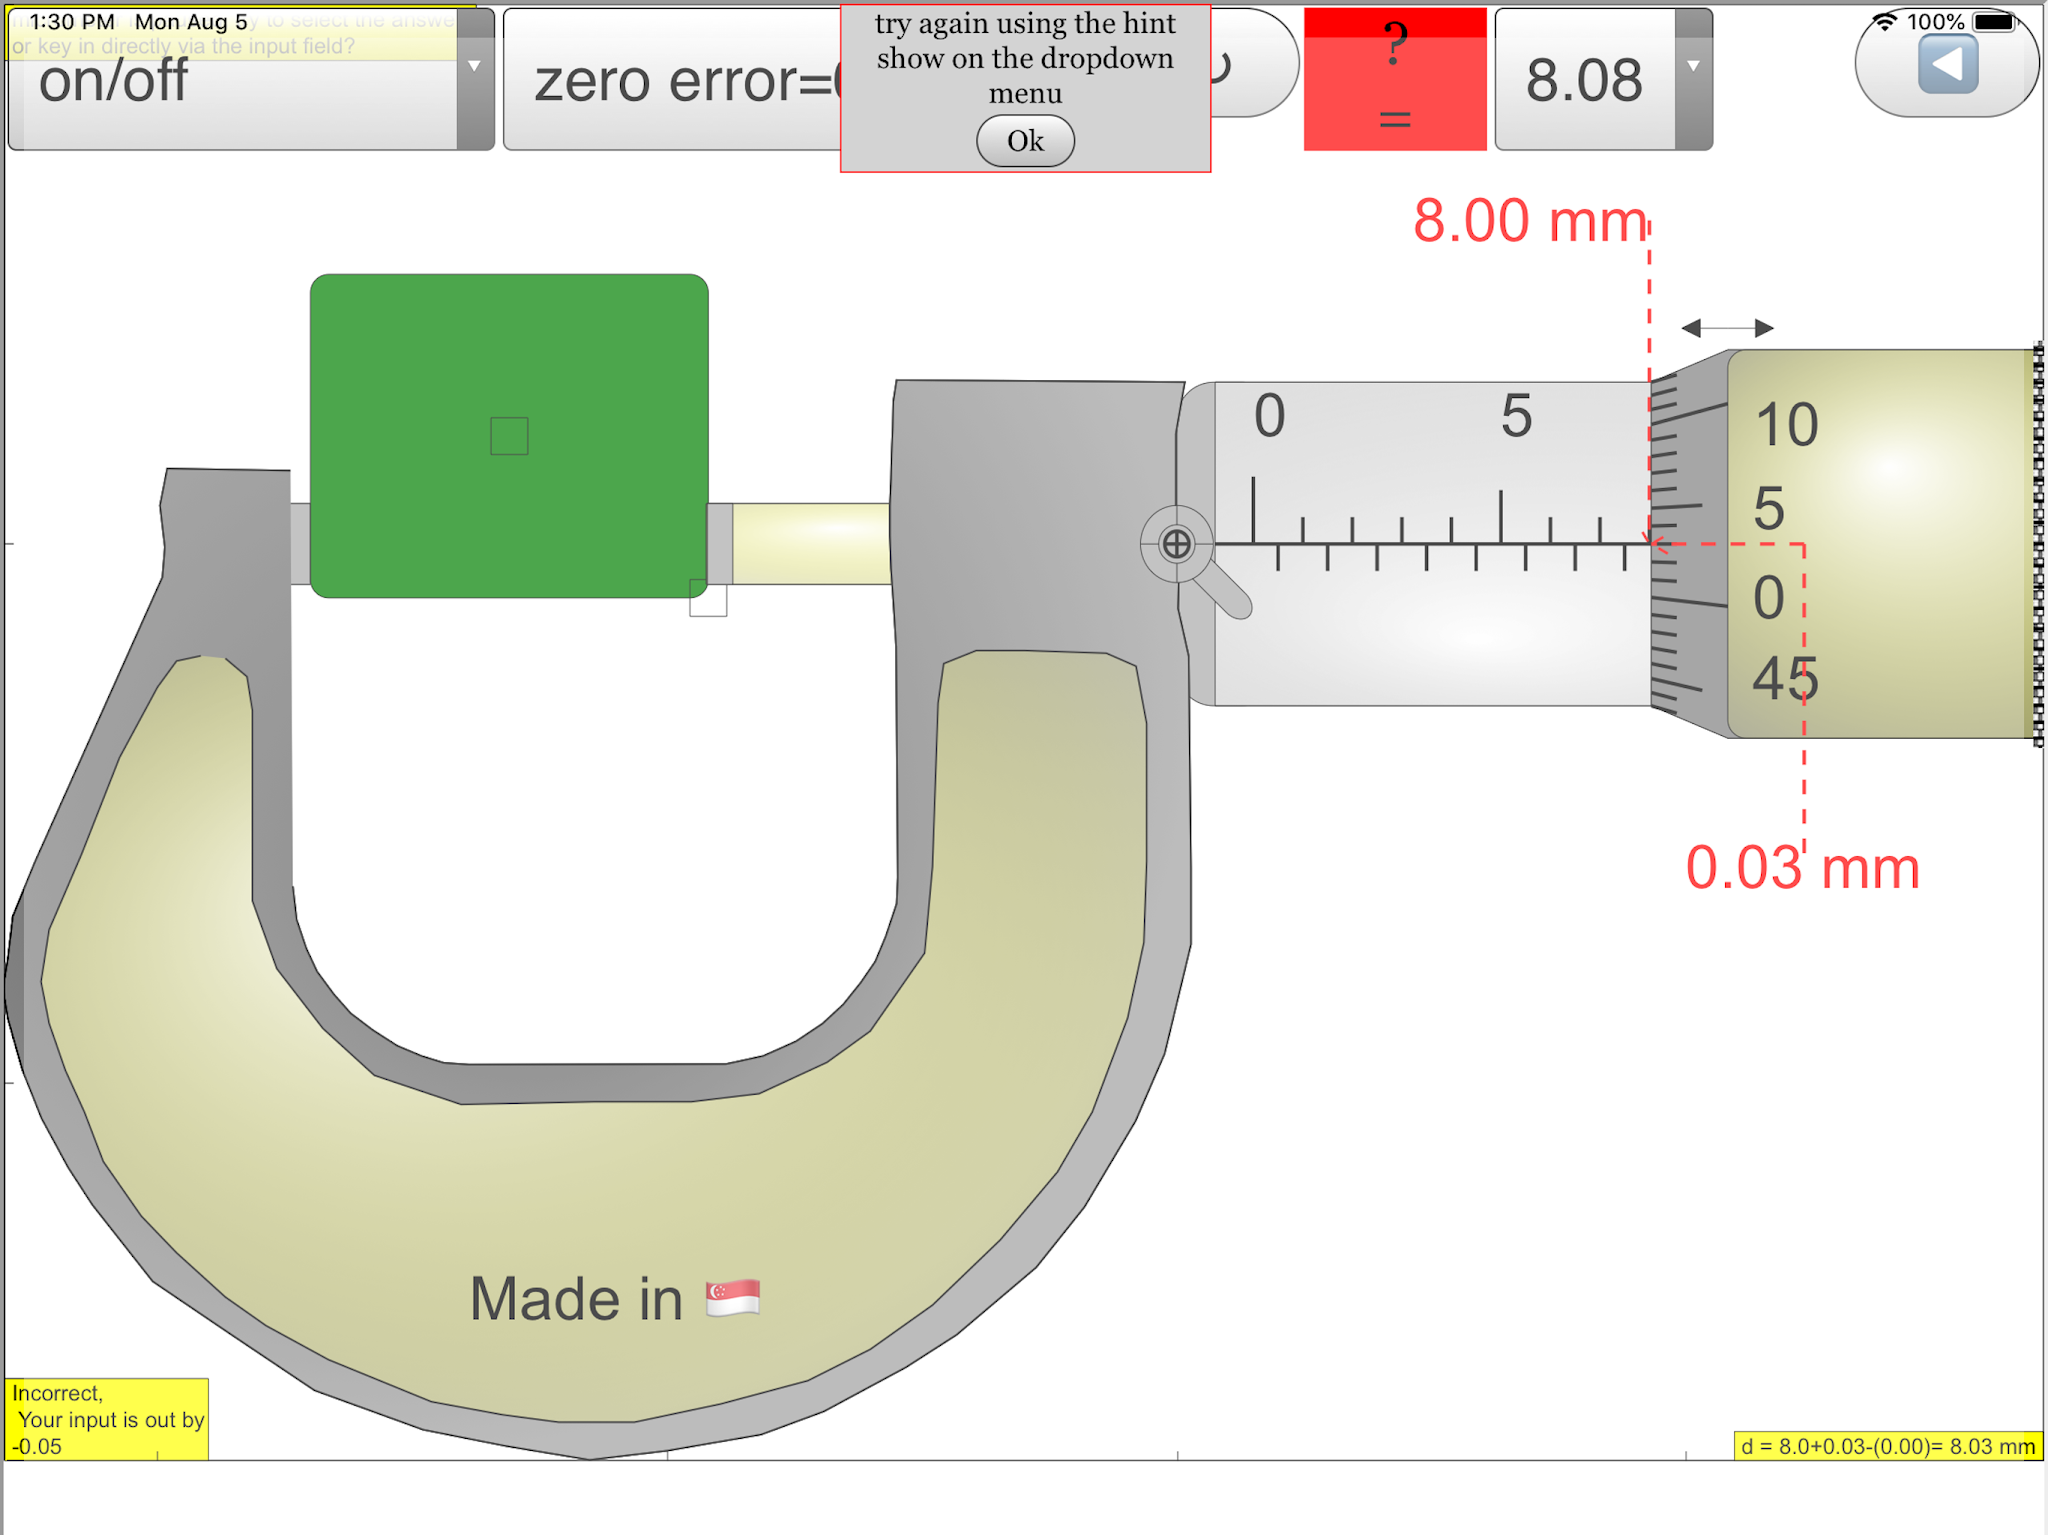
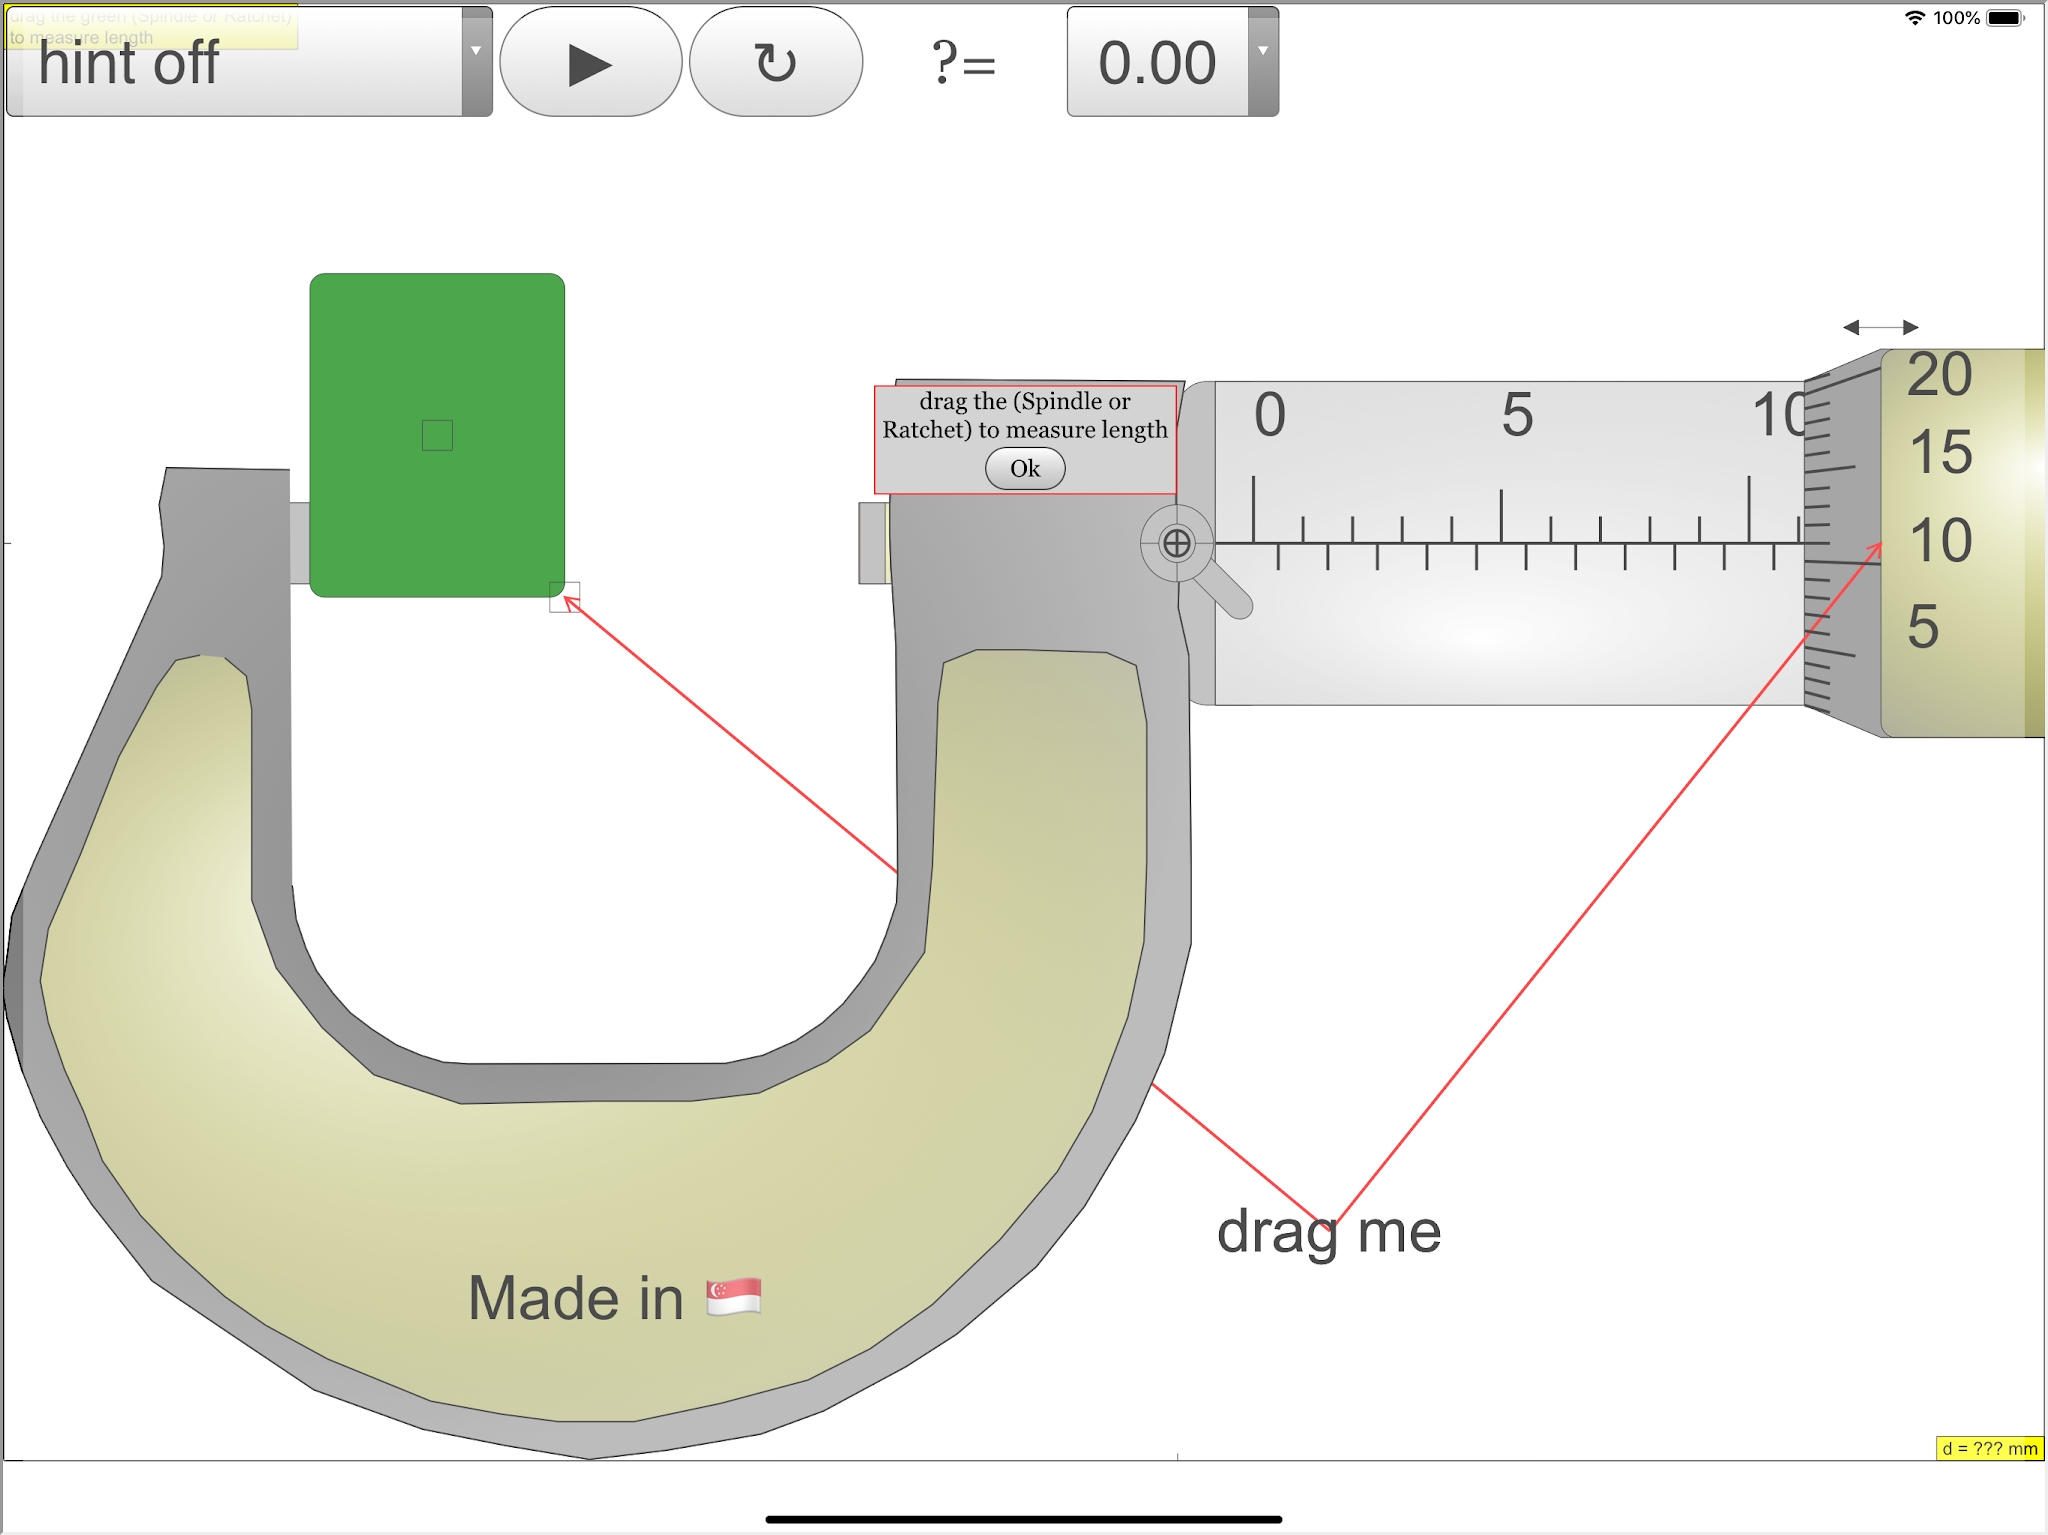
| When ratchet touch object, new pop up message appears to guide next step https://sg.iwant2study.org/ospsg/index.php/6-micrometer02 Fullscreen App version Direct link https://sg.iwant2study.org/ospsg/index.php/1005-micrometer02manualversion Manual version Direct link |
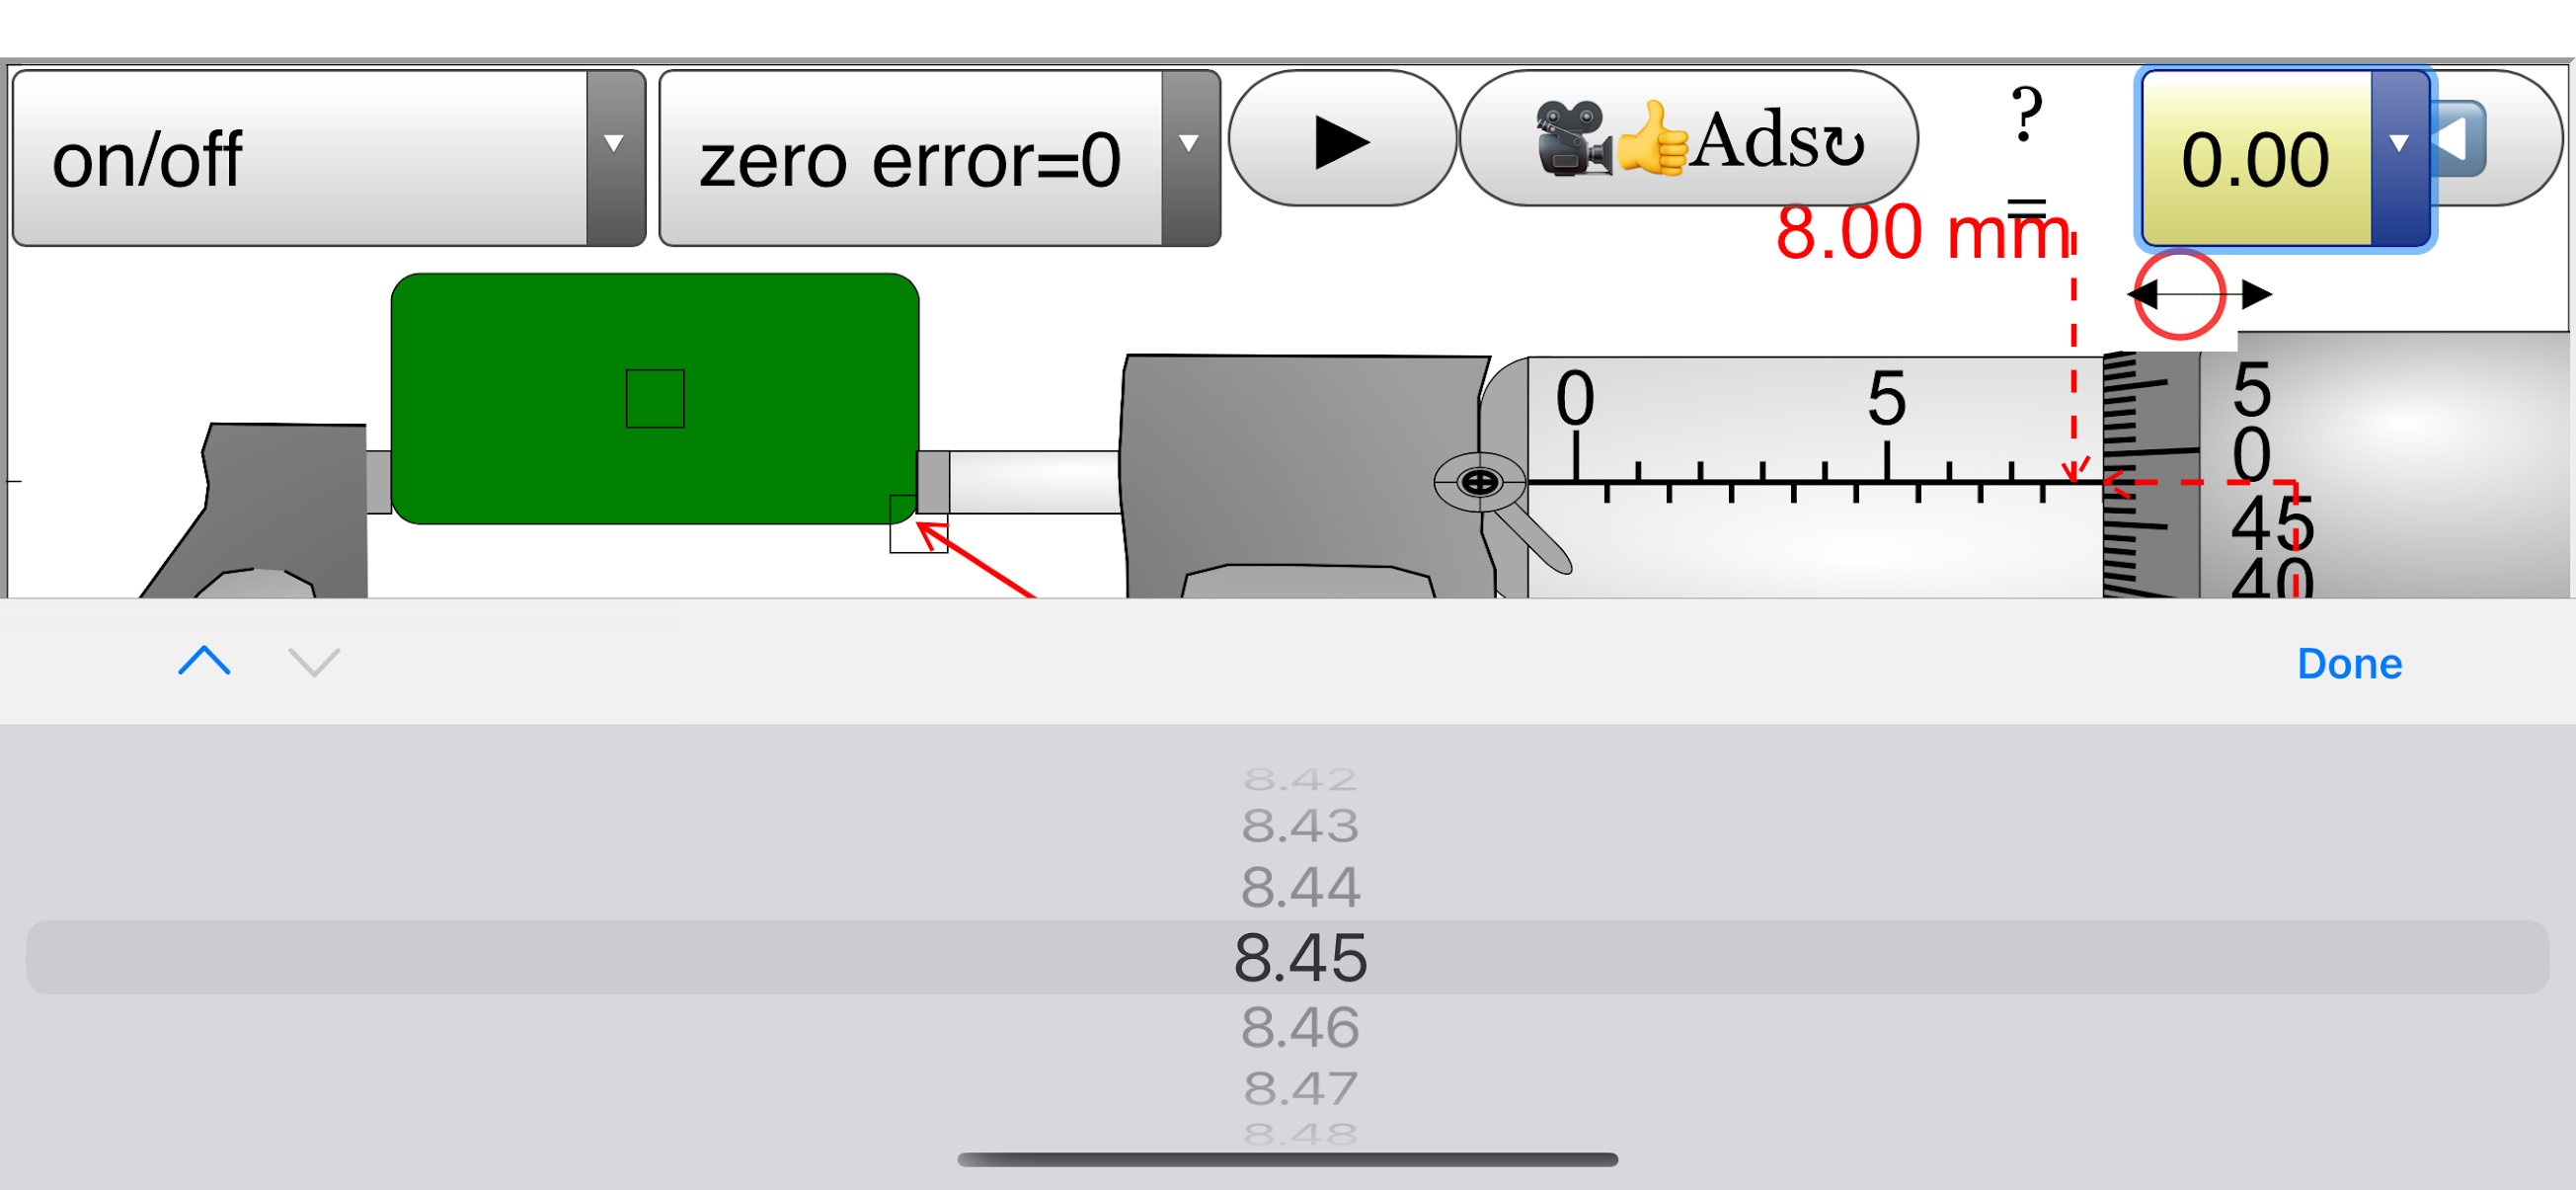 |
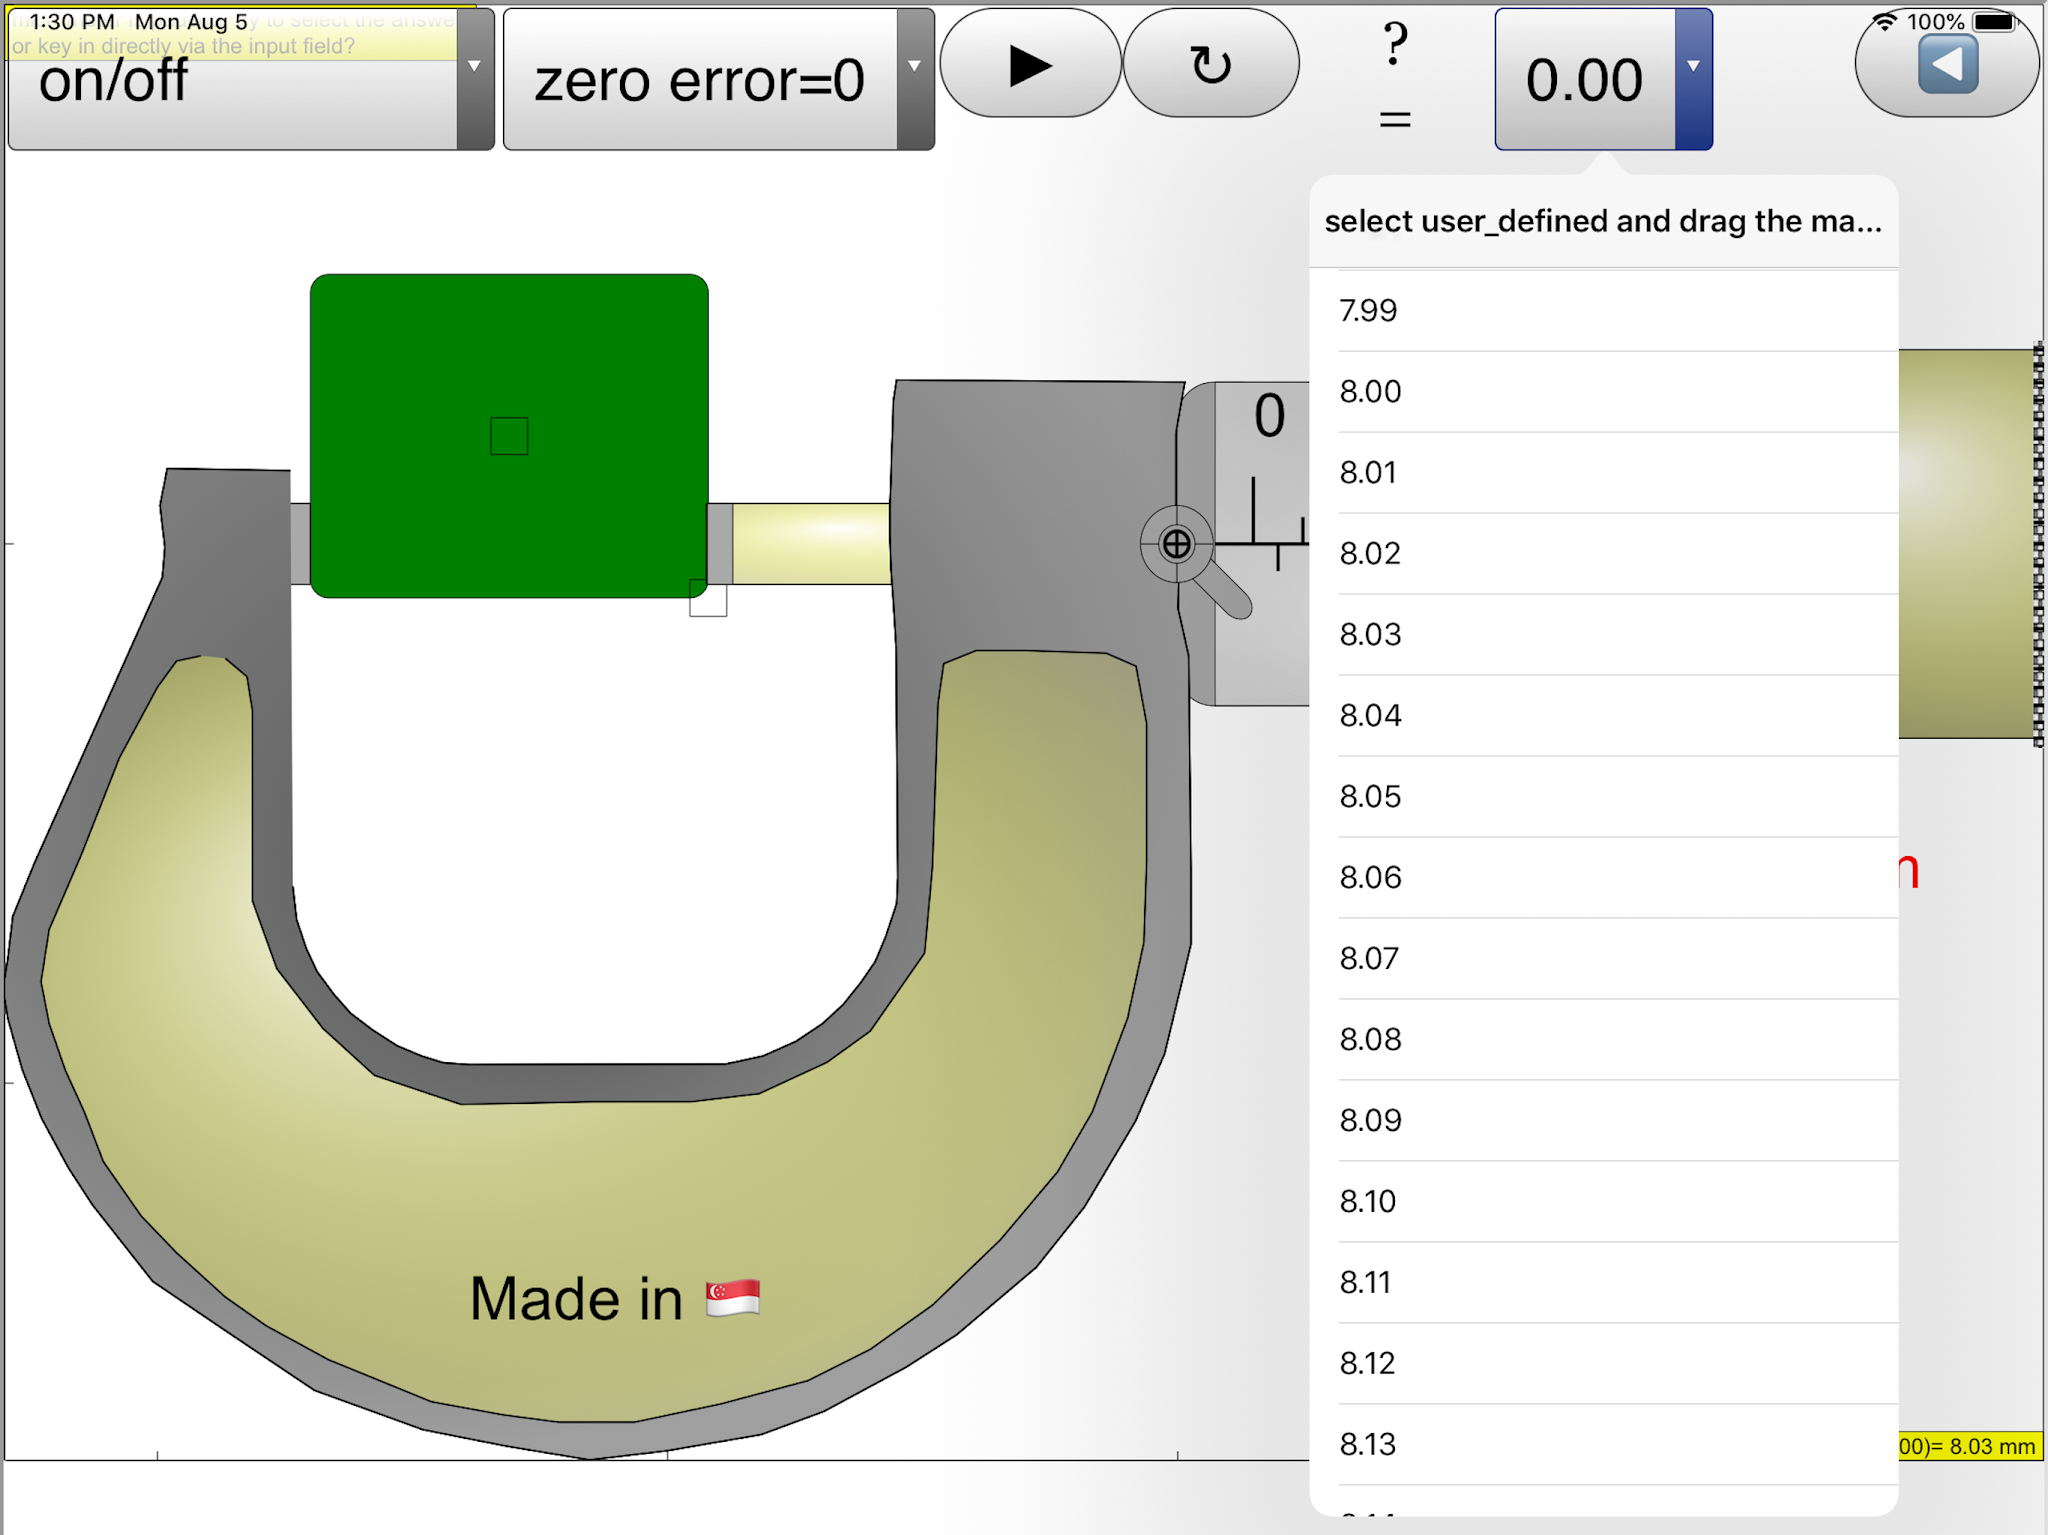
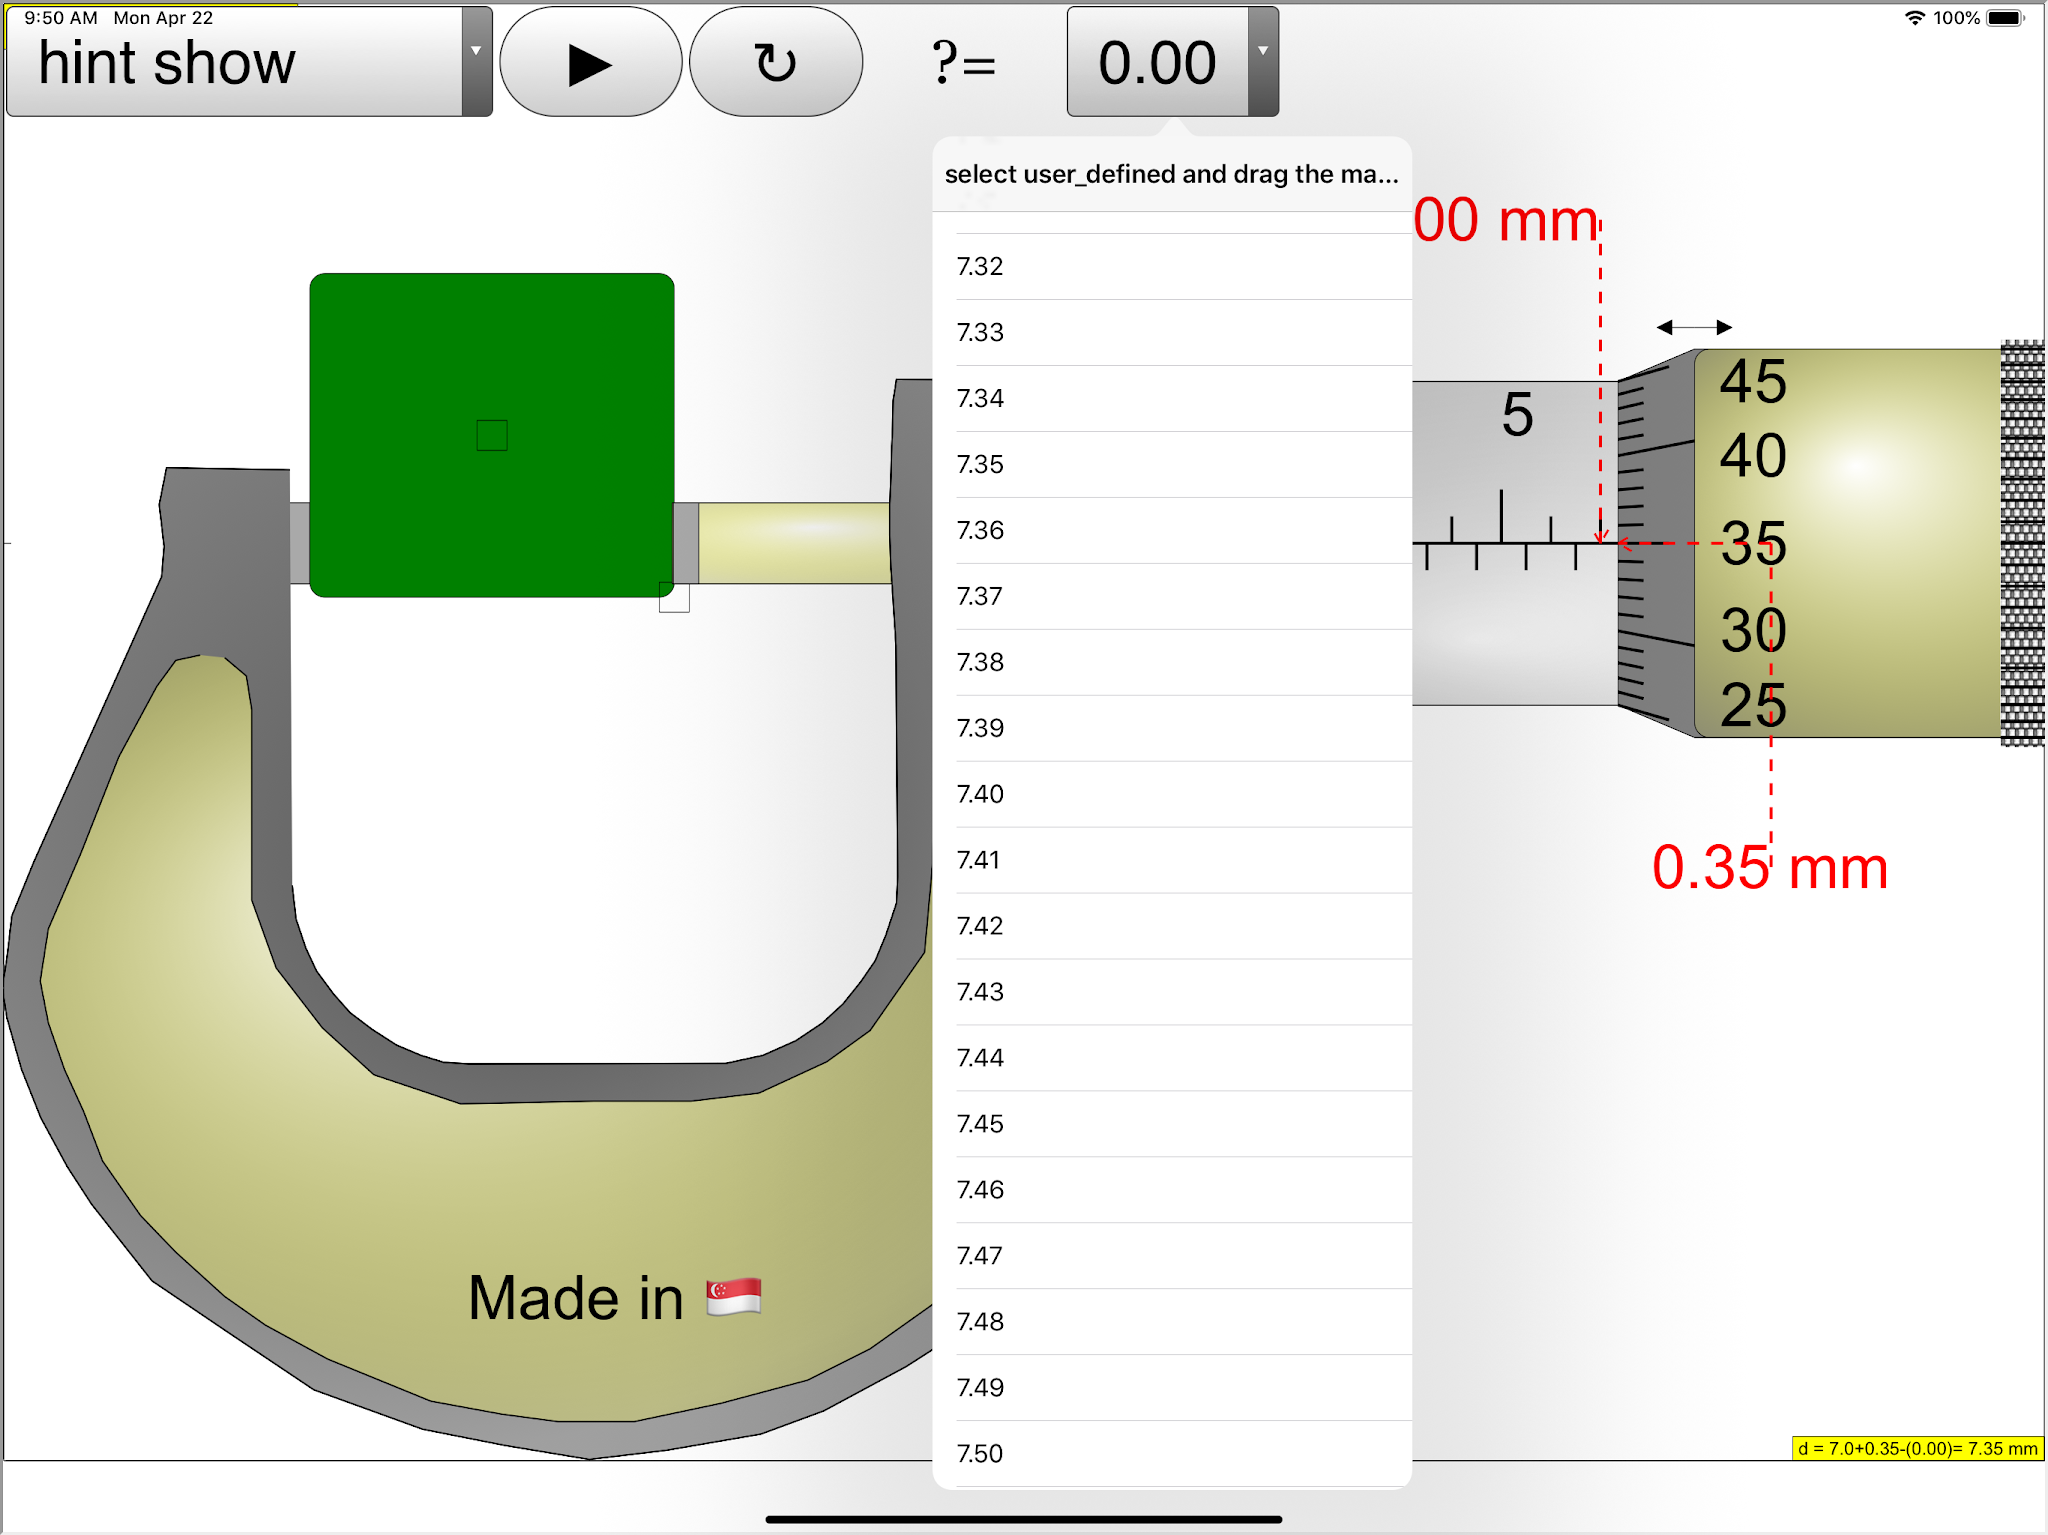
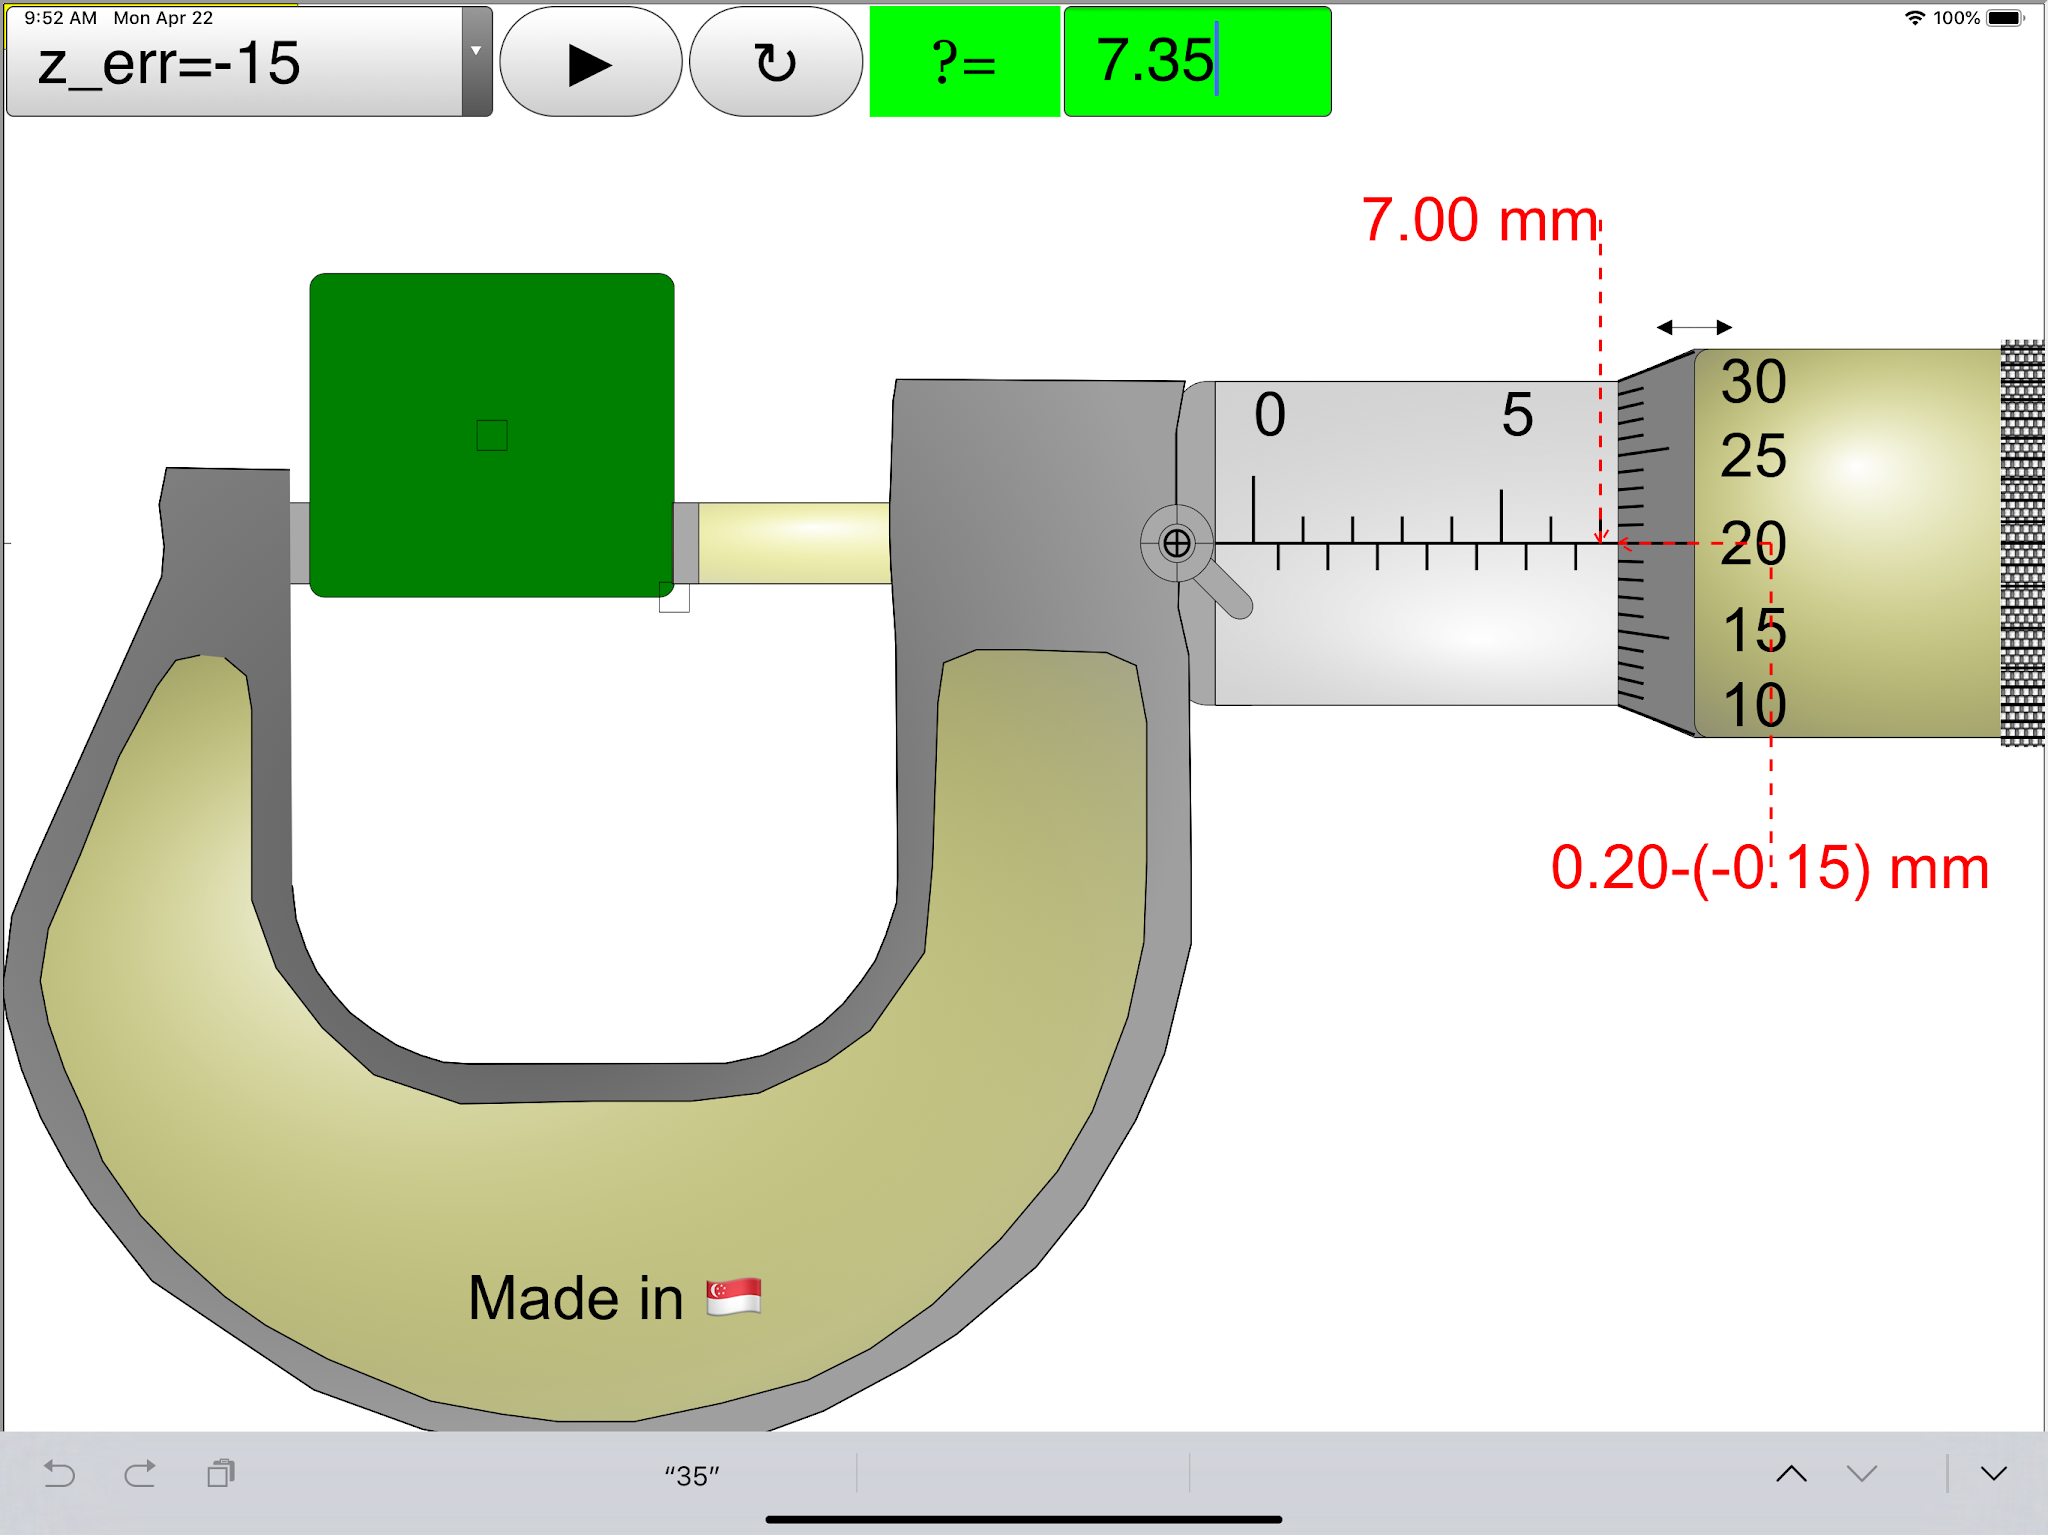
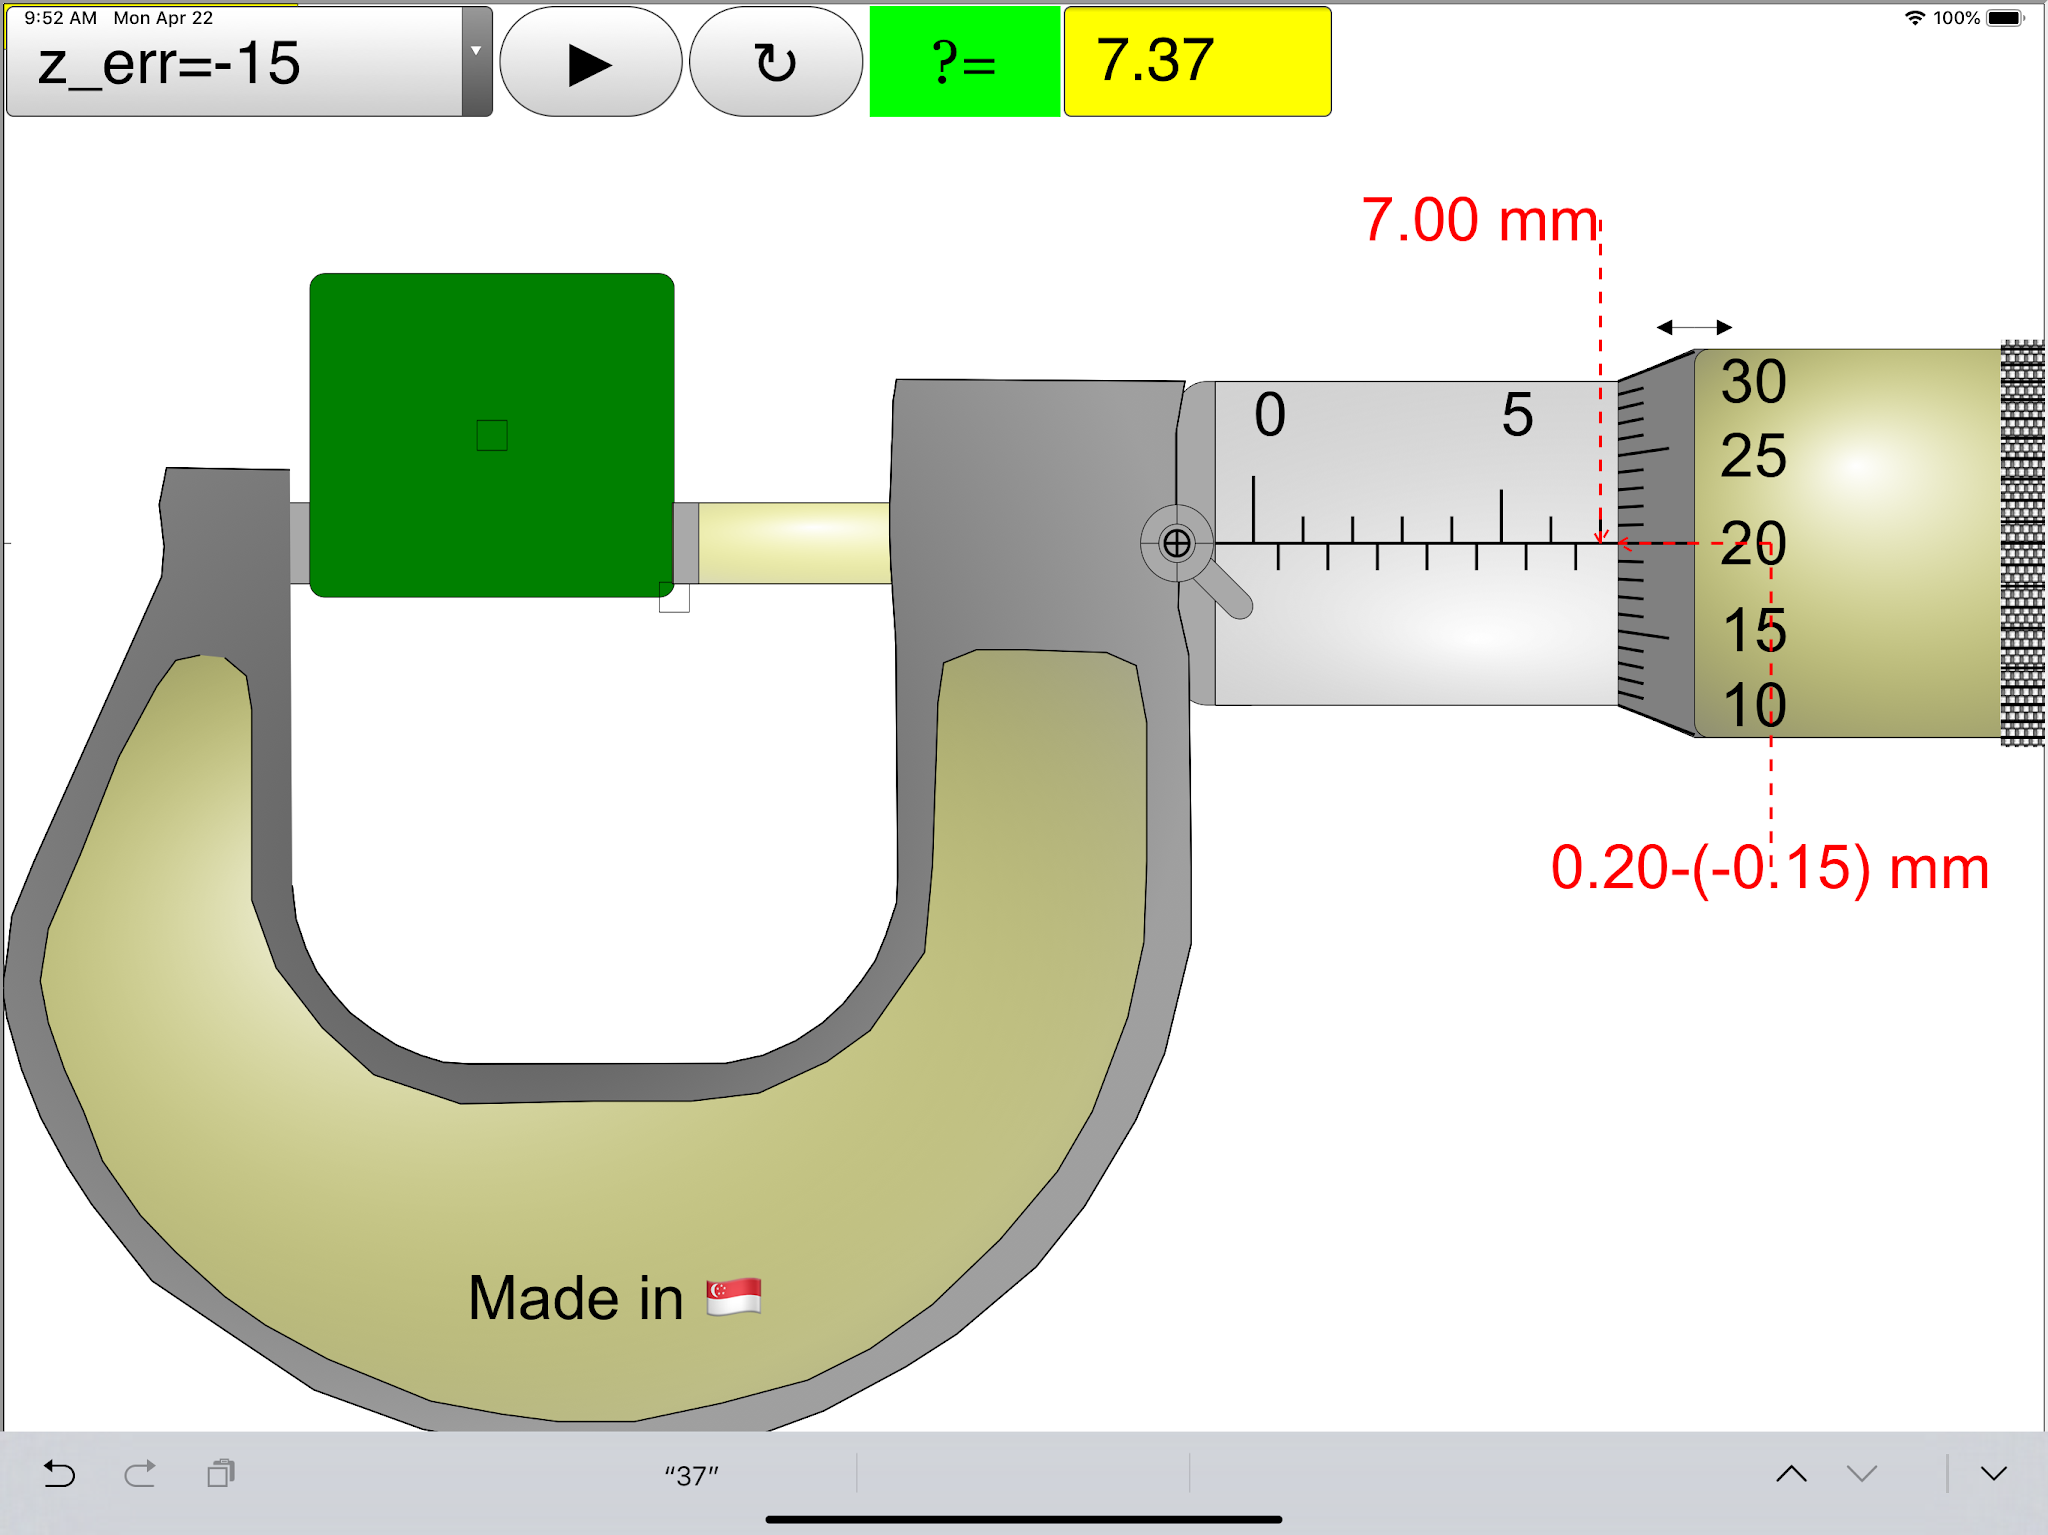
| scroll on answer combo box to correct attempted answer https://sg.iwant2study.org/ospsg/index.php/6-micrometer02 Fullscreen App version Direct link https://sg.iwant2study.org/ospsg/index.php/1005-micrometer02manualversion Manual version Direct link |
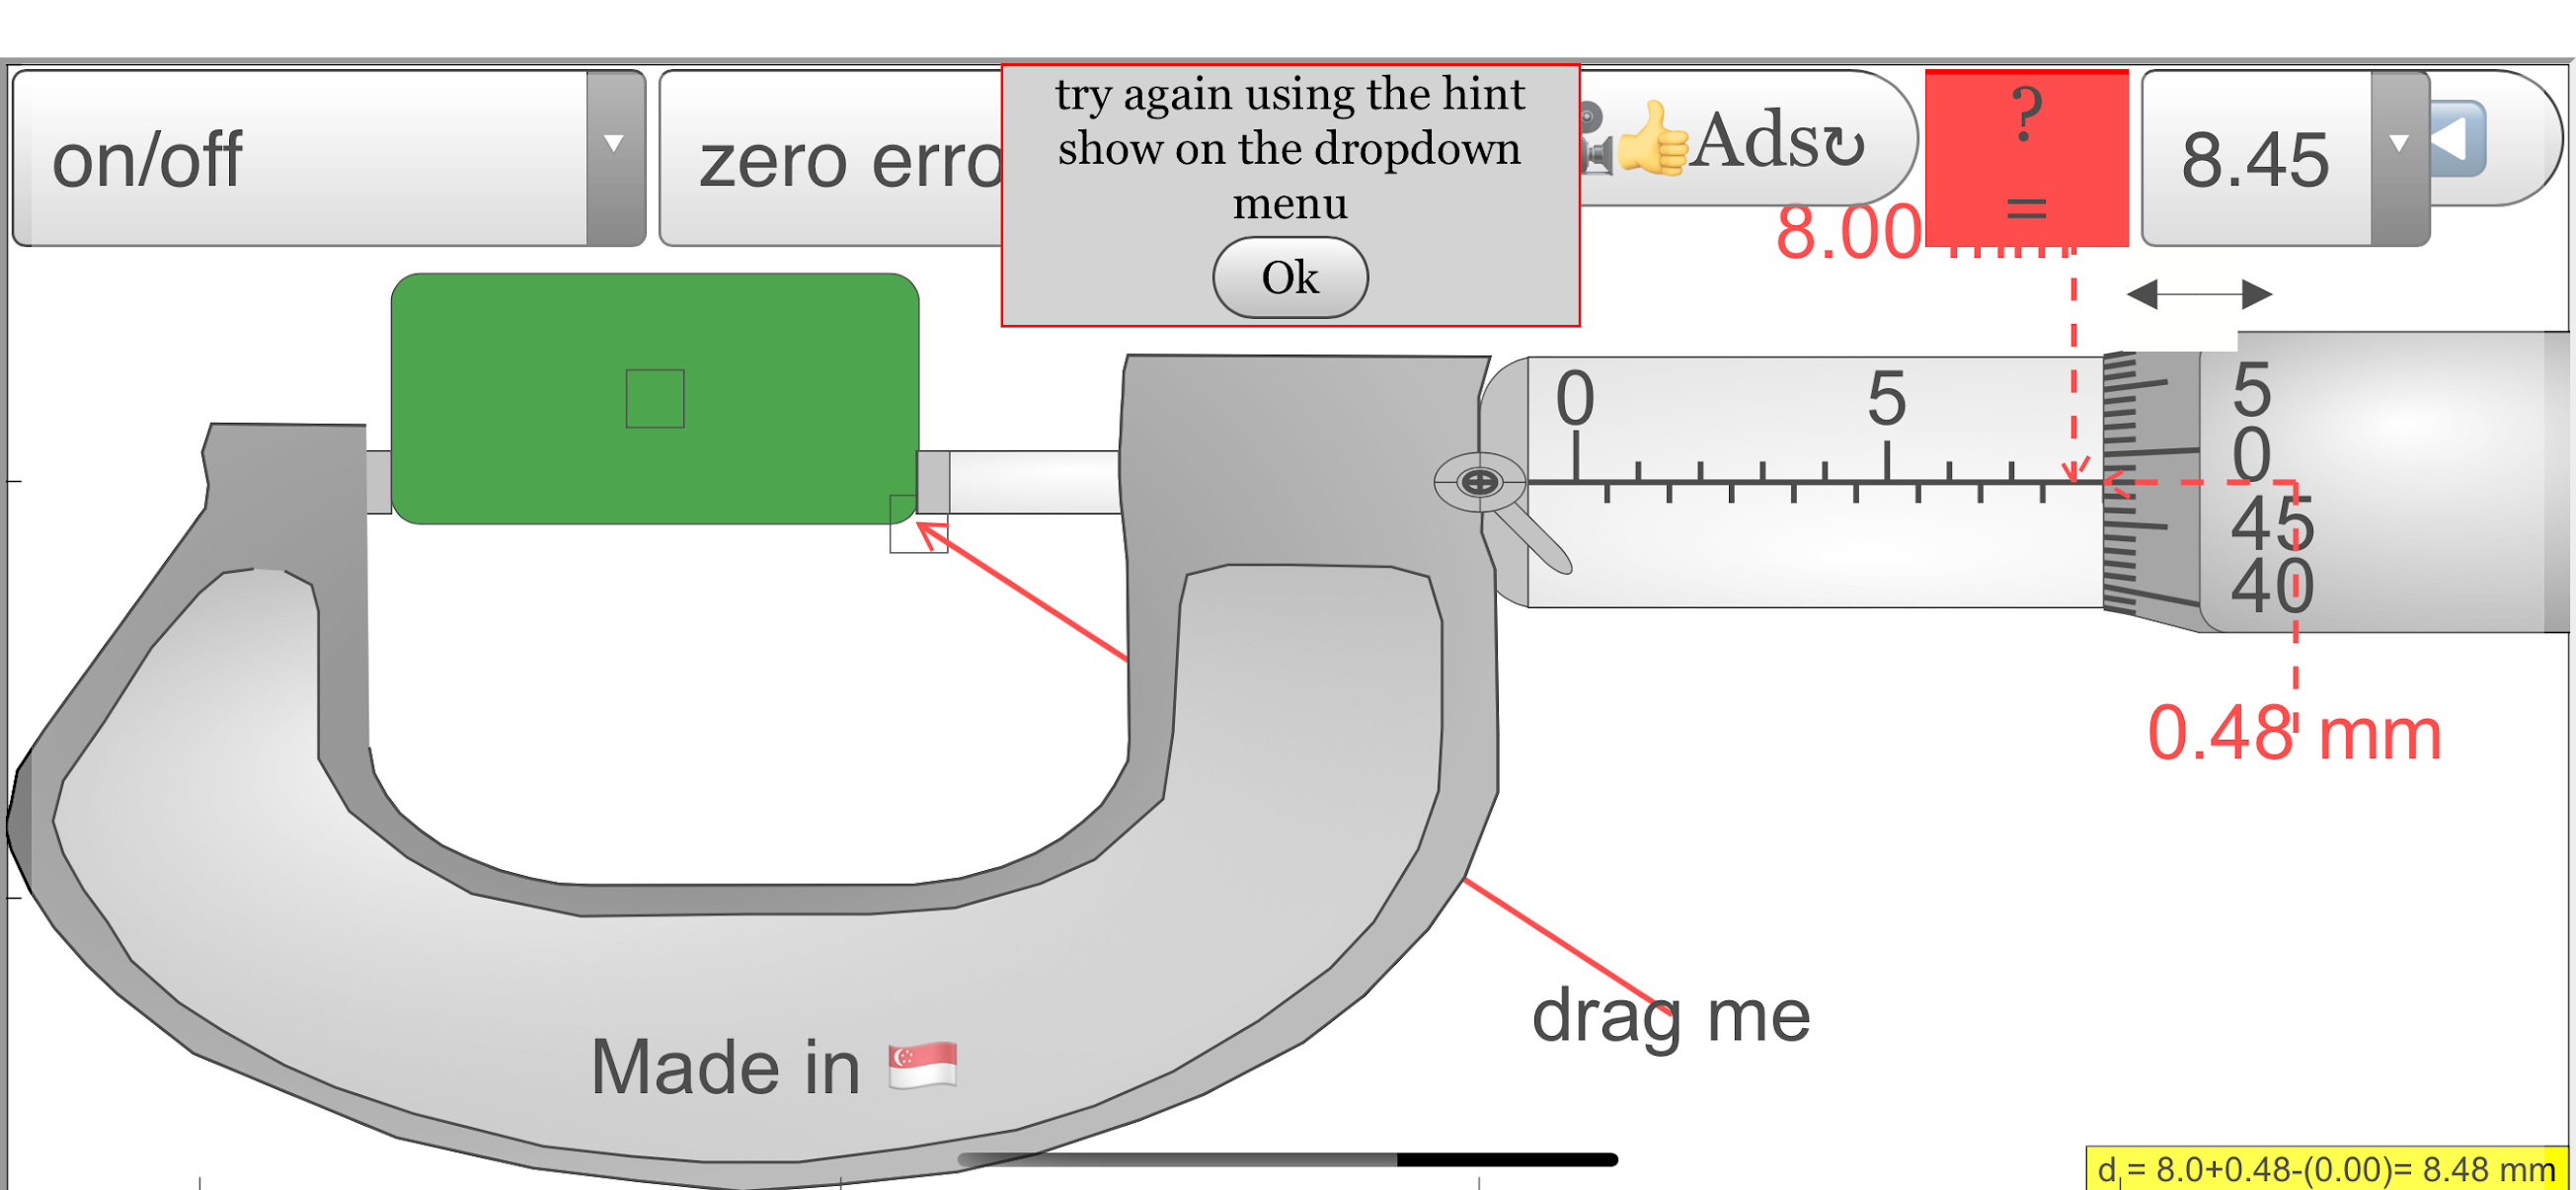 |
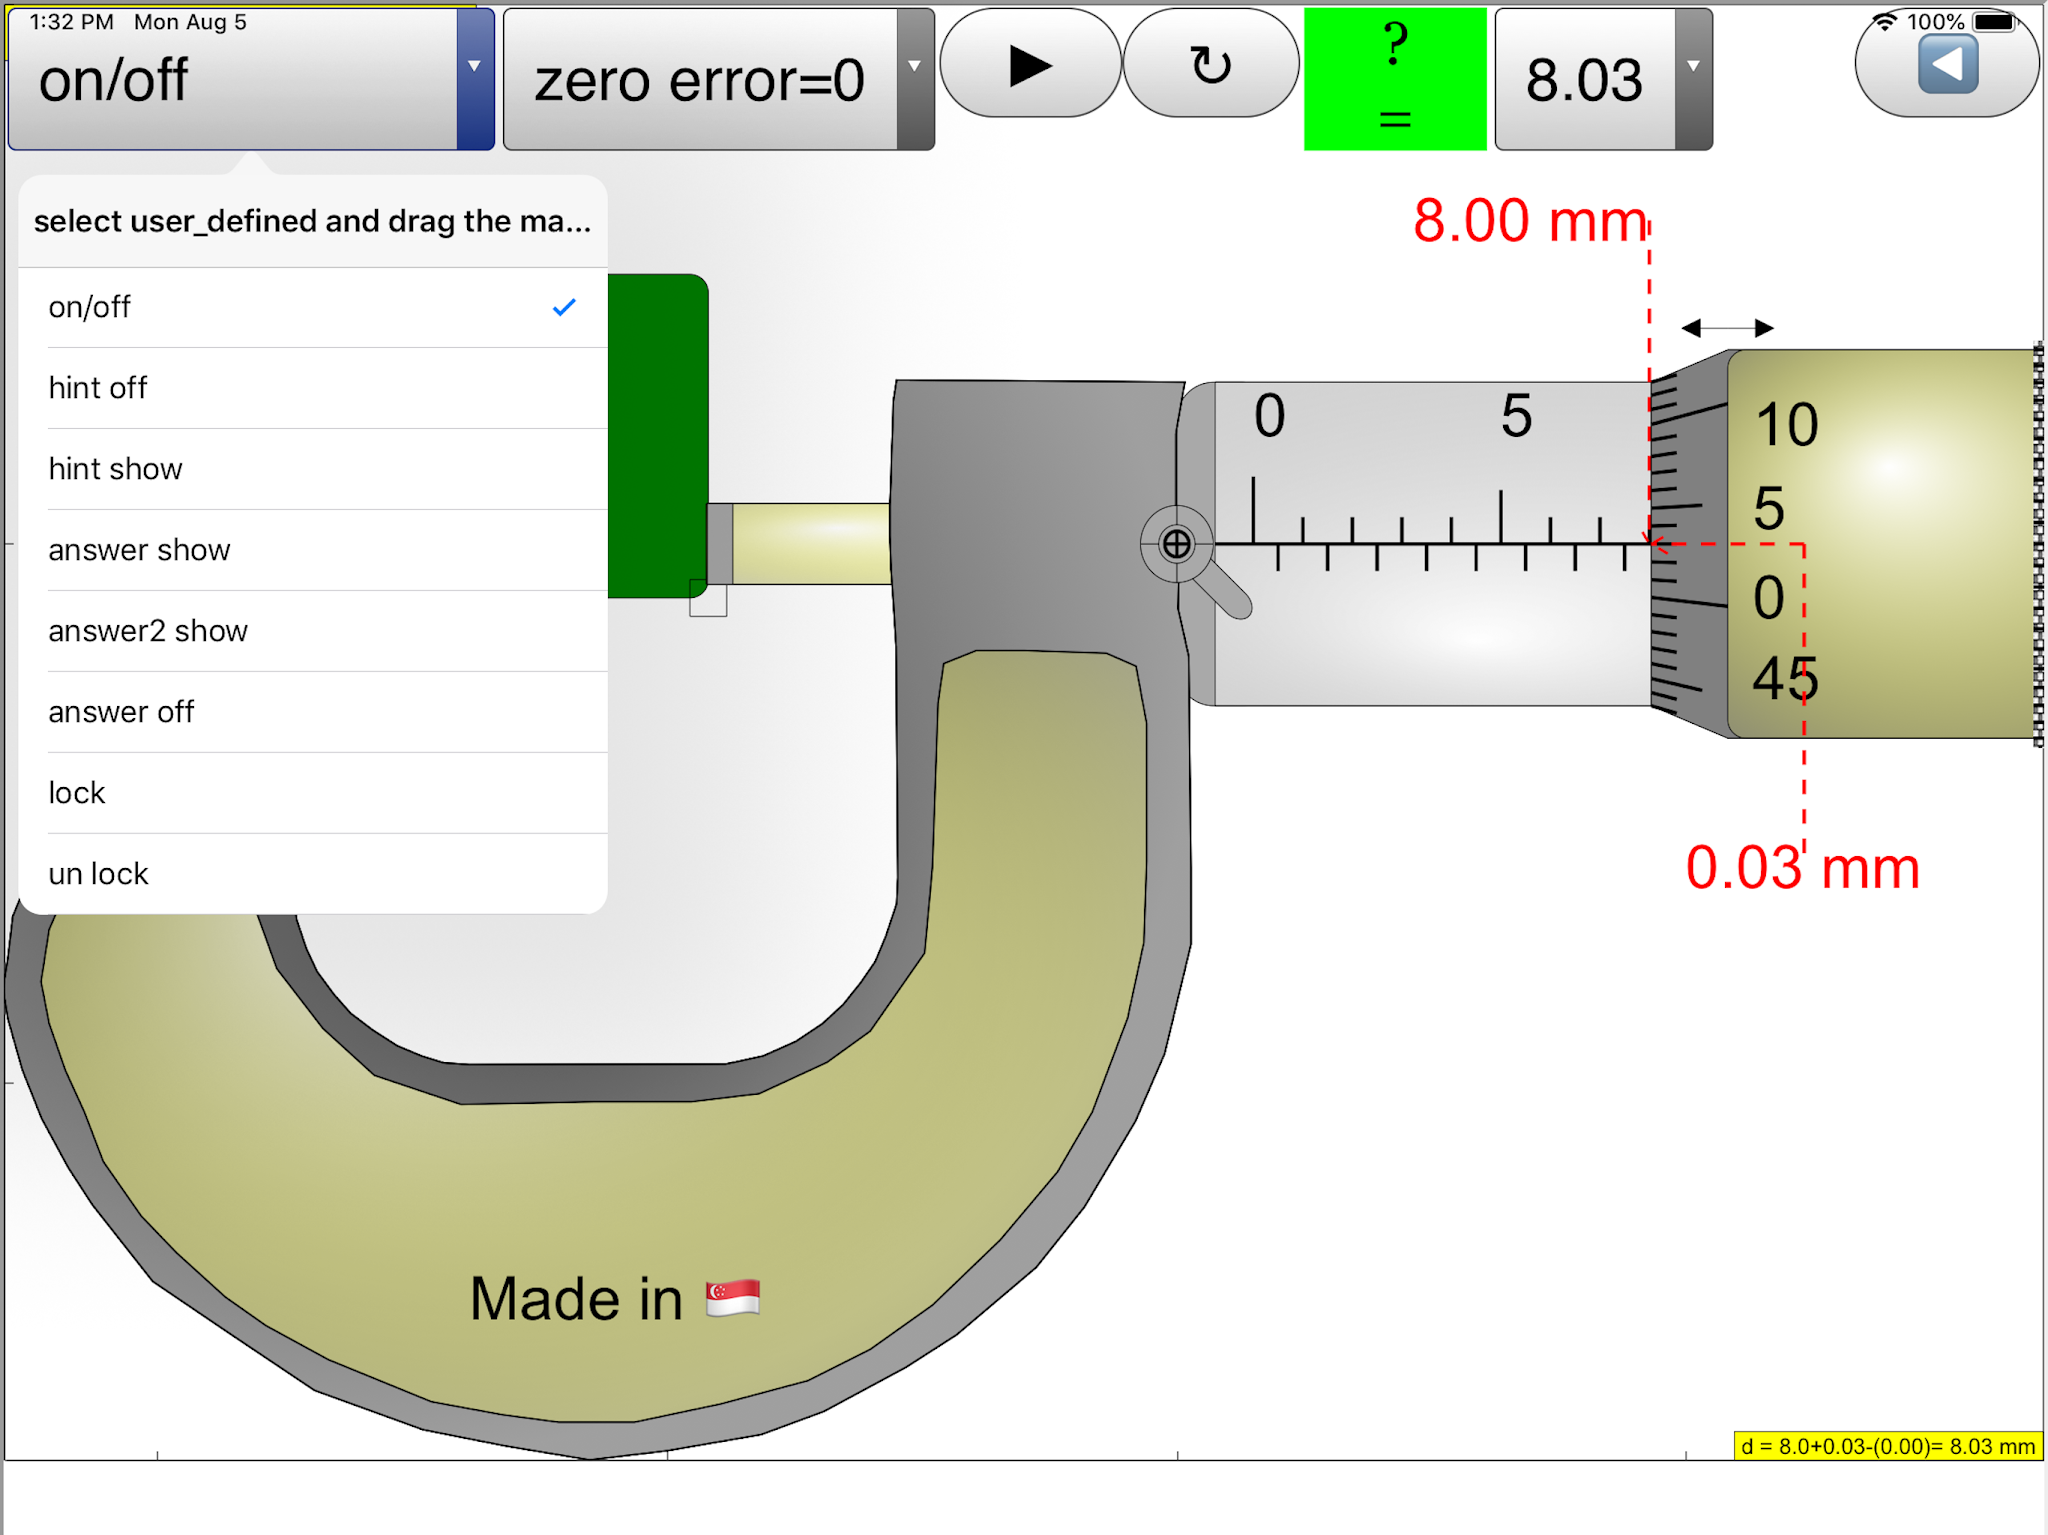
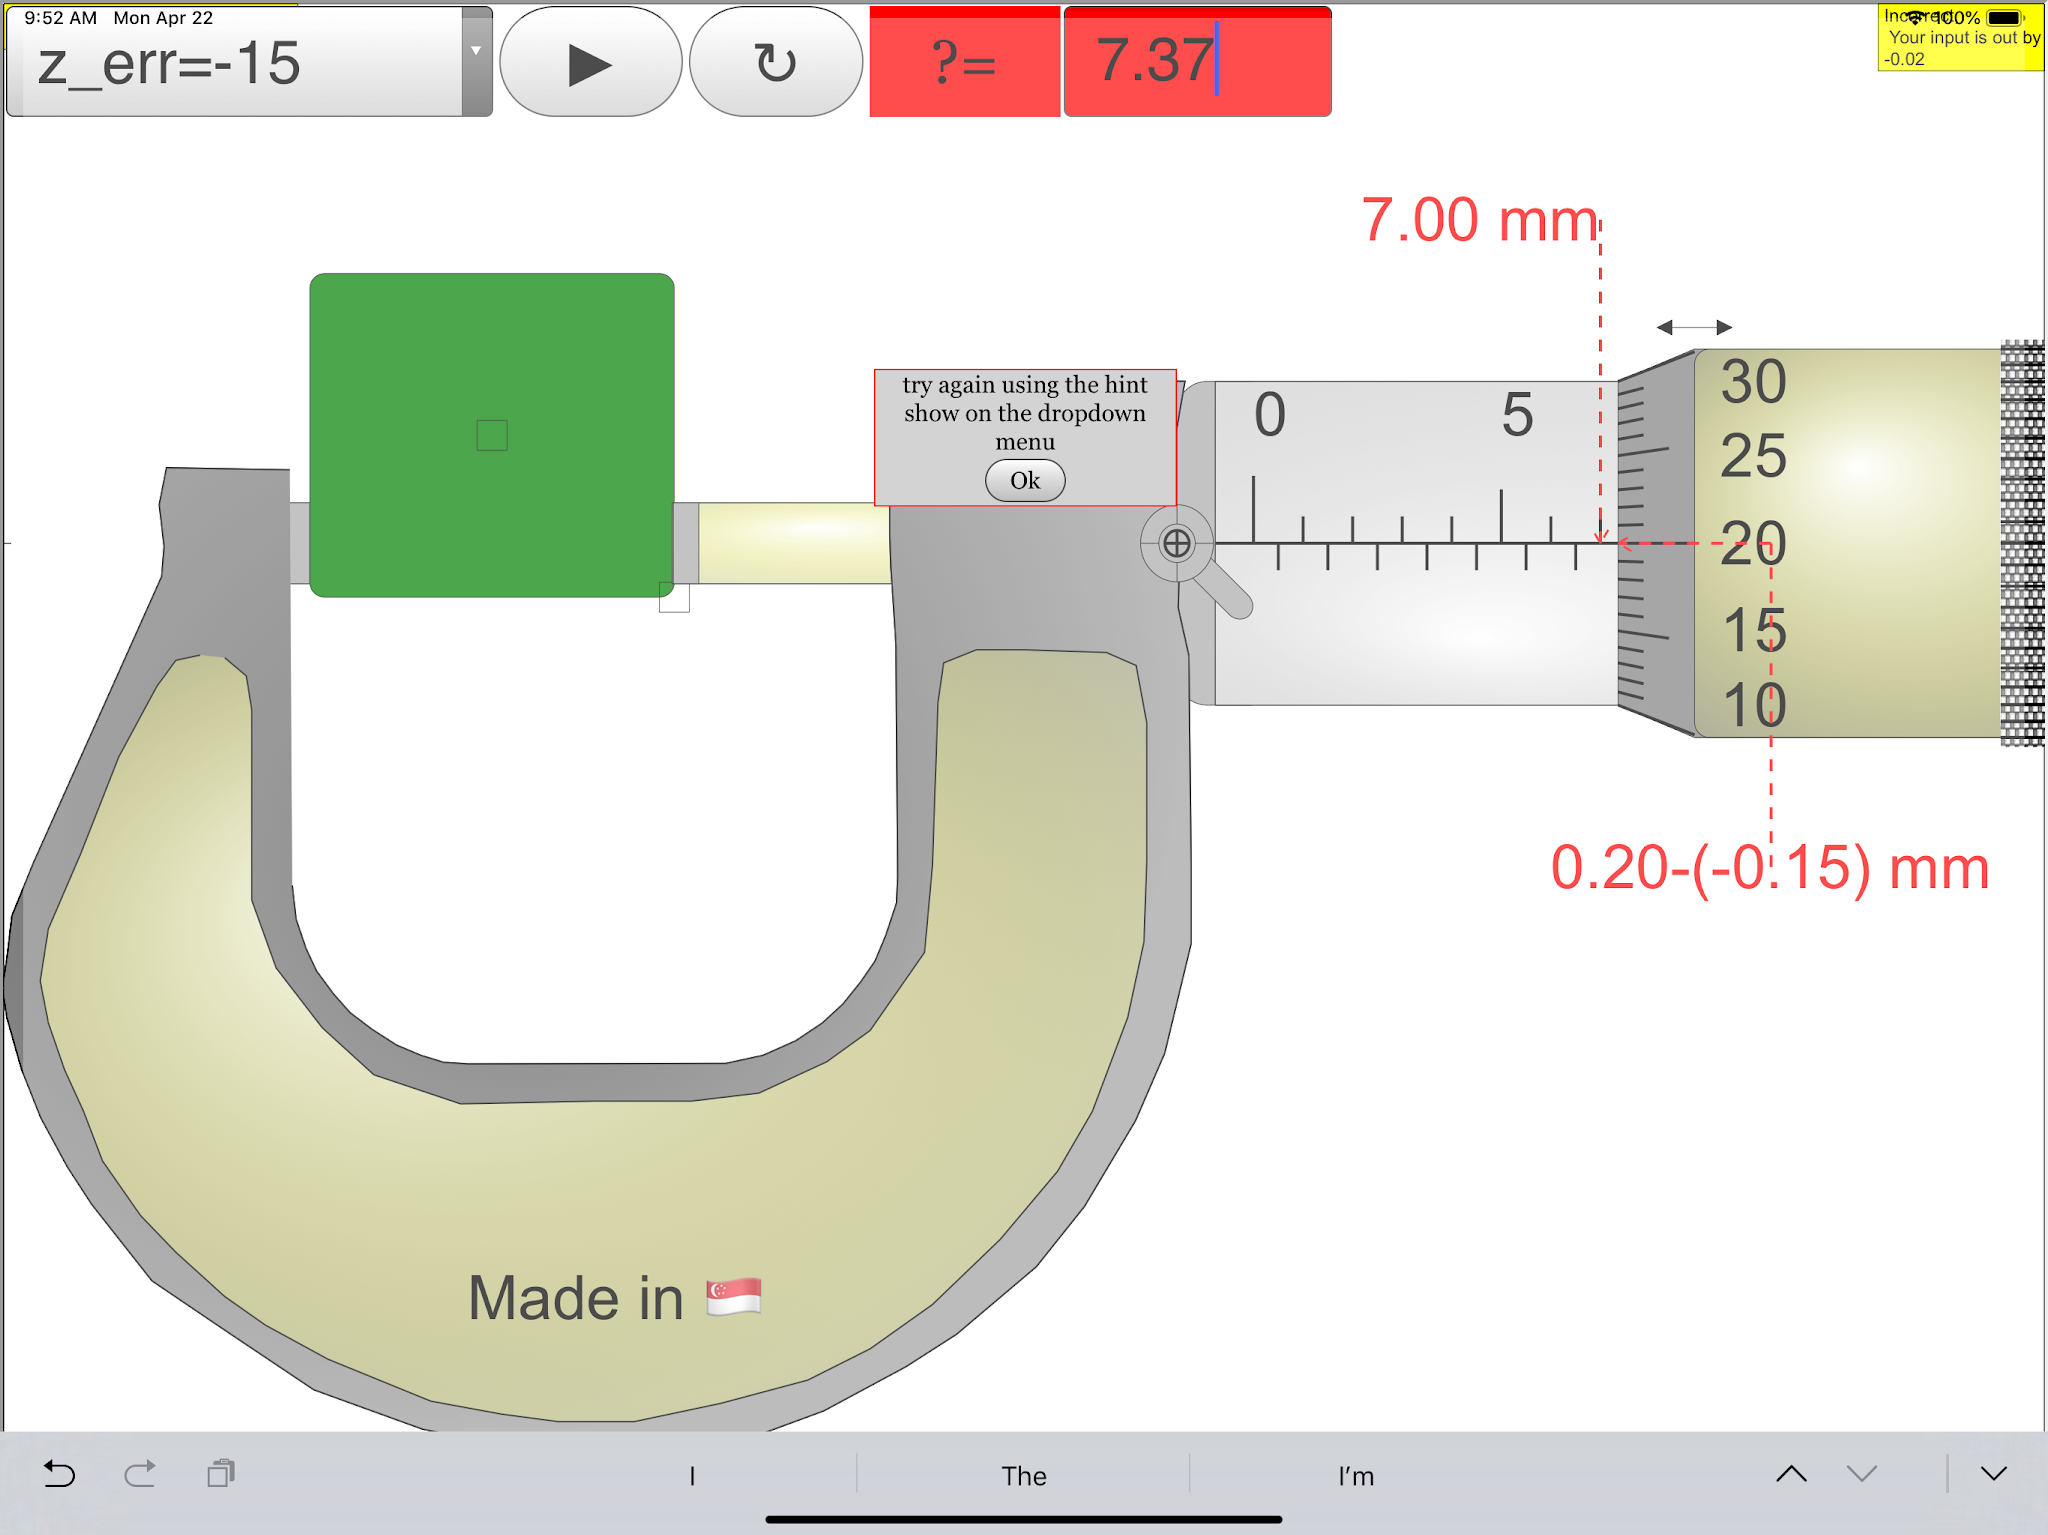
| when answer is wrong, gives hint to try to show the hint on option on the first combo box https://sg.iwant2study.org/ospsg/index.php/6-micrometer02 Fullscreen App version Direct link https://sg.iwant2study.org/ospsg/index.php/1005-micrometer02manualversion Manual version Direct link |
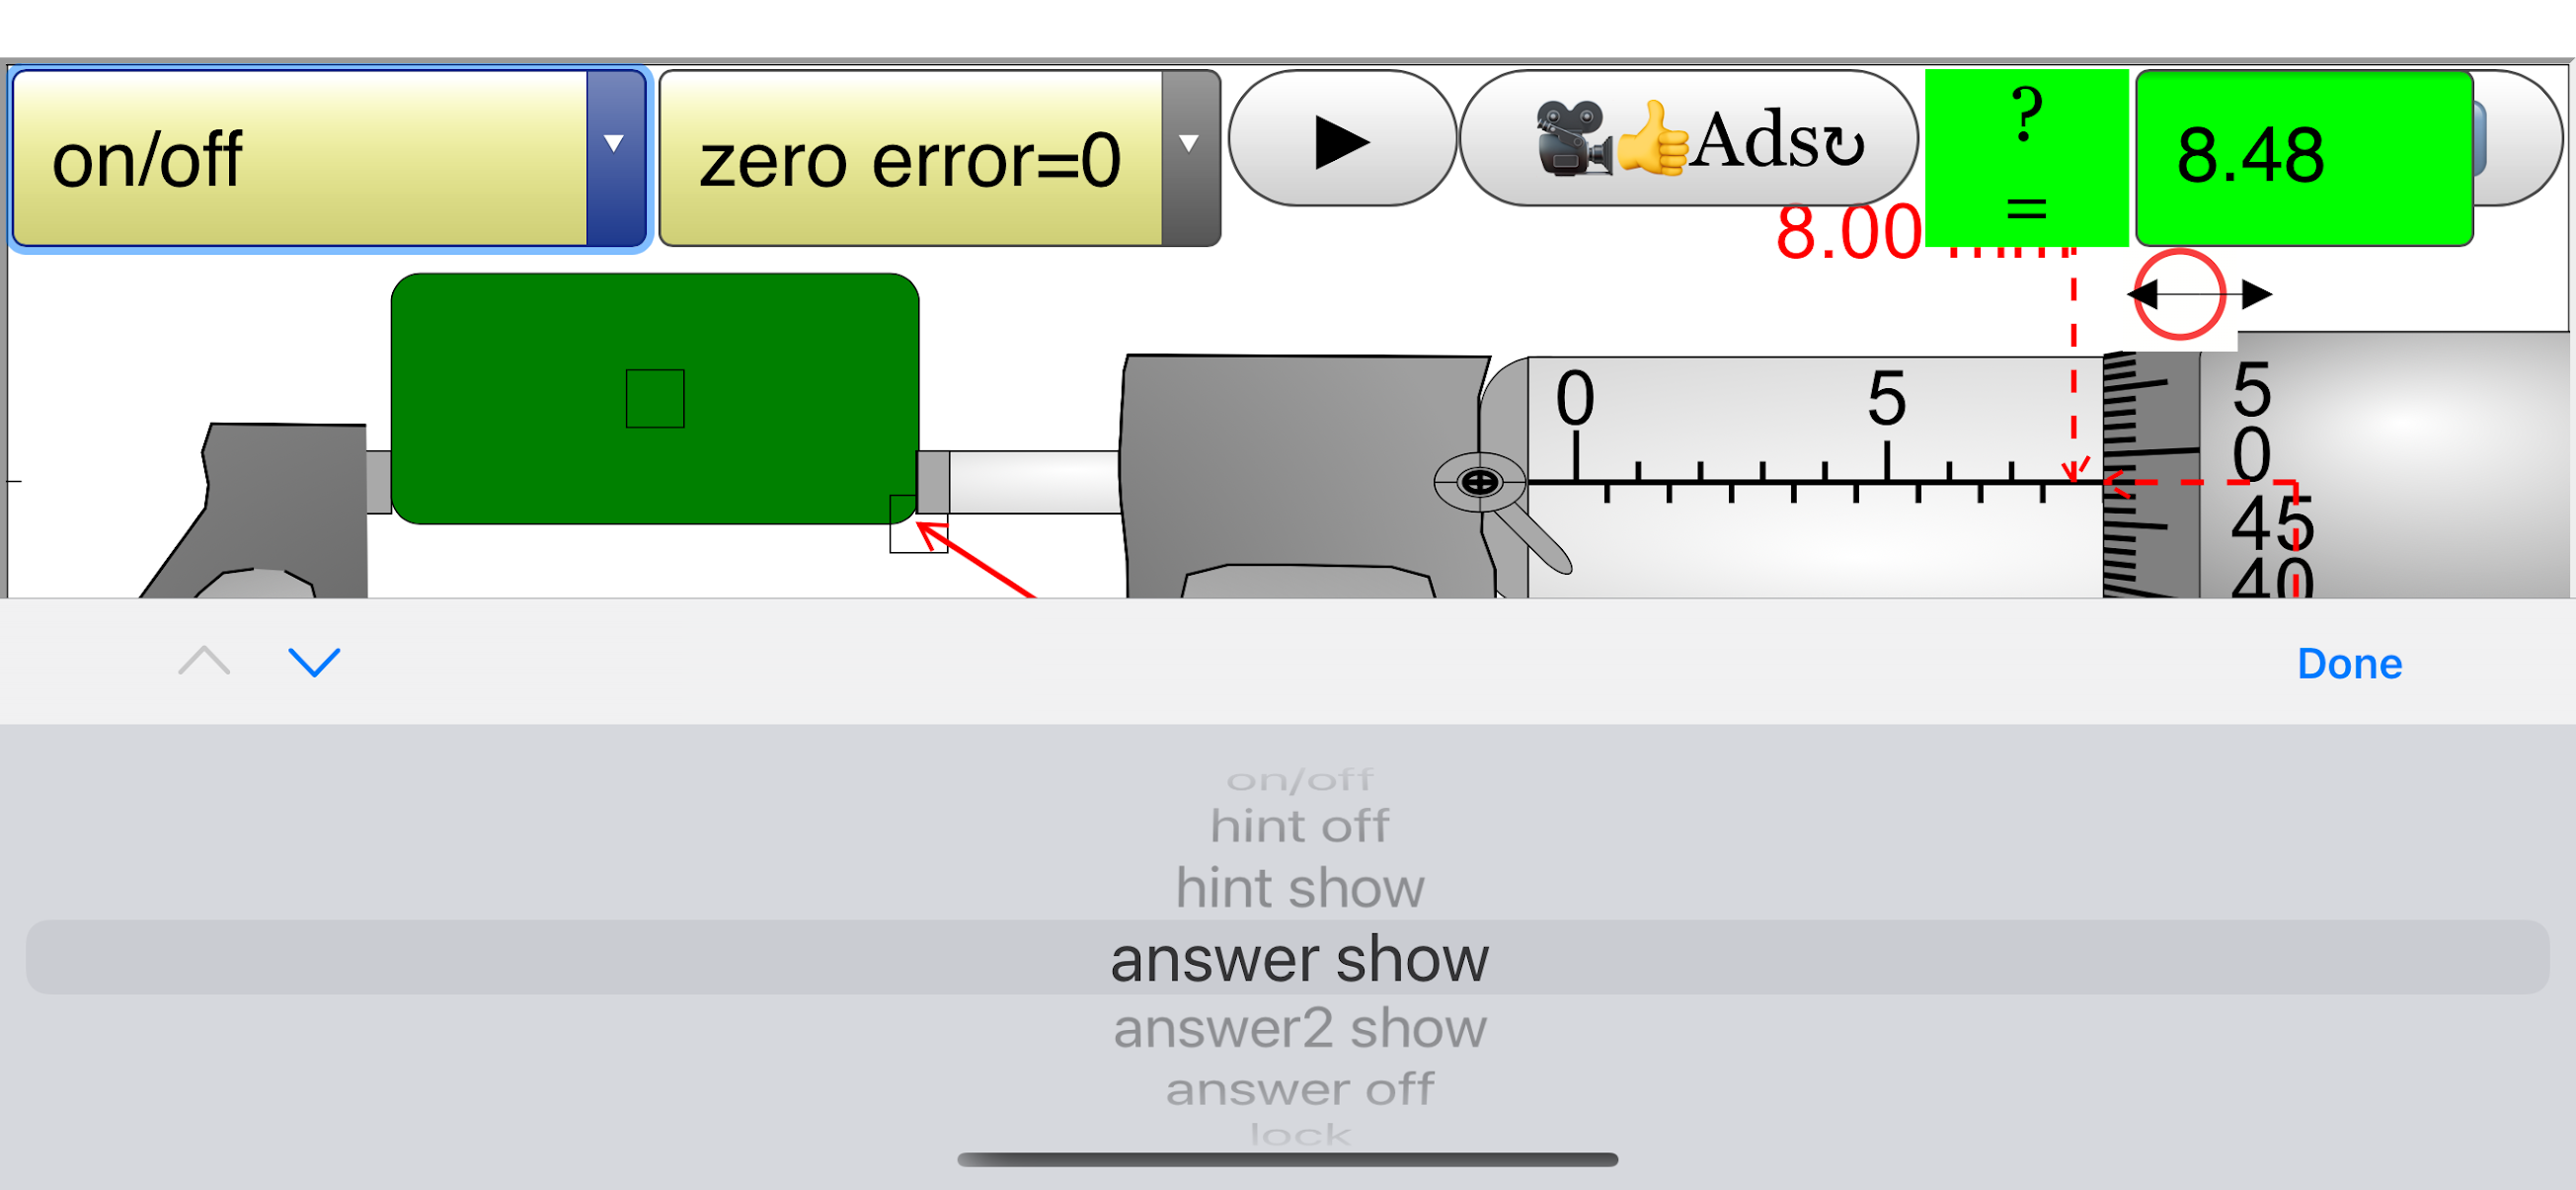 |
| able to show answer or hide https://sg.iwant2study.org/ospsg/index.php/6-micrometer02 Fullscreen App version Direct link https://sg.iwant2study.org/ospsg/index.php/1005-micrometer02manualversion Manual version Direct link |
 |
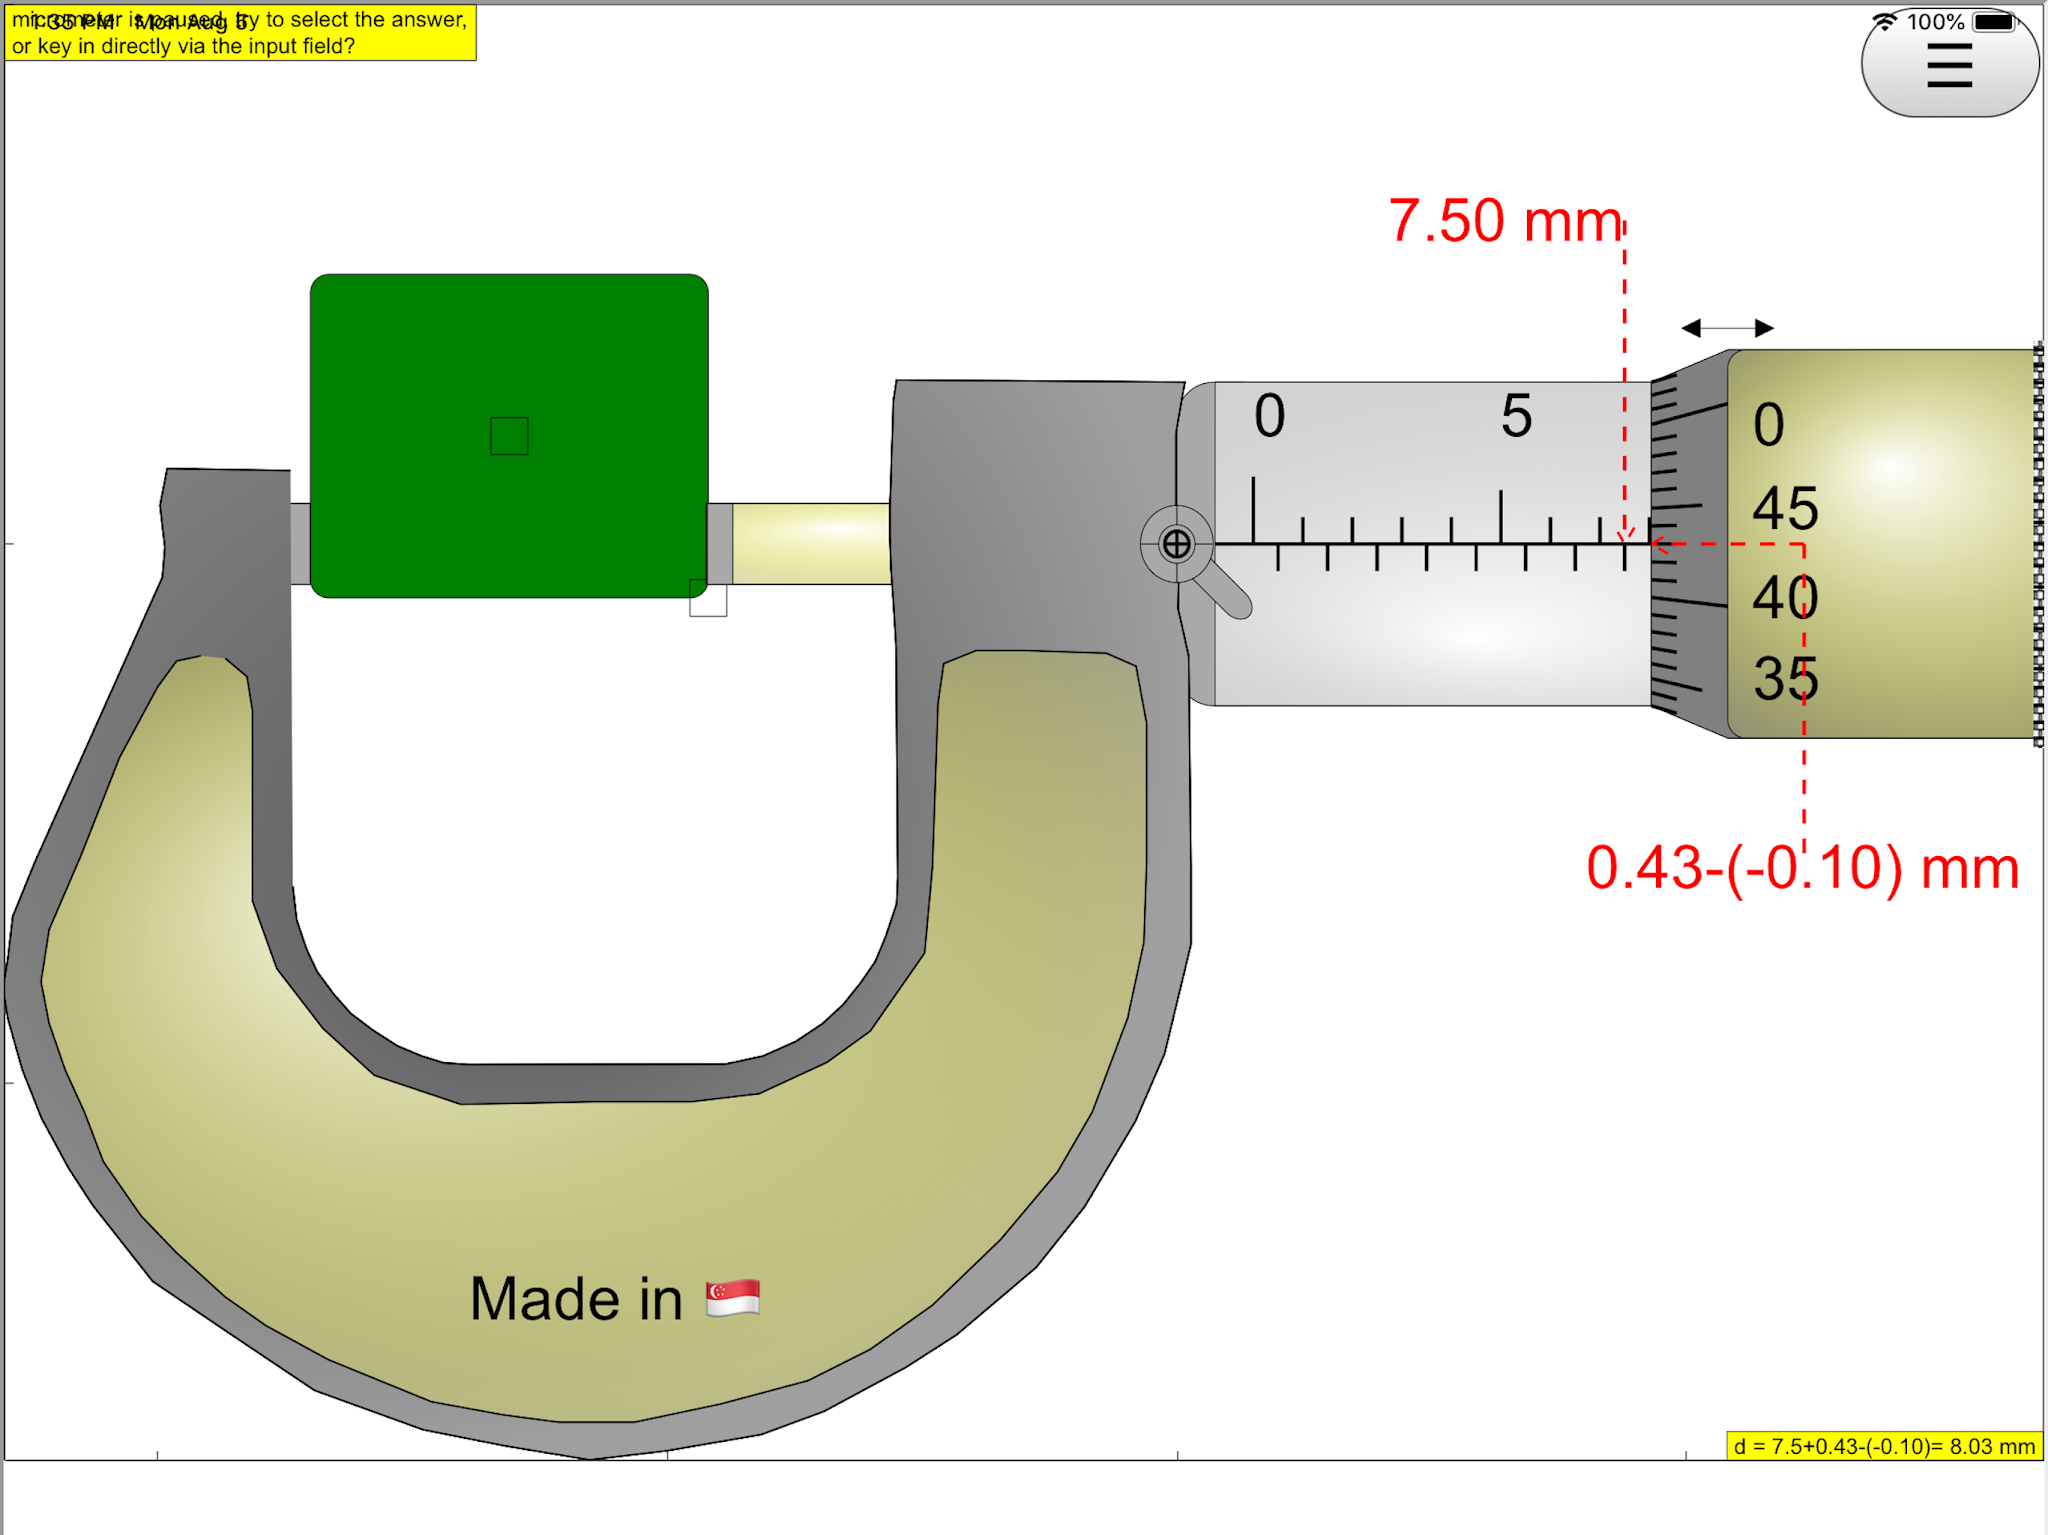
| click on the ?= to toggle between combo box (quick answers method) and input field (keyboard method) https://sg.iwant2study.org/ospsg/index.php/6-micrometer02 Fullscreen App version Direct link https://sg.iwant2study.org/ospsg/index.php/1005-micrometer02manualversion Manual version Direct link |
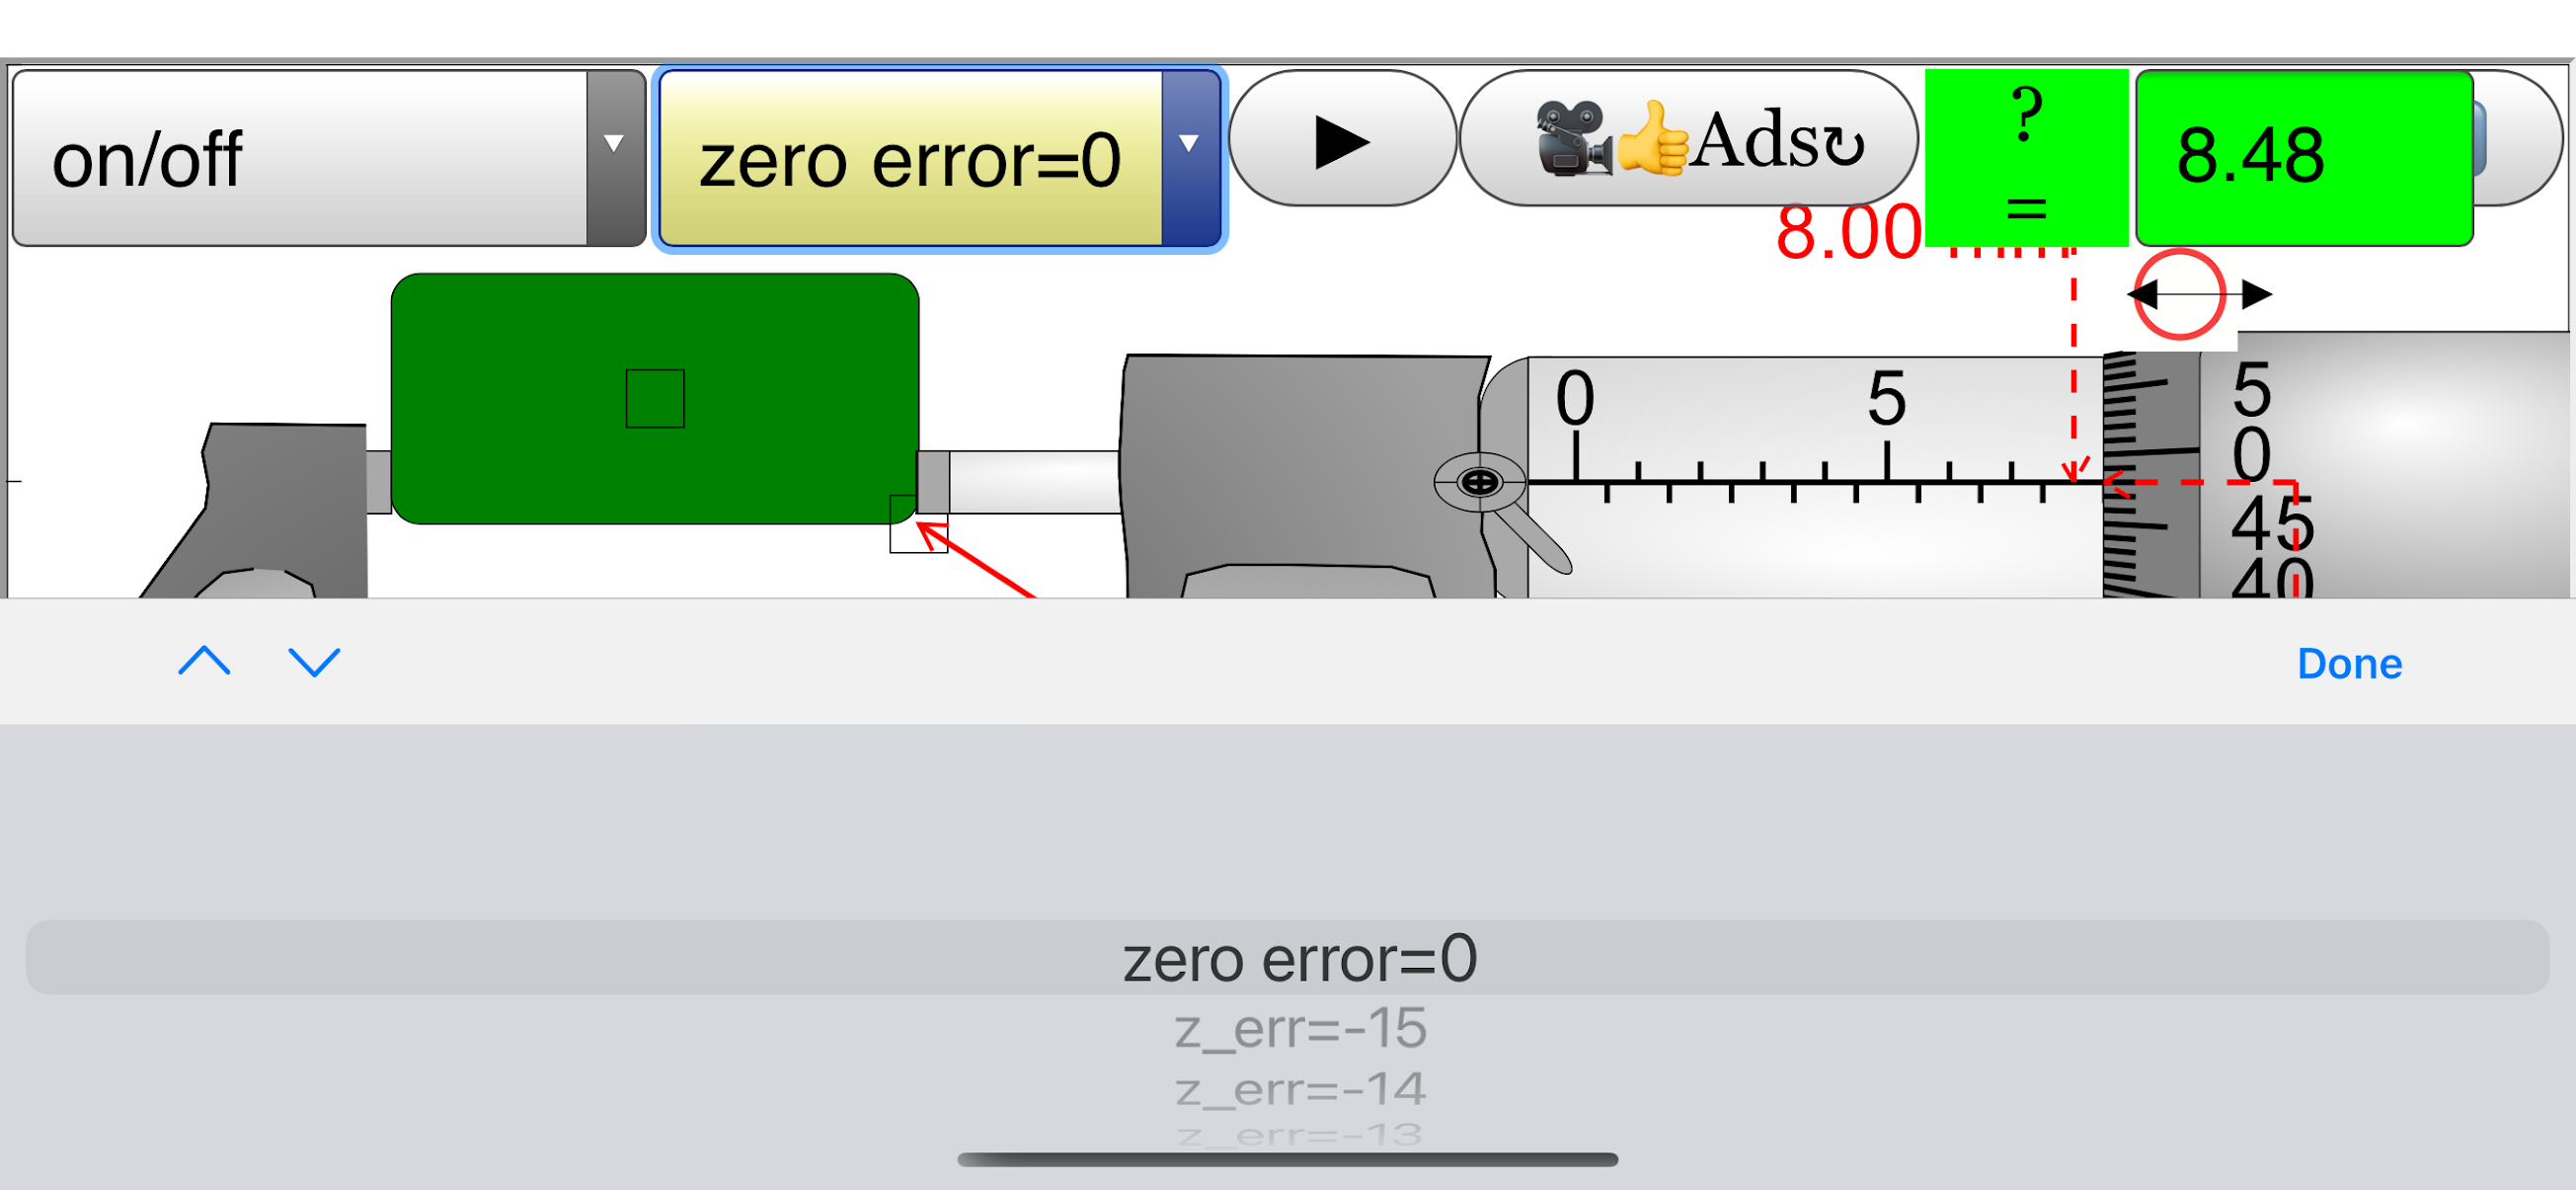 |
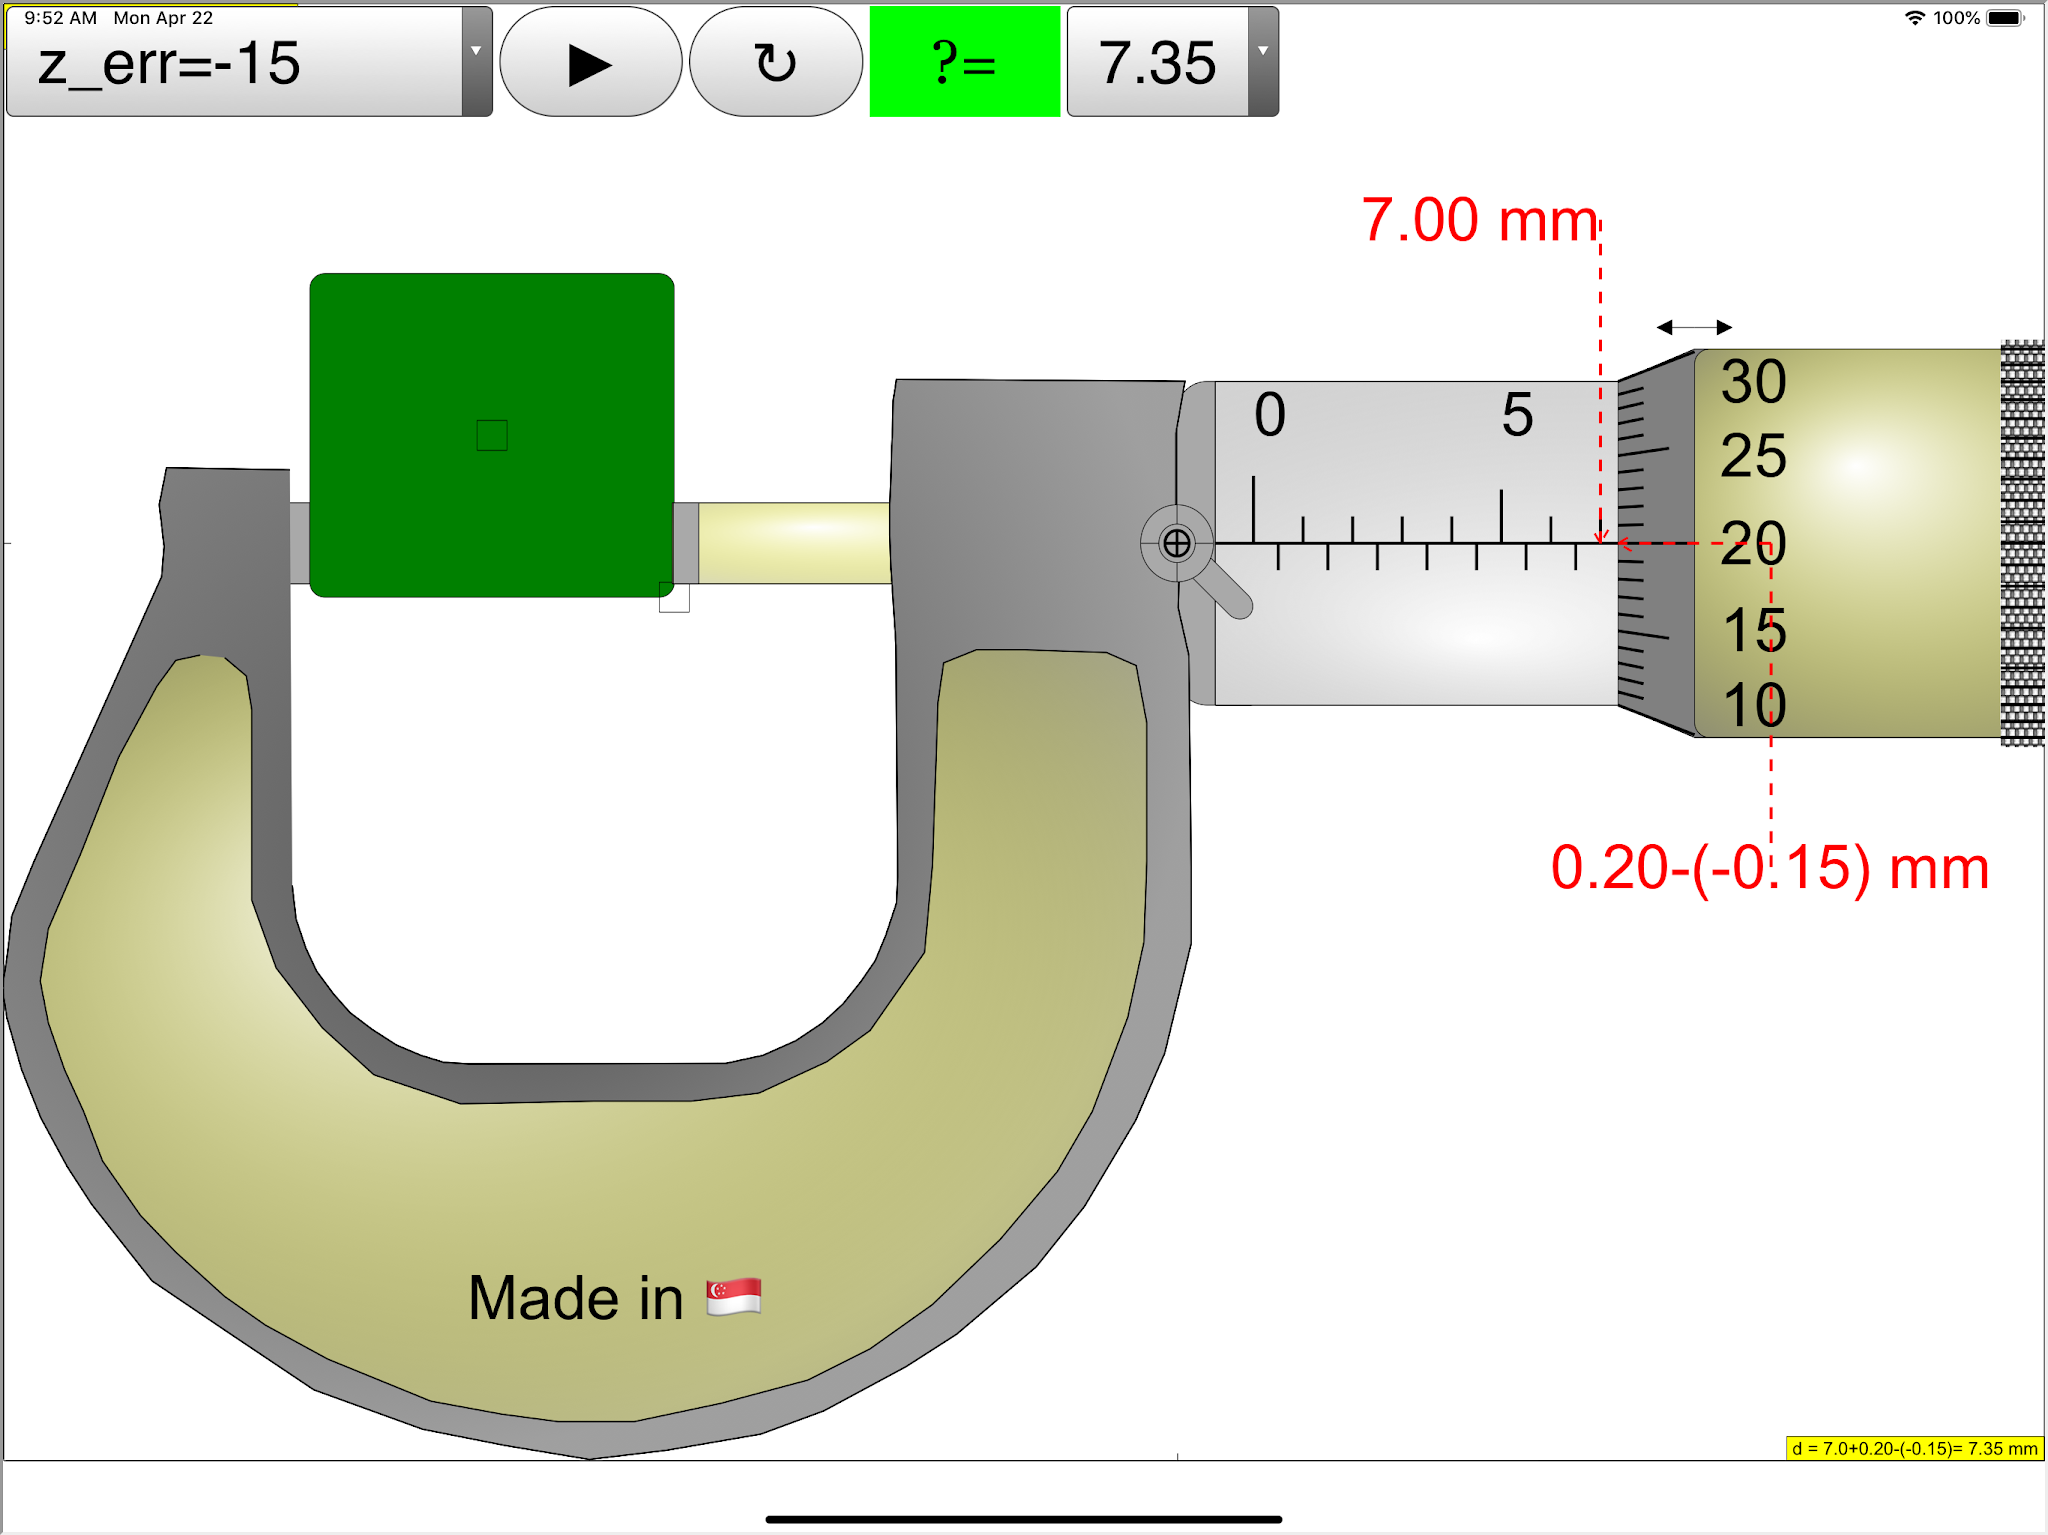
| second combo box allows zero error introduction https://sg.iwant2study.org/ospsg/index.php/6-micrometer02 Fullscreen App version Direct link https://sg.iwant2study.org/ospsg/index.php/1005-micrometer02manualversion Manual version Direct link |
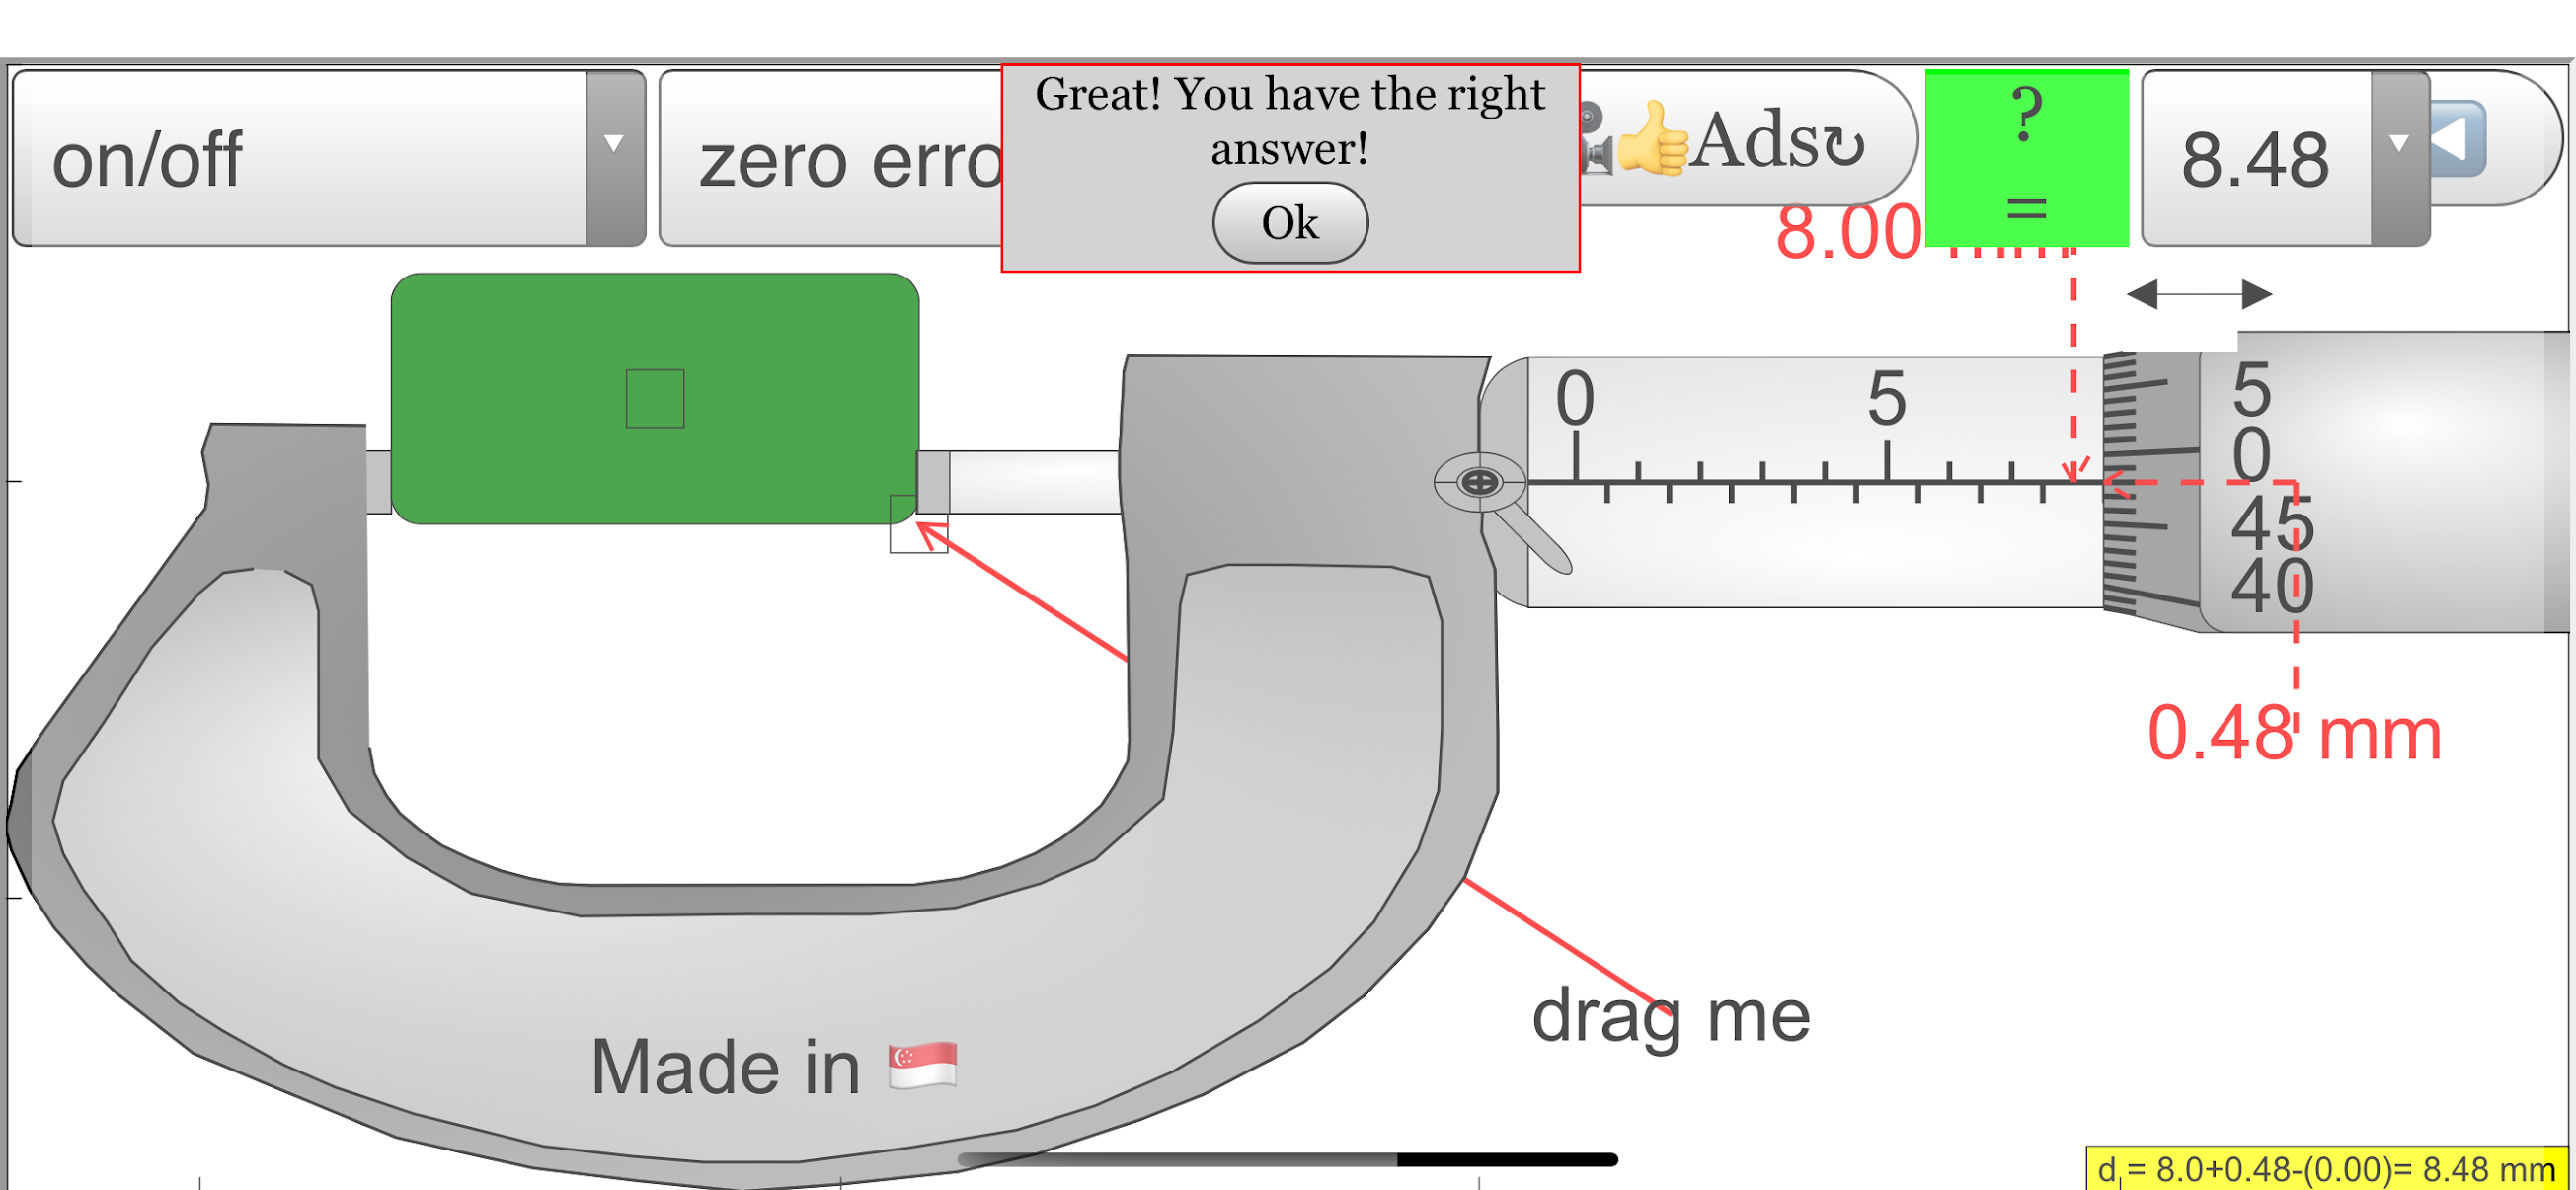 |
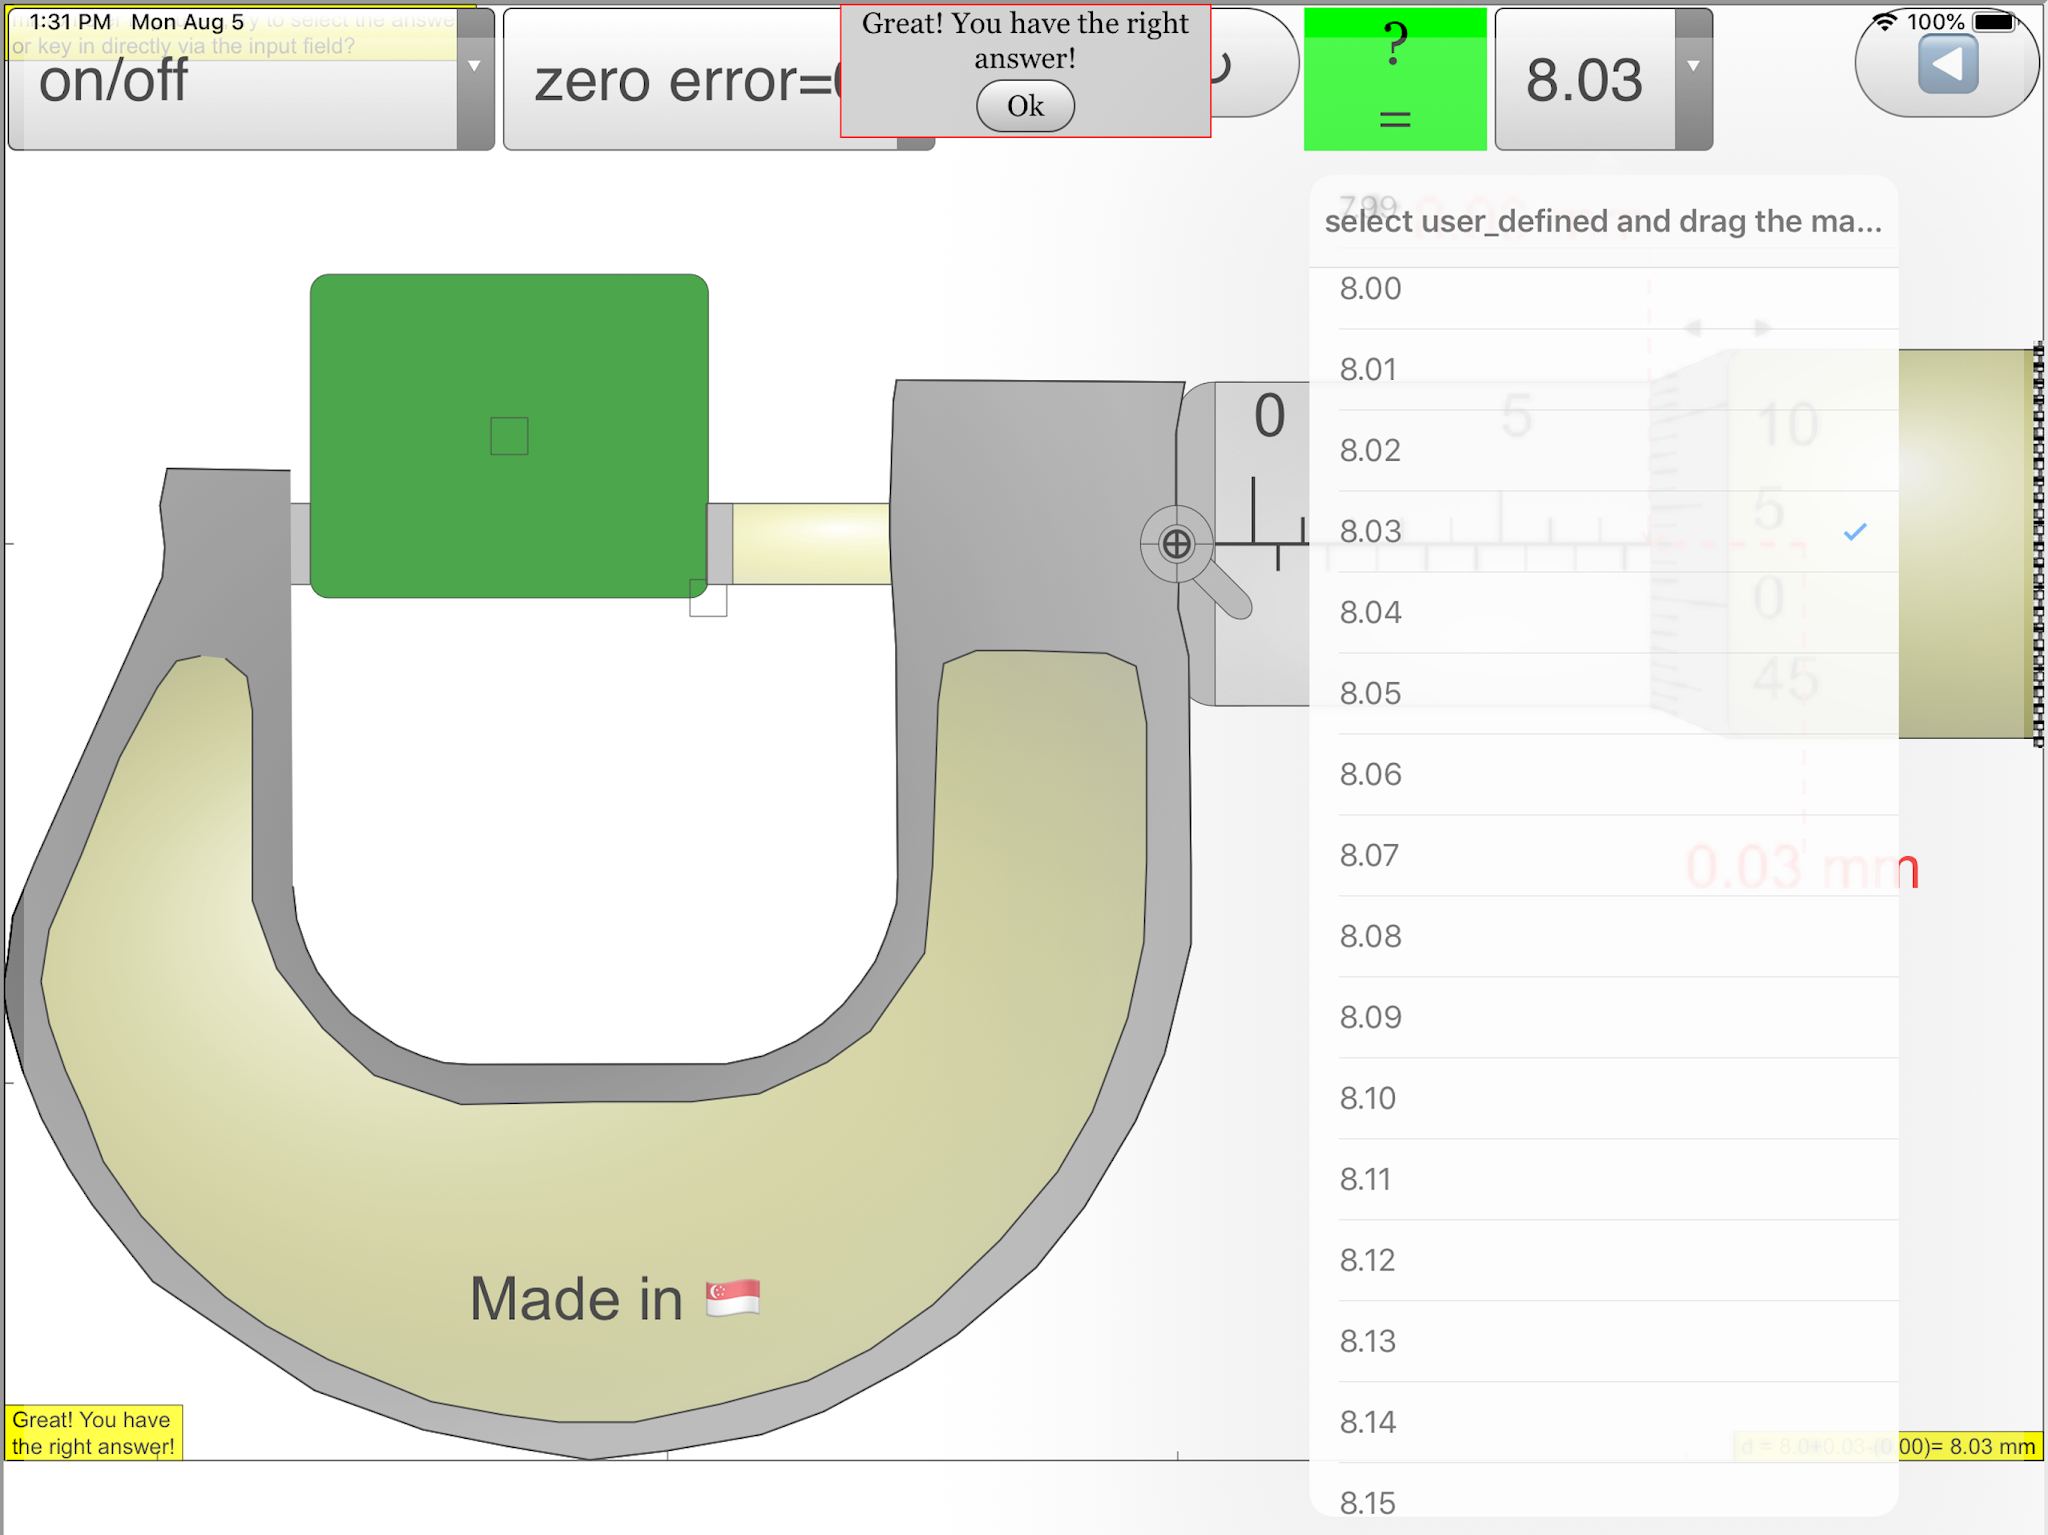
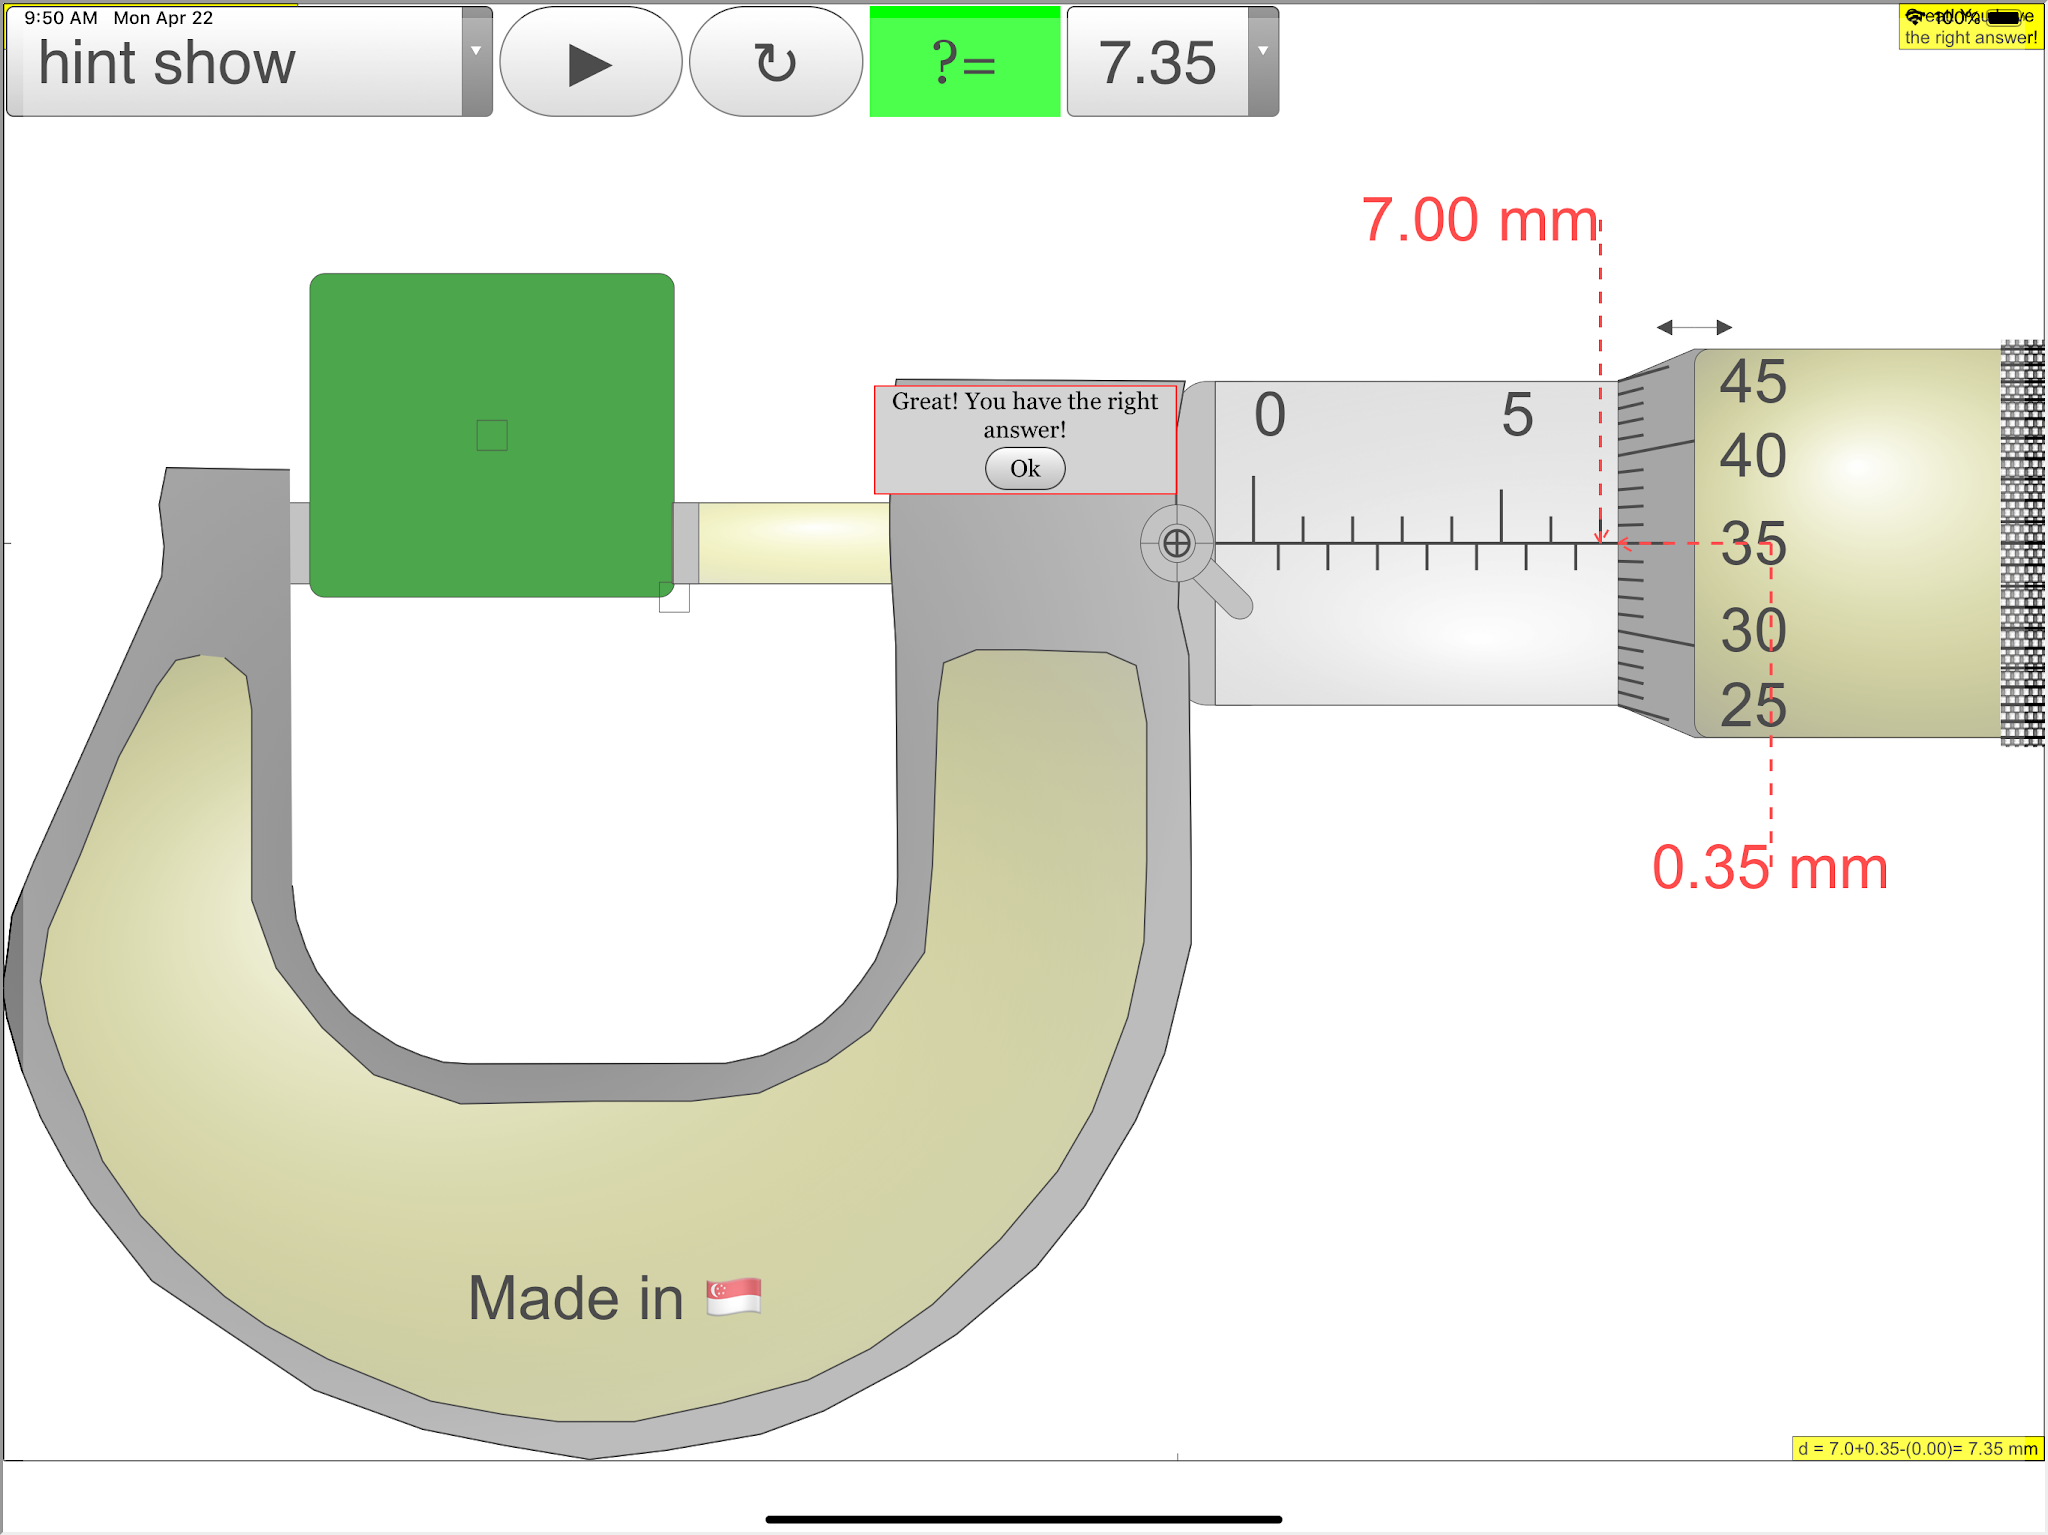
| affirms when answer is correct! https://sg.iwant2study.org/ospsg/index.php/6-micrometer02 Fullscreen App version Direct link https://sg.iwant2study.org/ospsg/index.php/1005-micrometer02manualversion Manual version Direct link |
Micrometer iOS App 12.9 inch, probably the world's best!


Video
Youtube by Kim Kia Tan
Youtube by Kim Kia Tan
Sample Learning Goals
(g) describe how to measure a variety of lengths with appropriate accuracy by means of tapes, rules, micrometers and calipers, using a vernier scale as necessary.
Version:
- http://weelookang.blogspot.sg/2015/07/ejss-micrometer-model.html?m=1 by Fu-Kwun Hwang and lookang JavaScript version blogpost
- http://weelookang.blogspot.sg/2010/06/ejs-open-source-micrometer-java-applet.html by Fu-Kwun Hwang and lookang Java version blogpost
- http://iwant2study.org/lookangejss/01_measurement/ejs/ejs_model_Micrometer02.jar by Fu-Kwun Hwang and lookang Java version digital library
- http://www.phy.ntnu.edu.tw/ntnujava/index.php?topic=567.0 by Fu-Kwun Hwang and lookang Java version
- http://www.phy.ntnu.edu.tw/ntnujava/index.php?topic=683.0 by Fu-Kwun Hwang Java version
- http://www.phy.ntnu.edu.tw/ntnujava/index.php?action=post;topic=502.0 by Fu-Kwun Hwang Java version mirror here
Other Resources
- http://www.vjc.moe.edu.sg/fasttrack/physics/macrometer_ya_v6.htm by VJC requires Flash
- http://www.upscale.utoronto.ca/PVB/Harrison/Micrometer/Flash/FullAnimation.html Animation
- http://www.upscale.utoronto.ca/PVB/Harrison/Micrometer/Flash/MicSimulation.html Animation
- https://www.geogebra.org/m/qedrwymk By Seng kwang
- https://simphy.com/weblets/micrometer-simulator/
Frequently Asked Questions: Micrometer and Simulation Model
- What is a micrometer and what is its fundamental principle of operation? A micrometer is a precision measuring instrument used to measure small distances accurately. Its basic operating principle relies on the screw mechanism. A very small axial movement of a precisely made screw results in a much larger, and therefore easier to read, circumferential movement. This relationship is determined by the screw's lead, which is the axial distance the screw advances with one complete rotation (360°). In most single-start threads, the lead is equivalent to the pitch. By correlating the rotation of the screw (read on the thimble) to the linear movement (read on the sleeve), precise measurements can be obtained.
- What are the main physical components of a micrometer and what is the purpose of each? The main physical parts of a micrometer include:
- Frame (Orange): A sturdy C-shaped body that provides a stable structure holding the anvil and barrel in a fixed relationship. Its thickness and high thermal mass minimize expansion or contraction due to temperature changes from handling.
- Anvil (Gray): A shiny, fixed surface against which the object being measured is placed.
- Sleeve / Barrel / Stock (Yellow): The stationary cylindrical part with a linear scale etched on it. It may also include vernier markings for even finer readings in some micrometers.
- Lock Nut / Lock-Ring / Thimble Lock (Blue): A knurled part or lever that can be tightened to fix the spindle's position, allowing a measurement to be held temporarily.
- Screw (Not Seen): The core component of the micrometer, located inside the barrel, responsible for the precise movement of the spindle.
- Spindle (Dark Green): A shiny cylindrical part that is moved towards the anvil by rotating the thimble, making contact with the object being measured.
- Thimble (Green): The rotating part, usually with graduated markings on its beveled edge, which is turned to move the spindle.
- Ratchet (Teal): A mechanism at the end of the handle that limits the applied pressure by slipping at a calibrated torque, ensuring consistent and accurate measurements by preventing over-tightening.
- How is a measurement obtained using a traditional micrometer screw gauge? Obtaining a micrometer reading involves two main parts:
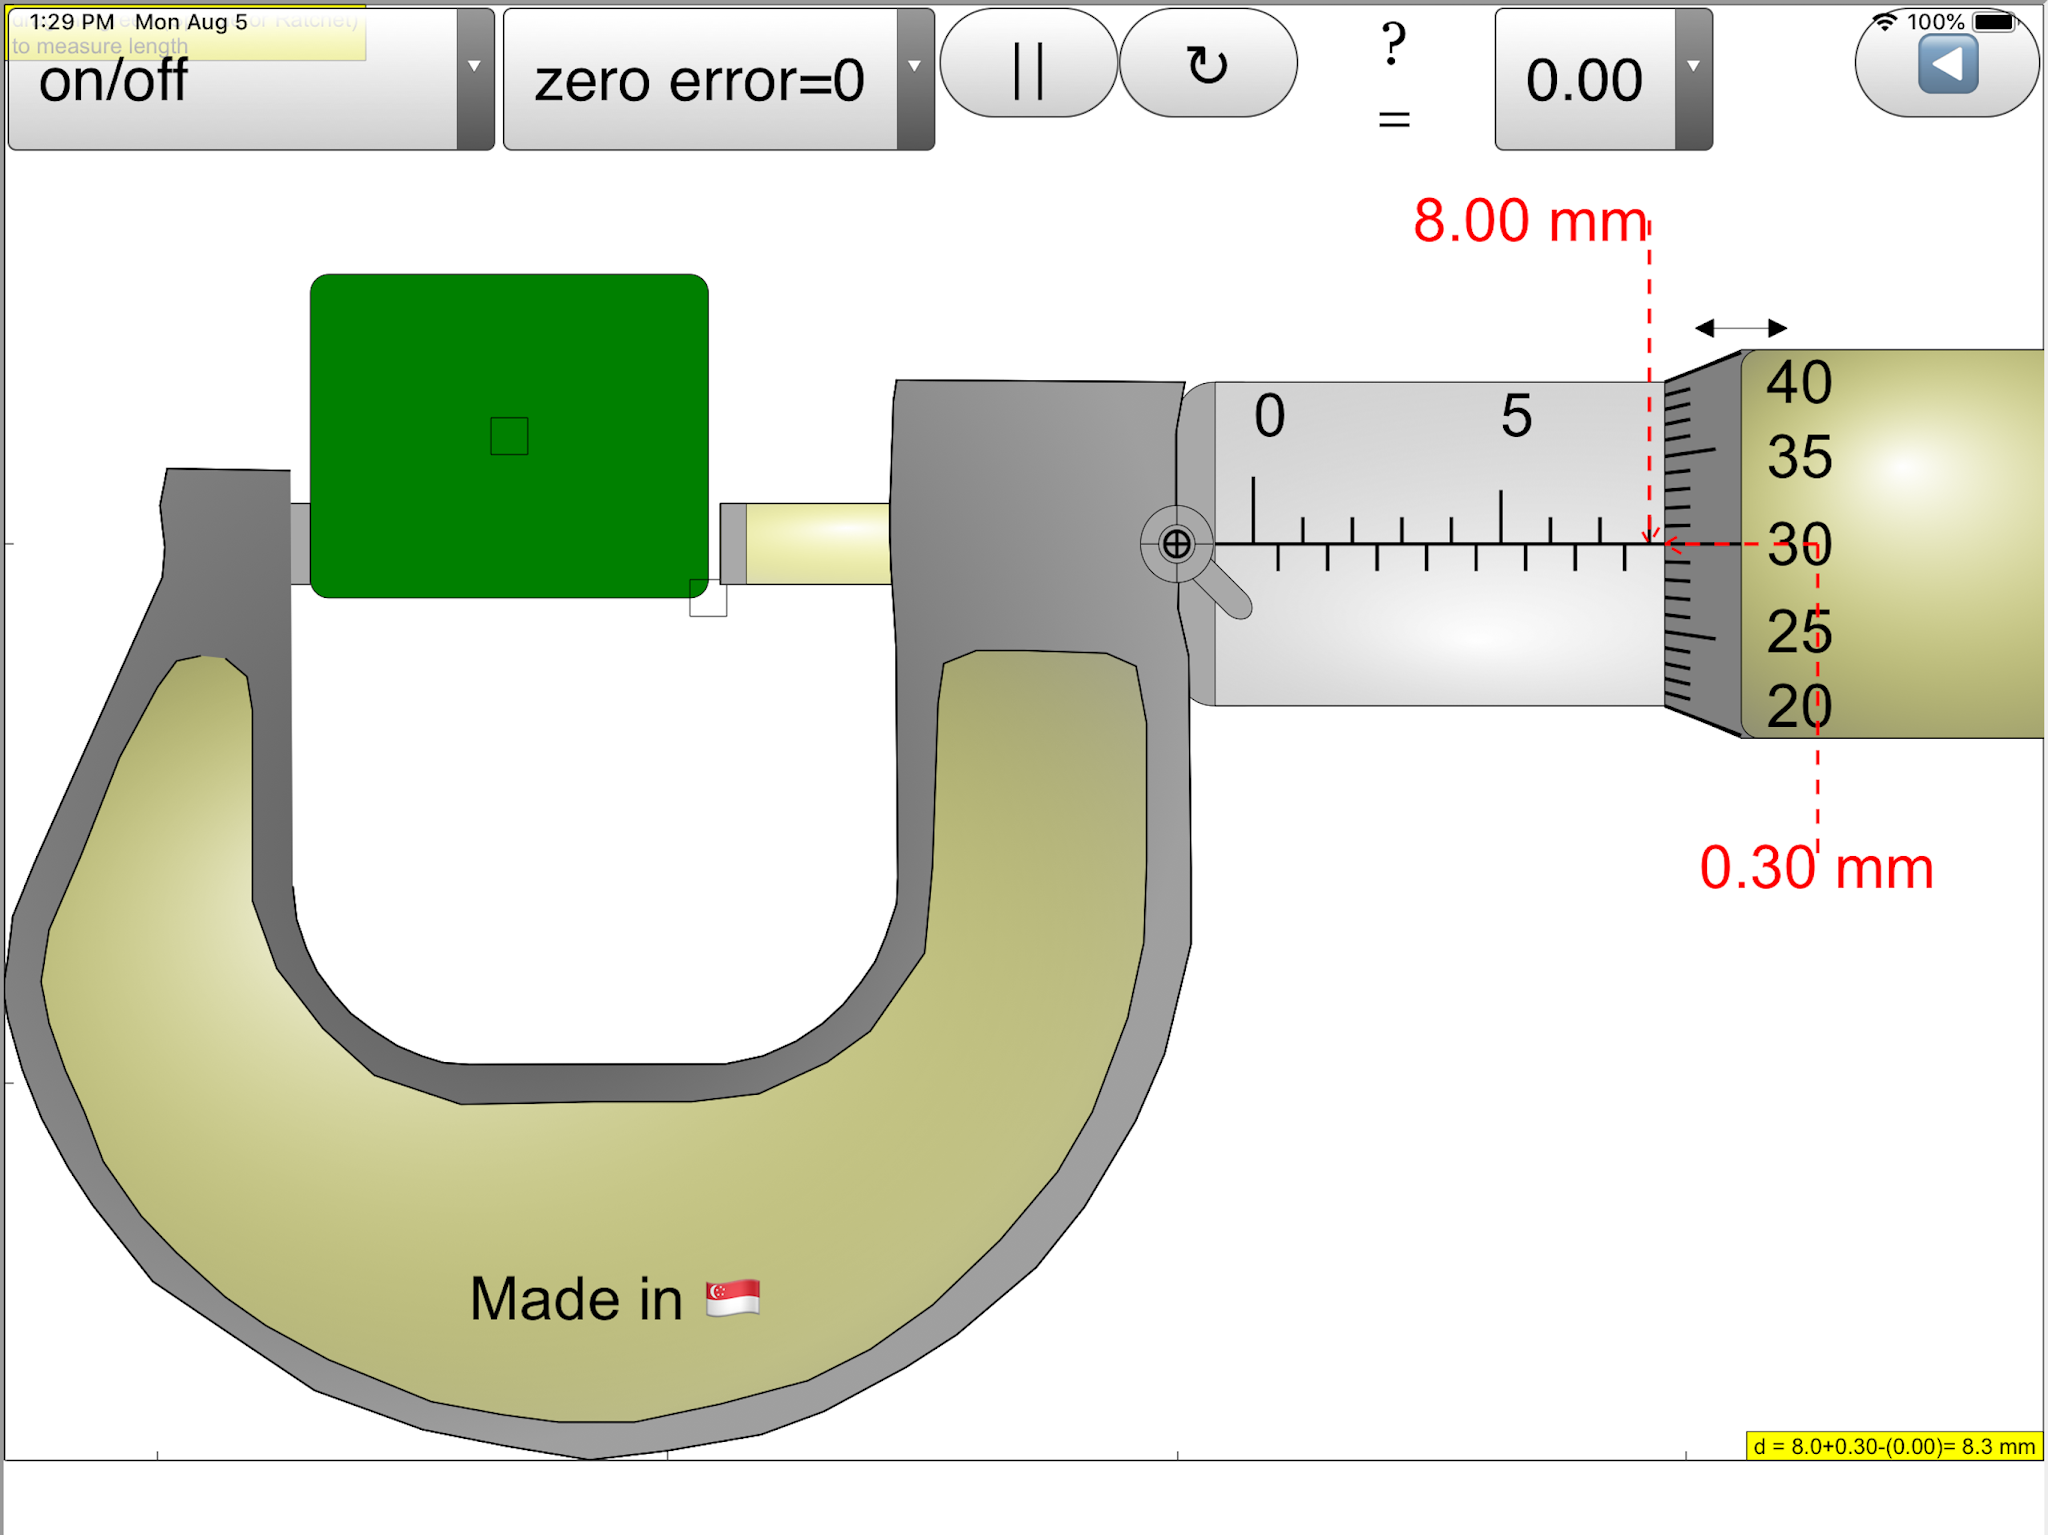
- Reading the Main Scale on the Sleeve: Observe the linear scale on the stationary sleeve. Note the largest whole millimeter marking visible to the left of the thimble. Also, check for the presence of an additional 0.5 mm marking below the datum line if the thimble has moved past it. Sum these values to get the first part of the measurement.
- Reading the Vernier Scale on the Thimble: Look at the circular scale on the rotating thimble. Find the graduation on the thimble that precisely aligns with the datum line on the sleeve. Multiply this thimble reading by the least count of the micrometer (typically 0.01 mm) to get the second part of the measurement.
- Final Measurement: Add the reading from the main scale (part 1) and the reading from the thimble scale (part 2) to obtain the total measurement.
- What is "zero error" in a micrometer and how is it accounted for? Zero error occurs when the micrometer's spindle and anvil are brought into contact (without any object being measured), and the zero line on the thimble does not coincide exactly with the zero line (datum line) on the sleeve.
- Positive Zero Error: If the zero line on the thimble is below the datum line on the sleeve when the jaws are closed, the micrometer reads a positive value. This excess reading needs to be subtracted from any actual measurement taken with the instrument.
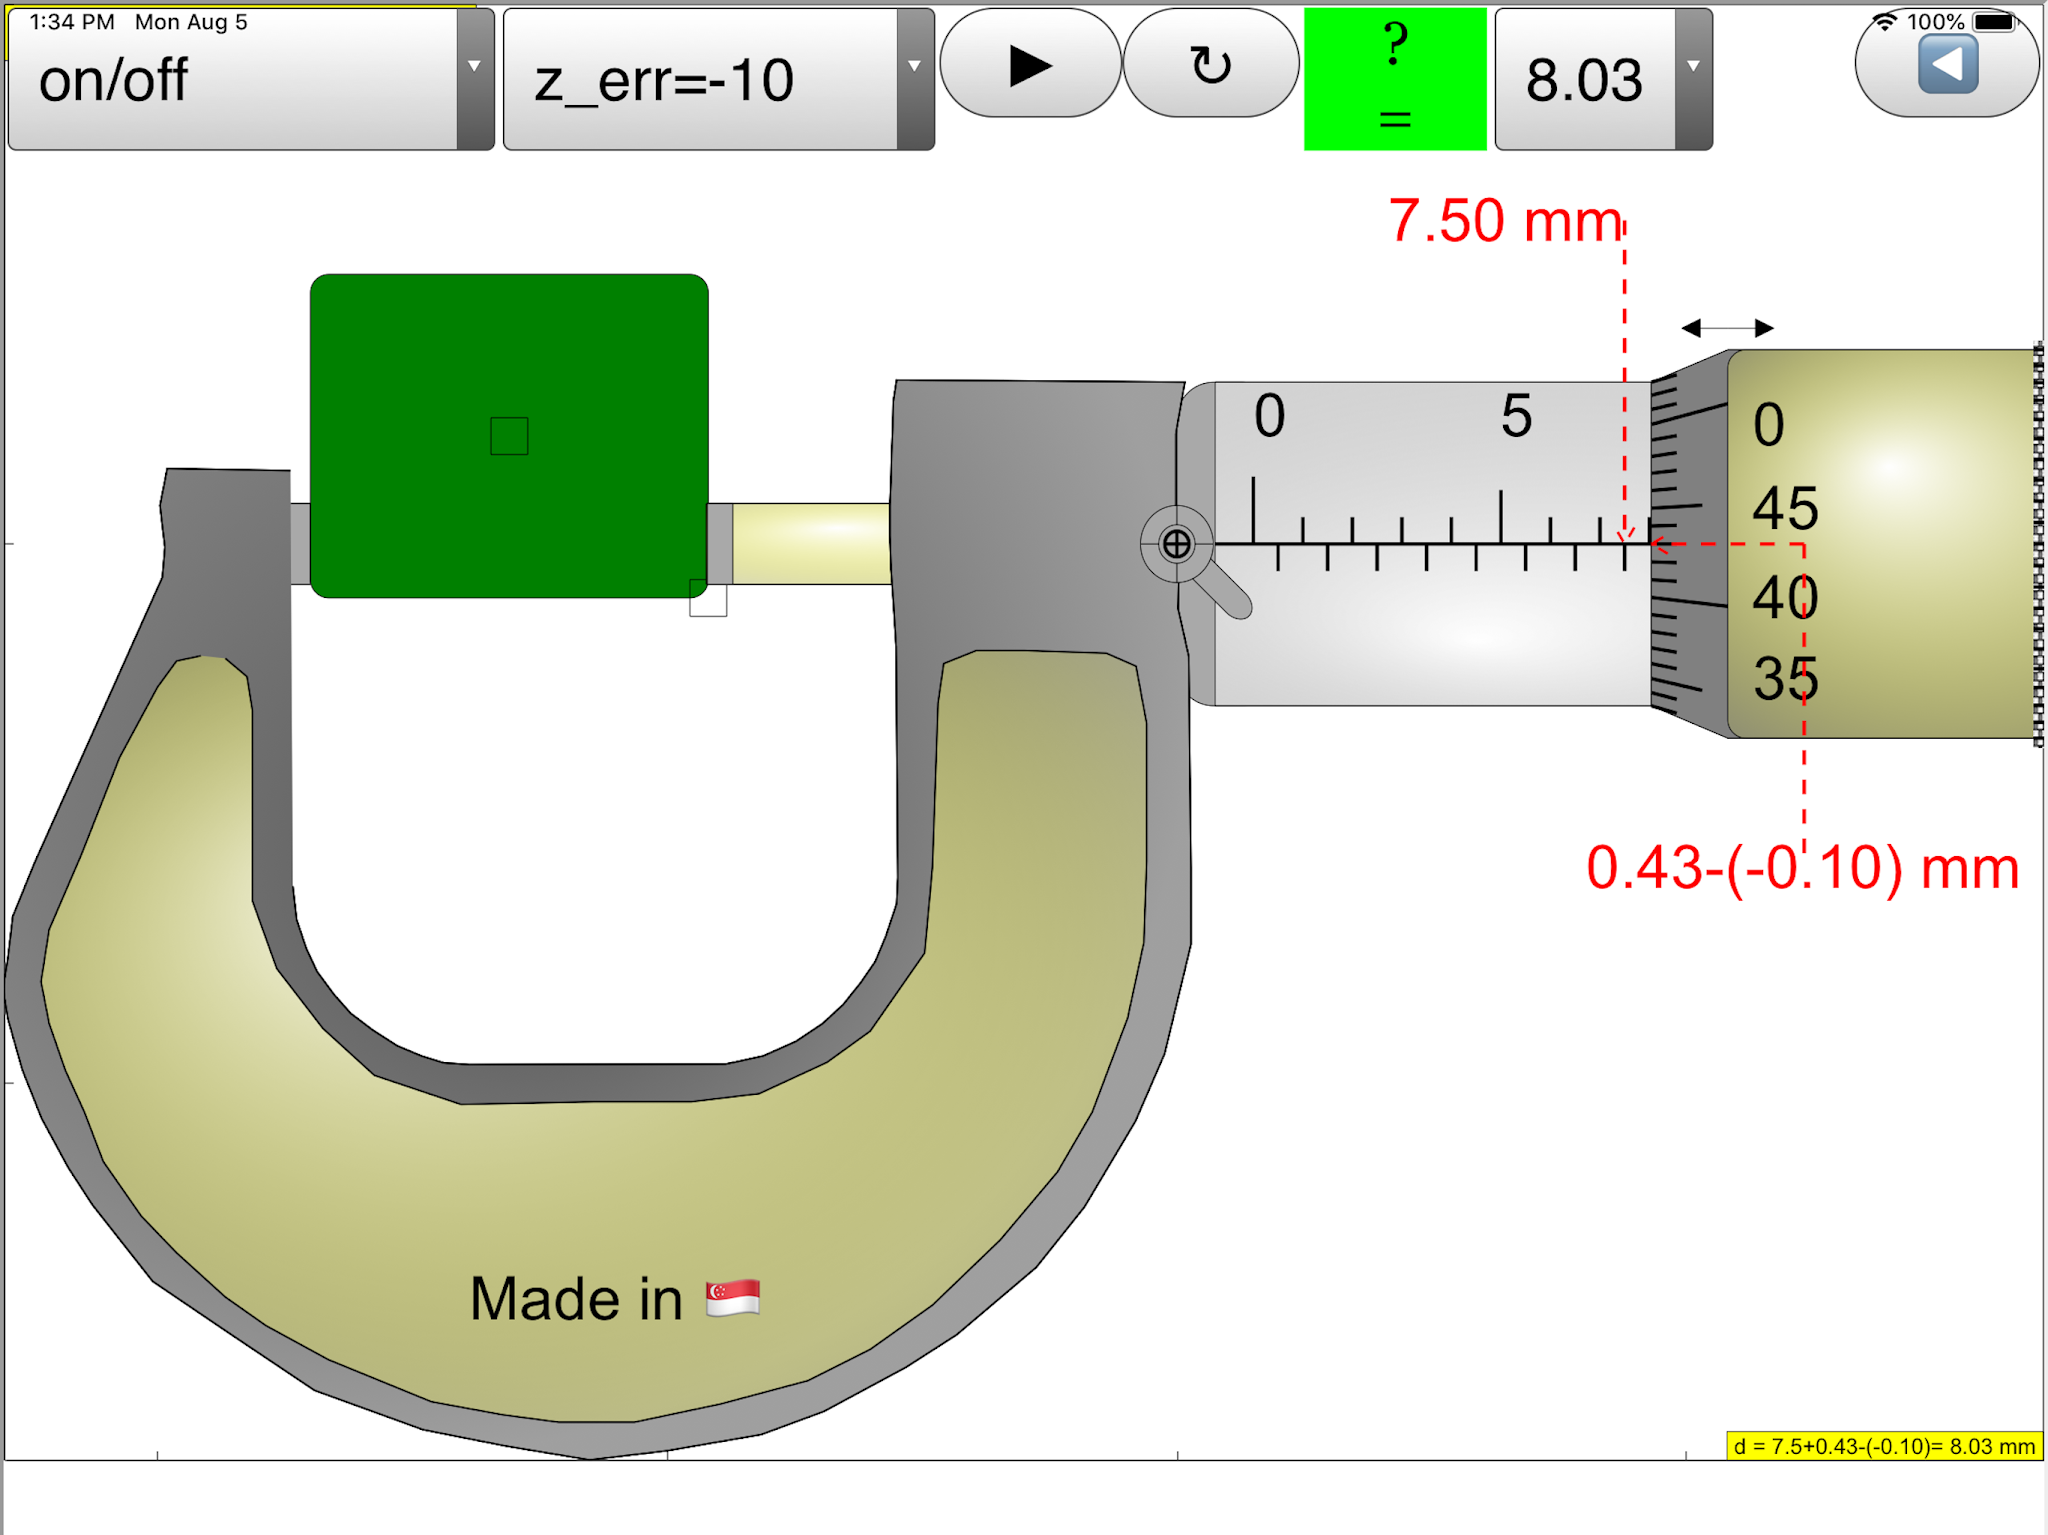
- Negative Zero Error: If the zero line on the thimble is above the datum line on the sleeve when the jaws are closed, the micrometer reads a negative value (or doesn't reach zero). This deficit needs to be added to any actual measurement taken. The simulation model provides a control to introduce and explore the effects of positive and negative zero errors (up to ±0.15 mm). To obtain the correct measurement, the zero error must be subtracted algebraically from the observed reading.
- How does the provided JavaScript HTML5 applet simulation model of a micrometer work and what features does it offer for learning? The interactive simulation model replicates the functionality of a real micrometer. Users can manipulate the spindle's position using a green slider at the bottom or by dragging any part of the view. The model also includes:
- Object Manipulation: Sliders on the left allow control over the simulated object's size and position between the anvil and spindle.
- Zero Error Control: A slider on the left bottom enables the introduction of positive or negative zero error to understand its impact on measurements.
- Hints and Answers: Checkboxes allow users to toggle guide lines and arrows to understand the reading process and to reveal the correct measurement for self-assessment.
- Lock Function: A checkbox simulates the lock nut, allowing users to freeze the spindle position and the displayed measurement.
- Fine Control Buttons: Left and right buttons provide single incremental changes to the spindle position, simulating the fine rotation and feel of a real micrometer.
- Reset Button: Restores the simulation to its default settings.
- Measurement Display: Shows the simulated measurement, allowing learners to check their readings.
- Toggle Between Input Methods: A button allows switching between combo box (quick answers) and input field (keyboard entry) for testing understanding.
- What are the pedagogical benefits of using a micrometer simulation model in education? Using a simulation model offers several pedagogical advantages:
- Visual and Interactive Learning: Students can visually observe how the rotation of the thimble translates to linear movement of the spindle, making the underlying principle more concrete.
- Hands-on Exploration: The interactive nature allows students to "use" the micrometer and take measurements without the need for a physical instrument, making learning accessible anytime and anywhere.
- Error Analysis: The ability to introduce zero error allows students to understand its concept and practice correcting for it.
- Guided Learning: Hints and immediate feedback on answers help students learn at their own pace and identify areas where they need more understanding.
- Simulation of Difficult Aspects: The model can simulate the fine adjustments and the use of the ratchet, which can be challenging for beginners to grasp with a real micrometer.
- Accessibility and Cost-Effectiveness: Simulations eliminate the need for physical micrometers, reducing costs and increasing accessibility for all students.
- How does the micrometer utilize the concept of amplification for precise measurement? The micrometer amplifies small distances through the principle of a screw with a fine pitch. The screw's lead (the distance it advances axially per rotation) is very small. This small linear movement is directly linked to a much larger circumferential rotation of the thimble. The graduated markings on the thimble are spread over this larger circumference, making it possible to read very small fractions of a millimeter with greater precision than could be achieved by directly observing the linear movement. For example, if the screw has a lead of 0.5 mm (advancing 0.5 mm for one full turn) and the thimble has 50 divisions, each division on the thimble corresponds to a linear movement of 0.5 mm / 50 = 0.01 mm, thus providing a high degree of measurement resolution.
- Where can I find and access the micrometer simulation model and related resources? The main access point for the manual version of the JavaScript HTML5 applet simulation model is provided as an embedded iframe link: https://iwant2study.org/lookangejss/01_measurement/ejss_model_Micrometer02manualversion/Micrometer02manualversion_Simulation.xhtml. The source also lists several related resources, including:
- Blog posts: Detailing the development and features of different versions of the micrometer model (both JavaScript and Java).
- Direct download links: For Java applet versions of the simulation.
- App store links: For mobile applications simulating a micrometer.
- Worksheets: For practical exercises related to micrometer measurements.
- Video tutorials: Demonstrating the use of real and simulated micrometers.
- Links to research papers: Discussing the pedagogical design of these simulation tools. These resources can be found within the provided text, particularly under the "Embed," "Version," "Apps," "Video," "Worksheet," and "Research" sections.
- Details
- Written by Loo Kang Wee
- Parent Category: 01 Foundations of Physics
- Category: 01 Measurements
- Hits: 17572