Note that I did most of the uploading and extracting of source files through command line, but if you have SFTP access or can access through your cPanel’s file manager, you can also just download the source files and use the user interface to upload them to your server. I will include a script that runs all these from the command line.
My server is running Ubuntu 20.04 64-bit (Focal Fossa). Some of the commands here may be slightly different if your server is running on a different OS.
How to Login to SSH with Key Pair
Your web host should have instructions on how to set up a key pair. You have to enter the public key in the server configuration (usually on your cPanel or dashboard) and have your private key ready in your computer. Don’t share the private key to anyone or upload it to the server. If this is the first time setting up your server, you may see that the server refused the private key:

This is because the public key must be added to a file called authorized_keys in the .sshdirectory. You probably have to create the directory and the file.
Log in with your server password. The password is intentionally hidden so you won’t see anything appearing when you type.
Then execute these commands to create the directory and the file:
mkdir .ssh
nano authorized_keys
If your server does not have nano text editor you can either install it or use whichever editor they already have installed.
Right click to paste the public key into the text editor. It should look something like this:
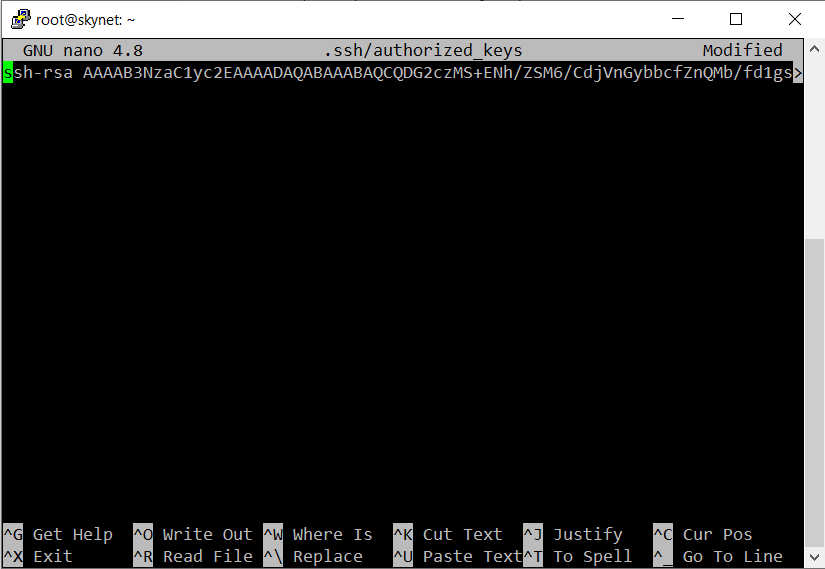
If you are on nano do Ctrl+X to exit, type y to confirm, hit enter to save file and you’re back to the command input.
To verify it is working type exitand restart the ssh connection.

You have to use the private key file saved in your computer to connect (steps vary based on your ssh client)
If you have done it right it should recognise the private key and prompt you for the passphrase (if you entered one).

Installing Nodejs with GCC Method 1 (Linux package manager)
If your server is running Linux you can probably use the package manager to install node and npm with a few commands (simplest method). Following nodejs instructions (https://nodejs.org/en/download/package-manager/):
curl -fsSL https://deb.nodesource.com/setup_16.x \| sudo -E bash -
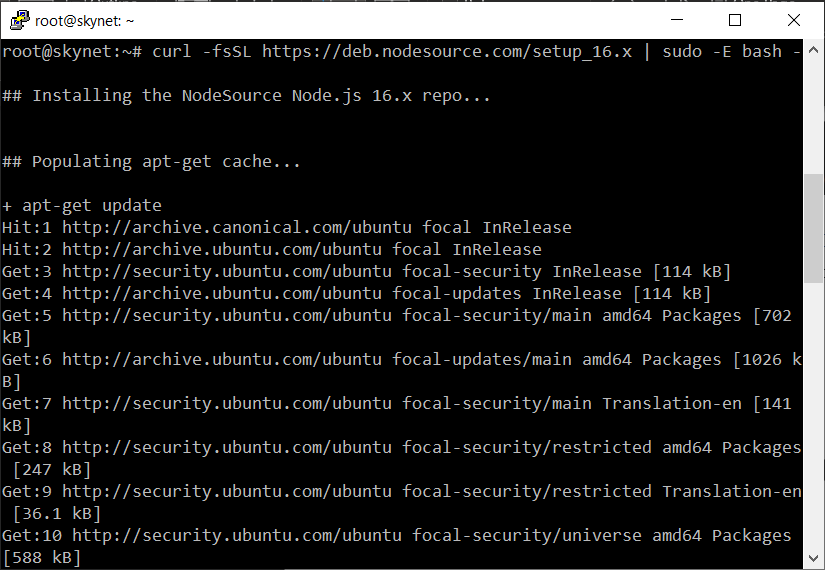
The server may prompt you to run sudo apt-get install -y nodejs and sudo apt-get
install gcc g++ make
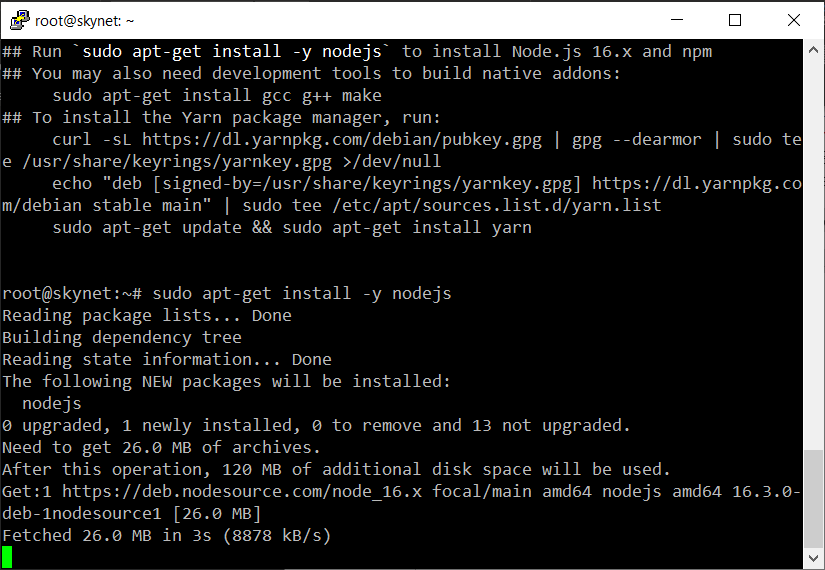
Verify that npm, node and gccare installed with npm -v, node -vand gcc -v. They should output the respective version numbers.

Installing Nodejs Method 2 (via nvm)
You can also install nodejs via node version manager (nvm) instead, perhaps if the above method didn’t work. I ran this on another server with more limited shell access.
wget -qO- https://raw.githubusercontent.com/nvm-sh/nvm/v0.38.0/install.sh
\| bash
or
curl -o- https://raw.githubusercontent.com/nvm-sh/nvm/v0.38.0/install.sh \|
bash
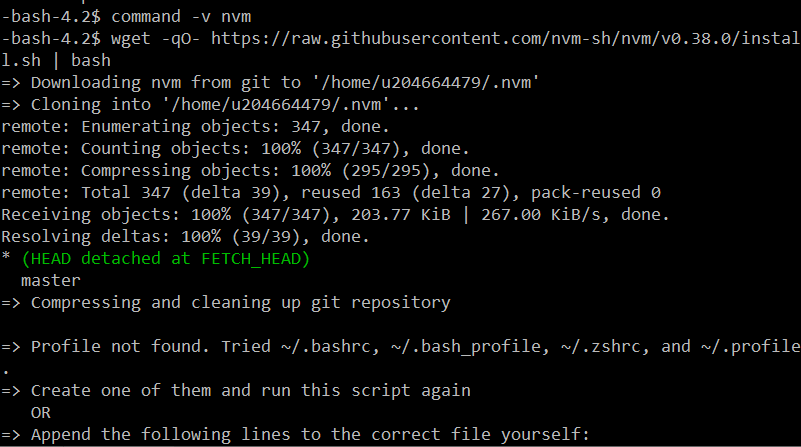
If you get the above warning just copy and paste the commands provided by the terminal and continue, for me it was
export NVM_DIR="\\(HOME/.nvm"
[ -s "\\)NVM_DIR/nvm.sh" ] && \\. "\\(NVM_DIR/nvm.sh" \# This loads nvm
You will have to do this every time you log in to ssh unless it’s added to the .bash_profile file in root (more on that later on).
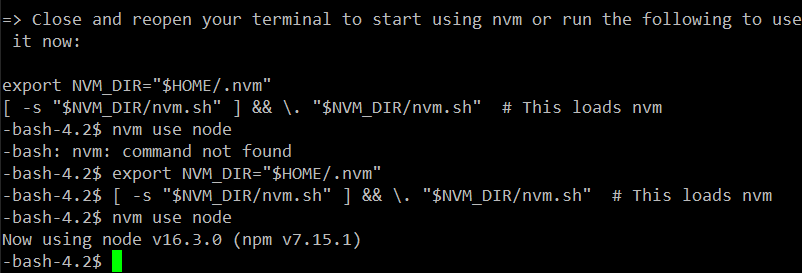
Verify that nvm is installed with the command nvm –version. The version number should show up if successfully installed.

Then install node with nvm install node, wait a while for it to complete.


Once completed, type nvm use node

Test if node is running with command node

You can try console.logand it should output what you wrote

To exit node, use Ctrl+D
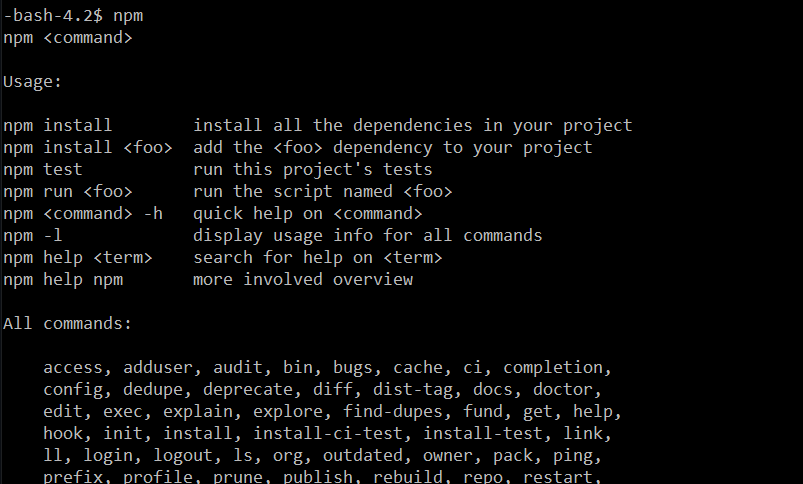
You can also test if npm is installed and working with command npm
Installing Nodejs Method 3 (manual install)
If the other methods fail you can try to manual install, but this requires more configuration options depending on your server.
You can get the current download link from the nodejs website as shown in the screenshot below. No need to install it locally, just copy the link to the source files. Direct download link for current version as of this writing: https://nodejs.org/dist/v14.17.0/node-v14.17.0.tar.gz
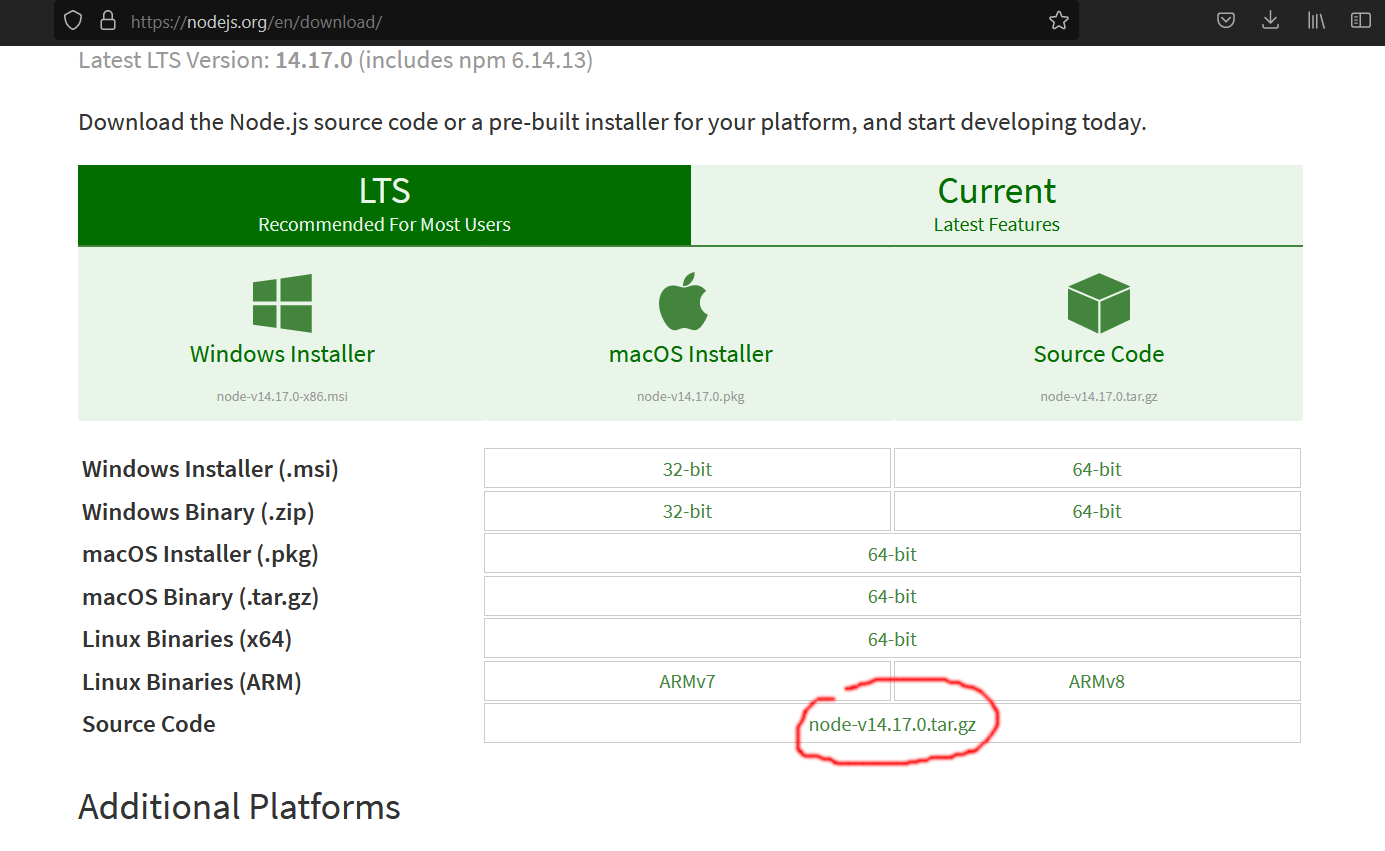
Switch back to terminal. Type cd \~ to change directory to root
Type wget <your source file link> to download the source code to root. You can right click to paste.
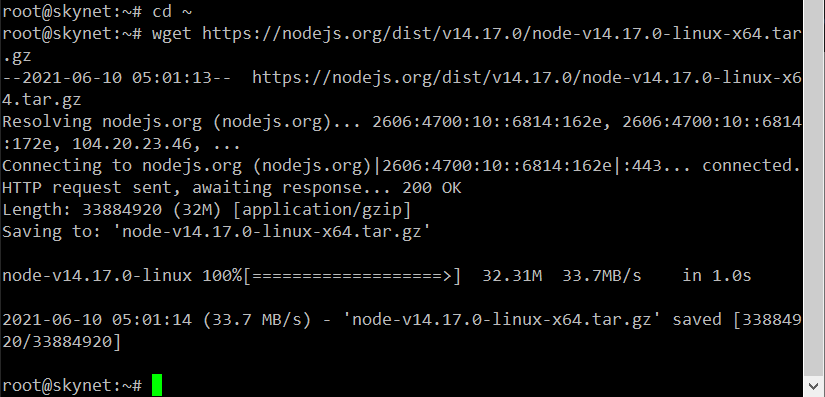
Type tar xvf <your file name> to unzip, this may take a while depending on your server.
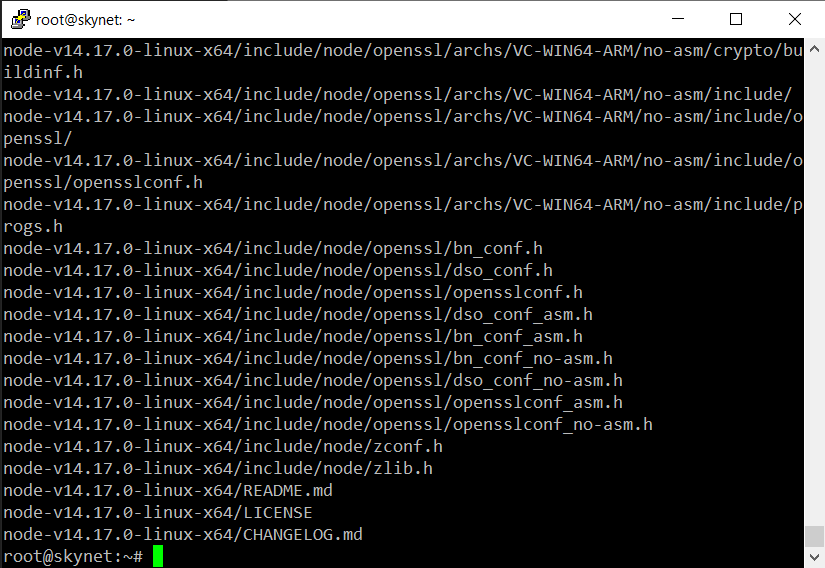
You can rename the directory so it’s easier to remember, execute mv <directory
name> <new name>, in this screenshot I’ve renamed my directory from node-v14.17.0-linux-x64to nodejs

Next, install the node and npm binaries so you can run commands on the server
mkdir ~/bin
cp nodejs/bin/node ~/bin
cd ~/bin
ln -s ../nodejs/lib/node_modules/npm/bin/npm-cli.js npm
These commands mean create a new directory bin in root, copy nodejs binaries over to it, change directory to bin and lastly create a link to the npm binary so that you can execute commands with the shortcut npm.

There may be additional config required that I’m not very familiar with.
Installing GCC (skip if already installed)
If you used the Linux package manager for nodejs and already installed gcc you can skip this. Or your web server may already have a C compiler by default. If gcc -v or cc-vreturns some output with the gcc version number, then you already have it installed.
This is required by GraphicsMagick. You can use any C compiler (gcc, cc, etc) that can run on your web server. I went with gcc.
You can do this from the command line or user interface on file manager/any SFTP client. I ran into problems unzipping the file in command line on the limited server, so I did it in file manager instead.
There are plenty of mirror sites you can download gcc from (list here: http://www.gnu.org/prep/ftp.html). I used this link (direct download): http://mirror.team-cymru.com/gnu/gcc/gcc-11.1.0/gcc-11.1.0.tar.gz
You do not actually need to download it to your local computer. Just type wget
<direct download url>in ssh to download it to your server, e.g.:
wget http://mirror.team-cymru.com/gnu/gcc/gcc-11.1.0/gcc-11.1.0.tar.gz
Command to unzip the file: tar xzf gcc-11.1.0.tar.gz or via your file manager UI
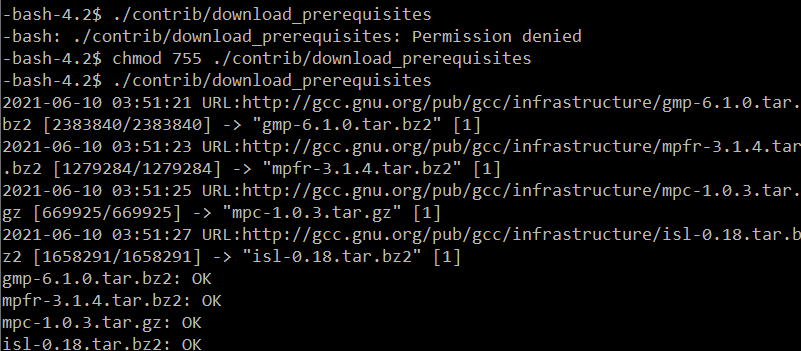

You can also install gcc with npm install gcc, but it’s not recommended since the gcc version served by that command is likely outdated and the compiler didn’t work for GraphicsMagick. In any case I’ve screenshotted the process here in case you want to try.

Installing GraphicsMagick
Type wget
ftp://ftp.graphicsmagick.org/pub/GraphicsMagick/1.3/GraphicsMagick-1.3.19.tar.gz
Executive Summary:
This document provides a detailed, step-by-step guide for installing the Spacedeck application on a Linux server. The guide assumes a user with some command-line familiarity and focuses on setting up the necessary environment, including SSH access with key pairs, installing Node.js (via package manager, nvm, or manual download), installing GCC (if needed for GraphicsMagick), installing GraphicsMagick, downloading and configuring Spacedeck, and finally launching the application. The document also includes troubleshooting tips and information on editing the .bash_profile for persistent environment configurations. It's important to note that the guide acknowledges a current backend error preventing the Spacedeck installation from fully functioning.
Main Themes and Important Ideas/Facts:
- Prerequisites for Spacedeck Installation:
- A Linux server (specifically mentioning Ubuntu 20.04 64-bit).
- SSH access to the server.
- Installation of Node.js and npm (Node Package Manager).
- Installation of GCC (GNU Compiler Collection), which is required by GraphicsMagick.
- Installation of GraphicsMagick, an image processing toolkit.
- SSH Key Pair Authentication:
- The guide emphasizes the importance of secure SSH access using key pairs (public and private keys).
- It details the process of adding the public key to the authorized_keys file within the .ssh directory on the server.
- Quote: "Don’t share the private key to anyone or upload it to the server."
- It provides command-line instructions for creating the .ssh directory and the authorized_keys file using mkdir .ssh and nano authorized_keys.
- Installing Node.js and npm:
- The document outlines three methods for installing Node.js:
- Method 1 (Linux Package Manager): Using curl to add the NodeSource repository and then using sudo apt-get install -y nodejs. It also includes installing gcc, g++, and make.
- Method 2 (via nvm - Node Version Manager): Downloading and running the nvm installation script using wget or curl. It highlights the need to source the nvm.sh script in the .bash_profile for persistent use.
- Method 3 (Manual Install): Downloading the Node.js tarball using wget, extracting it with tar, and then manually creating a bin directory and linking the node and npm binaries.
- The guide includes commands to verify the installation of npm, node, and gcc using -v flags (e.g., npm -v).
- Installing GCC:
- The guide advises skipping GCC installation if it's already present or if Node.js was installed via the package manager.
- It provides instructions for downloading the GCC source using wget and extracting it with tar.
- It explicitly discourages using npm install gcc due to potential issues with outdated versions.
- Quote: "You can also install gcc with npm install gcc, but it’s not recommended since the gcc version served by that command is likely outdated and the compiler didn’t work for GraphicsMagick."
- Installing GraphicsMagick:
- The guide details downloading the GraphicsMagick source using wget, unzipping it with tar, navigating to the directory (cd), running the configuration script (./configure), and then compiling and installing using make and make install.
- It includes troubleshooting for a missing C compiler error, suggesting the use of whereis gcc to find the GCC path and then exporting it to the PATH environment variable.
- Verification is done using gm version.
- Installing and Configuring Spacedeck:
- The guide explains how to download the Spacedeck source from GitHub using wget.
- Unzipping the downloaded file using unzip.
- Navigating to the Spacedeck directory (cd spacedeck-open-mnt) and installing dependencies using npm install.
- Crucially, it details the configuration of the config/default.json file to set default colors for Spacedeck.
- Quote: "Scroll to the bottom and enter the default colours as the value for the key "spacedeck" (at the end of the file): [...]"
- Launching Spacedeck:
- The command to launch Spacedeck is provided: node spacedeck.js.
- It mentions that a successful launch will show specific output.
- Troubleshooting Spacedeck Errors:
- General advice is given for troubleshooting npm install errors by manually installing missing packages.
- A specific issue with sequelize and its resolution through uninstallation and reinstallation (npm uninstall sequelize and npm install sequelize) is mentioned.
- Editing .bash_profile:
- The purpose of .bash_profile for autoloading configurations on SSH login is explained.
- Methods for editing the file (via SFTP, cPanel's File Manager, or command-line editors like nano) are provided.
- The guide suggests adding the nvm loading commands and the GCC path to .bash_profile for persistence.
- Verification of changes to the PATH variable using echo \)PATH is recommended.
- Current Installation Status:
- Critical Information: The guide explicitly states that the current installation of Spacedeck is not working due to a backend problem.
- Quote: "The current installation doesn't work because of a backend problem (unknown error). It has yet to be resolved."
- A frontend error with console output related to login options and a list of interactive resources is also included, suggesting potential issues beyond the backend.
Quotes from Original Source:
- "Note that I did most of the uploading and extracting of source files through command line, but if you have SFTP access or can access through your cPanel’s file manager, you can also just download the source files and use the user interface to upload them to your server."
- "My server is running Ubuntu 20.04 64-bit (Focal Fossa). Some of the commands here may be slightly different if your server is running on a different OS."
- "If your server does not have nano text editor you can either install it or use whichever editor they already have installed."
- "If you used the Linux package manager for nodejs and already installed gcc you can skip this. Or your web server may already have a C compiler by default."
- "If npm install complains about missing packages you can try to install the packages manually with npm install
- ".bash_profile is located in the root directory ~/ and is like a configuration file that runs whenever you log in to SSH. If you don’t add nodejs in .bash_profile, you will have to manually enter the command to start it every time."
Conclusion:
This document serves as a comprehensive technical guide for attempting to install Spacedeck on an Ubuntu 20.04 server. It meticulously covers the necessary steps from setting up secure SSH access to installing various dependencies and configuring the Spacedeck application. However, the document also contains a crucial disclaimer that the current installation is facing a backend error, indicating that following these steps might not result in a fully functional Spacedeck instance at this time. The inclusion of troubleshooting steps and guidance on environment configuration provides valuable information for server administration and potential future resolution of the identified issues.
Spacedeck Installation Study Guide
Quiz
Answer the following questions in 2-3 sentences each.
- What are two ways mentioned in the text to upload and extract Spacedeck source files to your server?
- Why might a server refuse an SSH connection using a key pair for the first time, and what is the solution?
- Briefly describe the purpose of the mkdir .ssh and nano authorized_keys commands.
- What are the prerequisites that should be installed on a Linux server when using the package manager method to install Node.js?
- Explain the primary difference between installing Node.js with the Linux package manager and installing it via nvm.
- After installing nvm, what are the subsequent commands needed to install and use a stable version of Node.js?
- What is the purpose of the wget command used in the manual installation of Node.js, and where are the files typically downloaded to?
- Why is GCC mentioned in the context of installing Node.js and GraphicsMagick, and how can you check if it is already installed on your server?
- After downloading and unzipping the GraphicsMagick archive, what are the three core commands used to configure and install it?
- What is the purpose of editing the config/default.json file after downloading the Spacedeck source code, and what specific modification is described?
Quiz Answer Key
- The text mentions using the command line for uploading and extracting source files. Alternatively, users with SFTP access or access through their cPanel's file manager can download the source files locally and then use the user interface to upload them to the server.
- A server might refuse an SSH connection with a key pair initially because the public key has not yet been added to the authorized_keys file within the .ssh directory on the server. The solution is to log in with the server password, create the .ssh directory and the authorized_keys file (if they don't exist), and then paste the public key into the authorized_keys file.
- The command mkdir .ssh is used to create a new directory named .ssh in the user's home directory on the server. The command nano authorized_keys is used to open a text editor (nano) to create or edit a file named authorized_keys inside the newly created .ssh directory, where the public SSH keys are stored.
- When using the Linux package manager method, the prerequisites that should be installed are Node.js, npm (Node Package Manager), and GCC (GNU Compiler Collection) along with g++ and make, as these might be prompted for installation by the setup script.
- Installing Node.js with the Linux package manager is generally simpler and uses the operating system's built-in package management system. Installing via nvm (Node Version Manager) provides more flexibility in managing and switching between different versions of Node.js, which can be useful if the package manager method fails or specific Node.js versions are required.
- After installing nvm, the command nvm install node is used to download and install the latest stable version of Node.js. Once the installation is complete, the command nvm use node is used to activate and use that installed version in the current SSH session.
- The wget command is used to download files from the internet directly to the server. In the manual installation of Node.js, it is used to download the compressed source code archive (.tar.gz file) from the Node.js website, and by default, the file is downloaded to the current working directory, which is typically the root directory (~) after logging in.
- GCC (GNU Compiler Collection) is a C compiler required by GraphicsMagick, which is a dependency for Spacedeck. You can check if GCC is installed by running the command gcc -v or cc -v in the terminal. If GCC is installed, these commands will output the GCC version number.
- After downloading and unzipping the GraphicsMagick archive, the three core commands used to configure and install it are ./configure (to prepare the build environment), make (to compile the software), and make install (to install the compiled software to the system).
- The purpose of editing the config/default.json file is to configure the Spacedeck application with specific settings. The text describes modifying the "spacedeck" key at the end of the file by entering a set of default colors as the value, which likely influences the visual appearance of the Spacedeck interface.
Essay Format Questions
- Discuss the advantages and disadvantages of the three different methods described for installing Node.js on a server. In what scenarios might one method be preferred over the others?
- Explain the role of SSH key pairs in securing server access. Describe the process of setting up SSH access with a key pair as outlined in the text, emphasizing the security considerations involved.
- Outline the steps involved in installing GraphicsMagick, highlighting why it is necessary for Spacedeck and the potential challenges one might encounter during the installation process.
- Describe the process of installing Spacedeck after its dependencies have been set up. What configuration steps are mentioned as being crucial for the application to function correctly?
- The text mentions troubleshooting Spacedeck errors and editing the .bash_profile. Discuss the importance of these steps in the overall installation and maintenance of the Spacedeck application, and what general approaches can be taken to resolve common issues.
Glossary of Key Terms
- SSH (Secure Shell): A cryptographic network protocol for operating network services securely over an unsecured network. It is commonly used for remote command-line access to servers.
- Key Pair: A set of two related cryptographic keys: a public key and a private key. The public key can be shared freely and is placed on the server, while the private key is kept secret by the user and is used to authenticate the connection.
- .ssh directory: A hidden directory in a user's home directory on Unix-like operating systems that contains SSH-related configuration files and keys, including the authorized_keys file.
- authorized_keys file: A file within the .ssh directory on a server that lists the public SSH keys that are authorized to log in to the user account without a password (when using key-based authentication).
- Linux package manager: A software tool that automates the process of installing, upgrading, configuring, and removing software packages on Linux operating systems (e.g., apt on Ubuntu, yum on CentOS).
- Node.js: A JavaScript runtime environment that allows developers to run JavaScript code on the server-side.
- npm (Node Package Manager): The default package manager for Node.js. It is used to install and manage dependencies for Node.js projects.
- nvm (Node Version Manager): A version manager for Node.js, allowing users to easily install and switch between multiple active Node.js versions.
- GCC (GNU Compiler Collection): A compiler system produced by the GNU Project supporting various programming languages, including C and C++. It is often required for building software from source code.
- GraphicsMagick: A robust collection of tools and libraries for image processing, supporting a wide variety of image formats.
- wget: A command-line utility for downloading files from the internet.
- tar: A command-line utility used for creating and extracting tar archives (often compressed with gzip, creating .tar.gz files).
- unzip: A command-line utility for extracting files from zip archives (.zip files).
- cd (change directory): A command-line command used to navigate the file system.
- npm install: A command used in Node.js projects to install the dependencies listed in the package.json file.
- config/default.json: A common configuration file format (JSON) used by Node.js applications to store default settings and parameters.
- .bash_profile: A configuration file for the Bash shell that is executed when a user logs into the system via SSH. It is often used to set environment variables and run initialization commands.
- SFTP (Secure File Transfer Protocol): A secure protocol for transferring files over an SSH connection.
- cPanel: A popular web hosting control panel that provides a graphical interface for managing various aspects of a web hosting account, including file management
Unzip the archive with tar -xvf GraphicsMagick-1.3.19.tar.gz

Enter the GraphicsMagick directory: cd GraphicsMagick-1.3.19. Type ./configure.

If you get a missing C compiler error, find where your GCC is installed with whereis gcc, then enter export PATH=\(PATH:<your path to gcc>

Wait for the config to finish, then type the following commands:
make
make install
Verify GraphicsMagick was successfully installed with gm version.

Installing Spacedeck
Download the Spacedeck source from Github to your server:
wget https://github.com/spacedeck/spacedeck-open/archive/refs/heads/mnt.zip
Unzip the archive:
unzip mnt.zip
Change working directory and install dependencies:
cd spacedeck-open-mntnpm install

Open up the config file.
nano config/default.json
You should see a file like this in the editor.
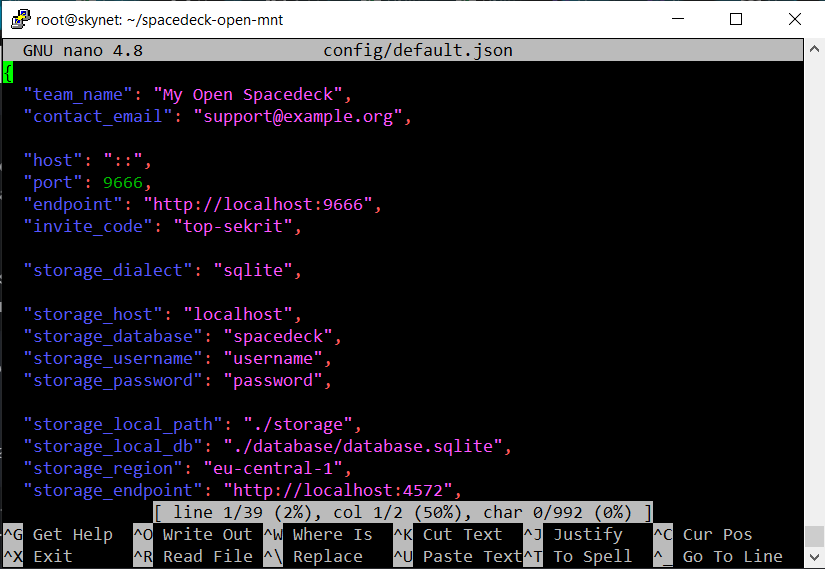
Scroll to the bottom and enter the default colours as the value for the key "spacedeck" (at the end of the file):
"spacedeck": { "default_text_color": "#E11F26", "default_stroke_color": "#9E0F13", "default_fill_color": "#64BCCA", "swatches": [ {"id":8, "hex":"#000000"}, {"id":30, "hex":"rgba(0,0,0,0)"}, {"id":31, "hex": "#E11F26"}, {"id":32, "hex": "#9E0F13"}, {"id":33, "hex": "#64BCCA"}, {"id":34, "hex": "#40808A"}, {"id":35, "hex": "#036492"}, {"id":36, "hex": "#005179"}, {"id":37, "hex": "#84427E"}, {"id":38, "hex": "#6C3468"}, {"id":39, "hex": "#F79B84"}, {"id":40, "hex": "#B57362"}, {"id":41, "hex": "#E7D45A"}, {"id":42, "hex": "#ACA044"} ]}
Save and exit.
Launching Spacedeck
You should be ready to launch Spacedeck now.
node spacedeck.js
If all goes well you will see some output like the following:
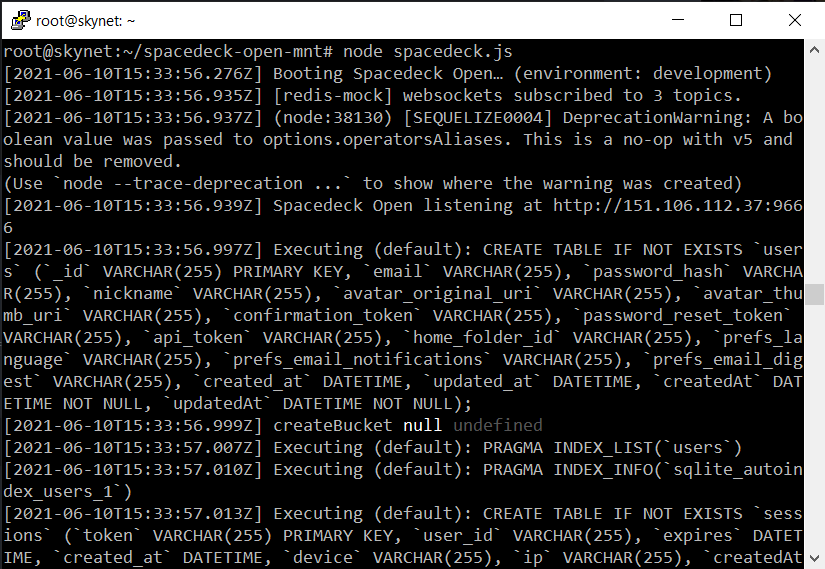
Troubleshooting Spacedeck Errors
You may run into errors when starting Spacedeck and I can't provide a detailed guide on how to resolve them as it really depends on your specific environment.
If npm install complains about missing packages you can try to install the packages manually with npm install <package name>.
The issue I had was that sequelize couldn't open the database file.
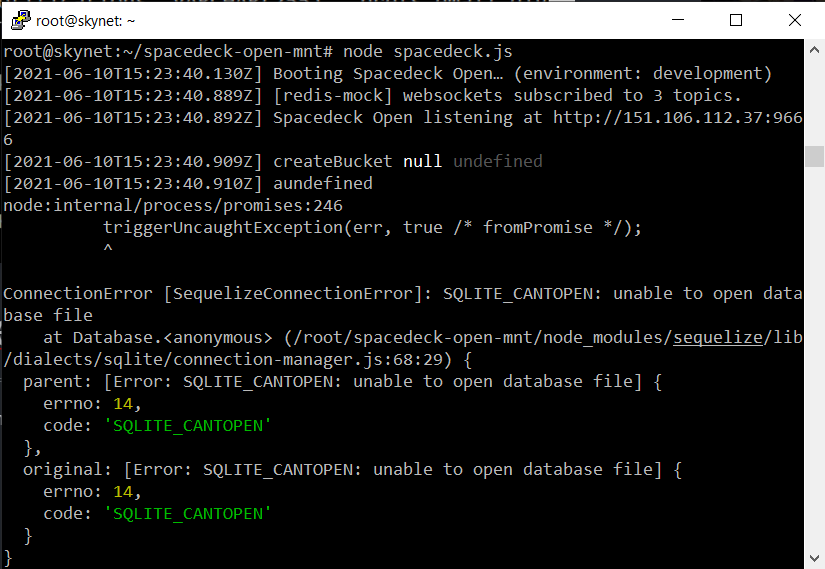
I resolved it by uninstalling and reinstalling sequelize:
npm uninstall sequelizenpm install sequelize
Editing .bash_profile (autoloaded whenever you log in to SSH)
.bash_profile is located in the root directory ~/ and is like a configuration file that runs whenever you log in to SSH. If you don’t add nodejs in .bash_profile, you will have to manually enter the command to start it every time.
To edit .bash_profile you can open it from your root file directory (you need to use sftp protocol to access the root folder, ftp account won’t work since it is usually only restricted to viewing public_html directory and lower). You can also go to your cPanel and enter File Manager from there. You can find .bash_profile in the root directory.
Alternatively, you can use the built-in text editor in the command line (may vary by web server architecture). Mine is nano:
nano .bash_profile

The file may be empty. Just add in the text that the output told you to (if any). I also added GCC to my path in the .bash_profile (necessary for GraphicsMagick to detect the compiler).
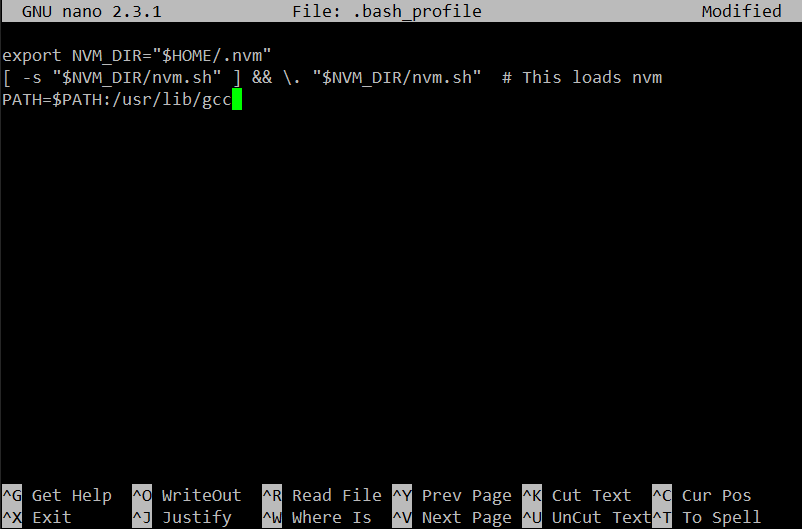
Save and exit after modifying the file. You may need to restart the SSH session for changes to take effect.
Verify that the changes are added to \)PATH with echo $PATH. You should see your path to gcc at the end of the output.

Current Errors
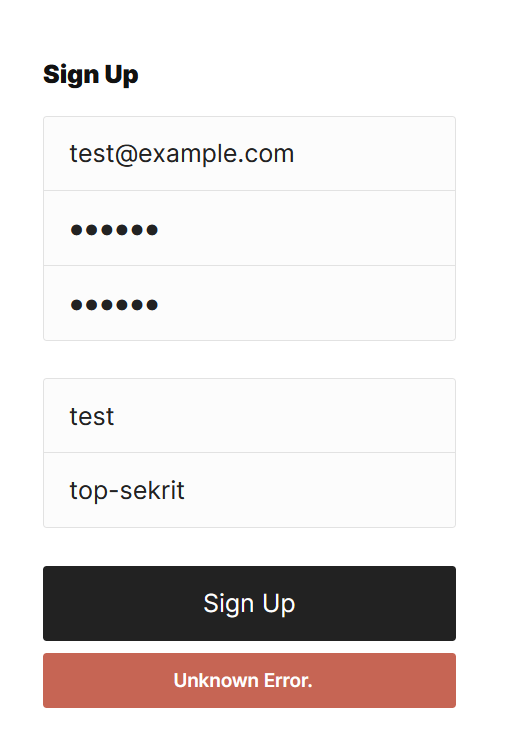
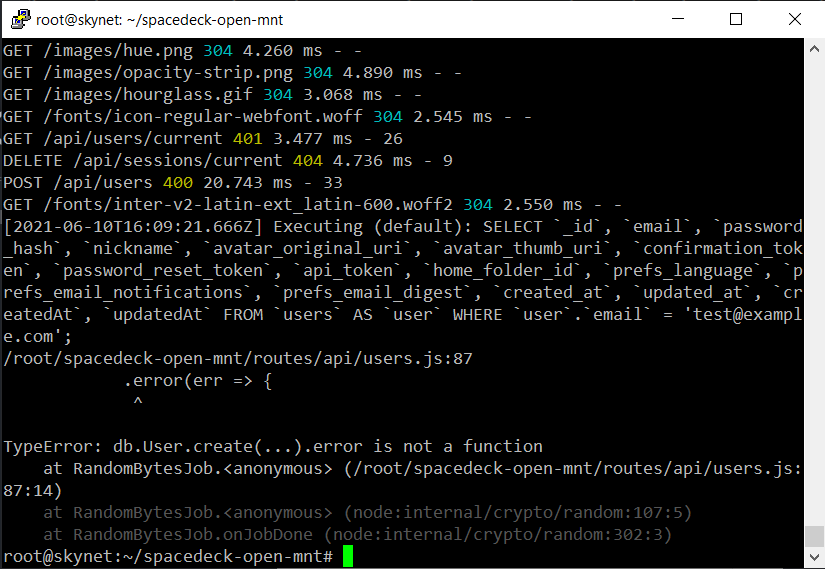
The current installation doesn't work because of a backend problem (unknown error). It has yet to be resolved.
Frontend error:
Frequently Asked Questions about Installing Spacedeck
1. What are the prerequisites for installing Spacedeck on a web server based on this guide? This guide primarily focuses on installing Spacedeck on a Linux server, specifically Ubuntu 20.04. Key prerequisites include command-line access (SSH), and potentially a C compiler (GCC) and package manager (like apt). You will also need the ability to download files via wget and extract them using tar and unzip. Node.js and npm (Node Package Manager) are essential for running Spacedeck.
2. How can I securely log in to my server to begin the installation process? The recommended method for secure login is using an SSH key pair. This involves generating a public and private key. The public key needs to be added to the authorized_keys file within the .ssh directory on your server (you may need to create these directories and the file if they don't exist). The private key remains on your local computer and is used by your SSH client to authenticate. It is crucial not to share or upload your private key to the server.
3. What are the different methods described for installing Node.js, and when might I choose one over the others? The guide outlines three methods for installing Node.js: * Method 1 (Linux package manager): This is the simplest method for Linux-based servers using commands like curl and sudo apt-get. It's preferred if your server has a package manager and you have sufficient privileges. * Method 2 (via nvm - Node Version Manager): This method is useful if the package manager installation fails or if you need more control over Node.js versions. It involves installing nvm first, then using it to install and manage Node.js. This might be necessary on servers with more limited shell access. * Method 3 (manual install): This is the most complex method and is recommended if the other two fail. It involves downloading the Node.js source code, extracting it, and manually creating links to the node and npm binaries. This requires more configuration depending on your server environment.
4. Why is GCC (GNU Compiler Collection) mentioned in the installation process, and how can I install it if needed? GCC is a C compiler that is required by GraphicsMagick, a dependency of Spacedeck. You can check if GCC is already installed by running gcc -v or cc -v in the command line. If not installed, the guide suggests using the Linux package manager (sudo apt-get install gcc g++ make alongside Node.js installation). Alternatively, you can download the GCC source code using wget and then extract it using tar. While npm install gcc exists, it's not recommended as it might provide an outdated version.
5. What is GraphicsMagick, and how is it installed as part of the Spacedeck setup? GraphicsMagick is a robust collection of tools and libraries for image processing. It's a dependency for Spacedeck. The installation process involves downloading the GraphicsMagick source code using wget, extracting it with tar, navigating into the extracted directory using cd, running ./configure to prepare for compilation, and then using make and make install to build and install the software. You might need to specify the path to your GCC installation if the configuration script cannot find it.
6. What are the specific steps to download and configure the Spacedeck source code after the prerequisites are installed? To install Spacedeck itself, you first need to download the source code from its GitHub repository using wget. Then, unzip the downloaded file using unzip. Navigate into the newly created Spacedeck directory using cd and install the necessary Node.js dependencies with npm install. Finally, you need to edit the config/default.json file to configure Spacedeck, specifically by adding default color values under the "spacedeck" key at the end of the file.
7. How is Spacedeck launched after installation, and what should I expect to see if it starts successfully? Once the dependencies are installed and the configuration file is updated, you can launch Spacedeck by running the command node spacedeck.js in the Spacedeck directory. If the launch is successful, you should see output in the terminal indicating that the Spacedeck server has started, although the specific output is not fully detailed in the provided excerpts.
8. What are some potential issues I might encounter during the installation, and what troubleshooting steps are suggested? The guide mentions potential errors during npm install due to missing packages. If this occurs, you can try to install the missing packages individually using npm install <package name>. The author also encountered an issue with Sequelize (a database ORM) failing to open the database file, which was resolved by uninstalling and reinstalling it using npm uninstall sequelize followed by npm install sequelize. The guide also notes a current unresolved backend issue that prevents the installation from fully working. For other errors, the troubleshooting will depend on the specific environment.
Console output:
Frequently Asked Questions about Installing Spacedeck
1. What are the prerequisites for installing Spacedeck on a web server based on this guide? This guide primarily focuses on installing Spacedeck on a Linux server, specifically Ubuntu 20.04. Key prerequisites include command-line access (SSH), and potentially a C compiler (GCC) and package manager (like apt). You will also need the ability to download files via wget and extract them using tar and unzip. Node.js and npm (Node Package Manager) are essential for running Spacedeck.
2. How can I securely log in to my server to begin the installation process? The recommended method for secure login is using an SSH key pair. This involves generating a public and private key. The public key needs to be added to the authorized_keys file within the .ssh directory on your server (you may need to create these directories and the file if they don't exist). The private key remains on your local computer and is used by your SSH client to authenticate. It is crucial not to share or upload your private key to the server.
3. What are the different methods described for installing Node.js, and when might I choose one over the others? The guide outlines three methods for installing Node.js: * Method 1 (Linux package manager): This is the simplest method for Linux-based servers using commands like curl and sudo apt-get. It's preferred if your server has a package manager and you have sufficient privileges. * Method 2 (via nvm - Node Version Manager): This method is useful if the package manager installation fails or if you need more control over Node.js versions. It involves installing nvm first, then using it to install and manage Node.js. This might be necessary on servers with more limited shell access. * Method 3 (manual install): This is the most complex method and is recommended if the other two fail. It involves downloading the Node.js source code, extracting it, and manually creating links to the node and npm binaries. This requires more configuration depending on your server environment.
4. Why is GCC (GNU Compiler Collection) mentioned in the installation process, and how can I install it if needed? GCC is a C compiler that is required by GraphicsMagick, a dependency of Spacedeck. You can check if GCC is already installed by running gcc -v or cc -v in the command line. If not installed, the guide suggests using the Linux package manager (sudo apt-get install gcc g++ make alongside Node.js installation). Alternatively, you can download the GCC source code using wget and then extract it using tar. While npm install gcc exists, it's not recommended as it might provide an outdated version.
5. What is GraphicsMagick, and how is it installed as part of the Spacedeck setup? GraphicsMagick is a robust collection of tools and libraries for image processing. It's a dependency for Spacedeck. The installation process involves downloading the GraphicsMagick source code using wget, extracting it with tar, navigating into the extracted directory using cd, running ./configure to prepare for compilation, and then using make and make install to build and install the software. You might need to specify the path to your GCC installation if the configuration script cannot find it.
6. What are the specific steps to download and configure the Spacedeck source code after the prerequisites are installed? To install Spacedeck itself, you first need to download the source code from its GitHub repository using wget. Then, unzip the downloaded file using unzip. Navigate into the newly created Spacedeck directory using cd and install the necessary Node.js dependencies with npm install. Finally, you need to edit the config/default.json file to configure Spacedeck, specifically by adding default color values under the "spacedeck" key at the end of the file.
7. How is Spacedeck launched after installation, and what should I expect to see if it starts successfully? Once the dependencies are installed and the configuration file is updated, you can launch Spacedeck by running the command node spacedeck.js in the Spacedeck directory. If the launch is successful, you should see output in the terminal indicating that the Spacedeck server has started, although the specific output is not fully detailed in the provided excerpts.
8. What are some potential issues I might encounter during the installation, and what troubleshooting steps are suggested? The guide mentions potential errors during npm install due to missing packages. If this occurs, you can try to install the missing packages individually using npm install <package name>. The author also encountered an issue with Sequelize (a database ORM) failing to open the database file, which was resolved by uninstalling and reinstalling it using npm uninstall sequelize followed by npm install sequelize. The guide also notes a current unresolved backend issue that prevents the installation from fully working. For other errors, the troubleshooting will depend on the specific environment.
