


Translations
| Code | Language | Translator | Run | |
|---|---|---|---|---|
 |
||||
Credits


 This email address is being protected from spambots. You need JavaScript enabled to view it.; Francisco Esquembre; Felix J. Garcia Clemente
-
Main Themes and Important Ideas:
- Utilizing the OSP@SG Digital Library and EJSS Editor:
- The tutorial highlights the availability of a vast library of over 500 simulations and games within the Open Source Physics @ Singapore (OSP@SG) digital library.
- Crucially, it emphasizes the open-source nature of these resources, allowing users to download source code, modify it using the EJSS editor, and incorporate features into their own projects.
- Quote: "The OSP@SG digital library has +500 simulations and games and anyone can download the source code, unzip it into the workspace source folder and open it with EJSS editor to continue working on it or copy out features that you want into another copy of EJSS editor."
- The tutorial also advises on running two instances of the EJSS editor for easier feature copying.
- Leveraging Templates for Quick Development:
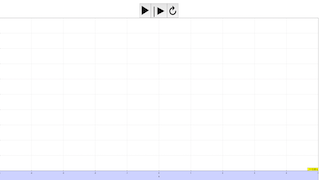
- The tutorial advocates using a generic starter file ("my template") that includes basic play/pause/reset buttons and a plotting panel to expedite the game creation process.
- Quote: "for quick making, let use my template, a generic starter file with a basic play pause reset buttons and a single plottingPanel,"
- Instructions are provided to download and integrate this template into the EJSS workspace.
- Step-by-Step Guide to Building the Matching Game:
- The tutorial provides a detailed, step-by-step process for creating the game, covering key aspects:
- Setting up the Card Grid: Defining variables for screen boundaries, card dimensions, and initial positions.
- Creating Visual Cards: Using ShapeSets in the EJSS HTMLView to represent the cards. Properties like size, position, and interactivity are configured.
- Adding Interactivity: Utilizing the objectinteracted variable and the elementInteracted property of the ShapeSet to detect which card is selected. Enabling the ENABLED_NO_MOVE setting for interactivity without allowing repositioning.
- Debugging with Text: Employing TextSets to display variable values for debugging purposes.
- Duplicating Elements: Efficiently creating the second set of matching cards by copying and pasting variables and ShapeSets in the EJSS Model and HTMLView, respectively, and adjusting their properties (e.g., y-position).
- Adding Images: Incorporating images for the matching pairs using imageSets and controlling their visibility based on user interaction.
- Implementing Click Logic: Using the onPress event of the ShapeSet to toggle the visibility of corresponding images.
- Implementing Scoring and Game Logic:
- A score variable is introduced to track correct matches.
- The onRelease event of the second ShapeSet implements the core game logic:
- Checking if the objectinteracted values of the two clicked cards match.
- Incrementing the score for a correct match and providing a "correct!" dialog.
- Hiding the matched cards (shapes and images).
- Displaying a "try again!" dialog for an incorrect match and hiding the images.
- Quote (example of game logic):if (objectinteracted==objectinteracted2){
- score=score+1;
- _tools.showOkDialog("correct!", function() {
- // ... (hiding logic) ...
- });
- }
- else {
- score = score;
- _tools.showOkDialog("try again!", function() {
- // ... (hiding logic) ...
- });
- }
- Implementing an end-of-game condition when the score reaches a certain value (4 in this example), displaying a "end of game" dialog and pausing the game.
- Adding Instructions and Styling:
- The tutorial demonstrates how to add an introductory dialog using _tools.showOkDialog() within the Model's Initialization section.
- It also provides basic JavaScript code snippets to customize the styling (font size, color, background color, width, margin, top position) of the dialog box using document.getElementById(".myBoxPanelOk").style.
- Creating Multiple Screens/Panels:
- The tutorial introduces the concept of using multiple plottingPanel elements to create different "screens" within the game.
- It utilizes boolean variables (world, graph) and the Display property of the plottingPanel (using CSS syntax "inline" and "none") to control the visibility of these panels based on the game state.
- A stepButton's onClick event is used as an example to transition between these panels.
- Availability of Source Code and Embedding:
- The tutorial explicitly provides a link to download the complete source code of the "complimentarymatchproteinv2" game.
- It also shows how to embed the created game into a webpage using an iframe tag.
- Quote (embedding):<iframe width="100%" height="100%" src="https://iwant2study.org/lookangejss/biology/ejss_model_complimentarymatchproteinv2/complimentarymatchproteinv2_Simulation.xhtml " frameborder="0"></iframe>
Key Facts:
- The tutorial was created for the SLS Hackathon 2019.
- It utilizes the Easy JavaScript Simulations (EJSS) authoring tool.
- The target platform for deployment is HTML5, making the game accessible through web browsers.
- The example game focuses on a 4x2 matching card layout.
- The tutorial demonstrates basic game mechanics, scoring, and user interface elements.
- The OSP@SG digital library offers a wealth of pre-built simulations and games that can be used as learning resources and development starting points.
Implications:
This tutorial provides a practical and accessible entry point for educators and developers looking to create interactive learning games for the Singapore Student Learning Space. By leveraging the EJSS environment and existing templates, the development process can be significantly accelerated. The focus on open educational resources encourages sharing and collaboration within the educational community. The techniques demonstrated can be adapted and expanded upon to create more complex and engaging educational games
Tutorial
SLS Hackathon Tutorial on Matching Game
- The OSP@SG digital library has +500 simulations and games and anyone can download the source code, unzip it into the workspace source folder and open it with EJSS editor to continue working on it or copy out features that you want into another copy of EJSS editor. to have 2 copies of EJSS editors, click on the Launch EjsS on the EjsS console
and open the source file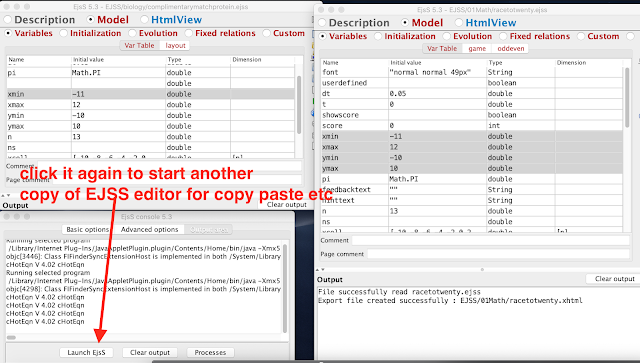
- so let say to create a matching game say 4 cards match to the lower 4 cards and if correct, score is increase by 1 and wrong score decrease by 0.5.
- for quick making, let use my template, a generic starter file with a basic play pause reset buttons and a single plottingPanel,
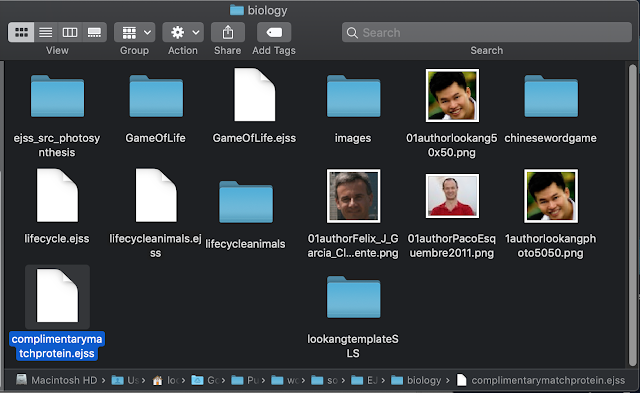
click this to download it https://sg.iwant2study.org/ospsg/index.php/translations/858-ejss-model-lookangtemplatesls and unzip it and copy the folder to the workspace
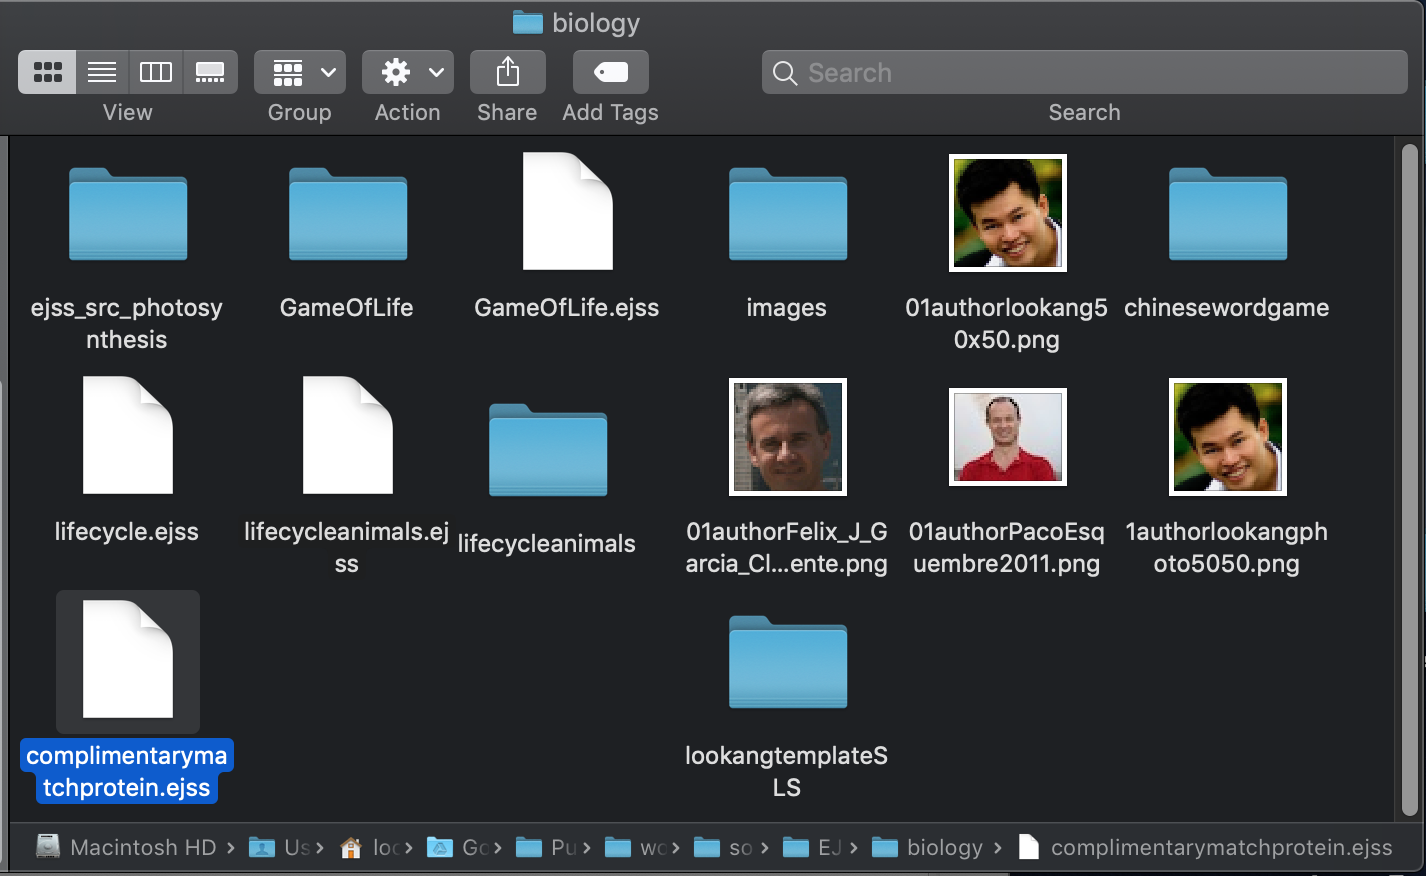
- my copy is in my /Users/lookang/Google Drive/PublicLawrence/workspace/source/EJSS/biology/complimentarymatchprotein.ejss and i rename it as complimentarymatchprotein.ejss
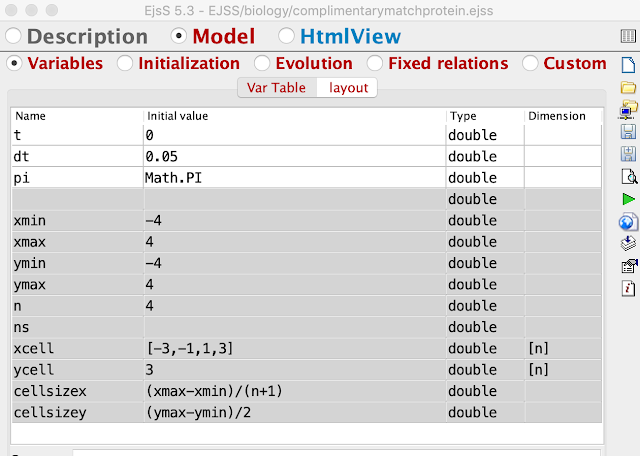
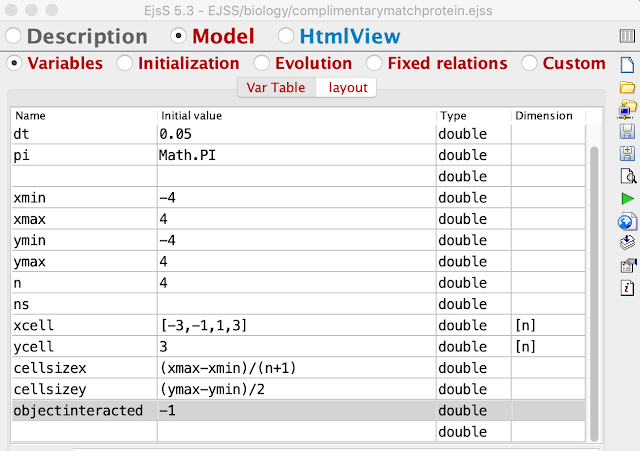
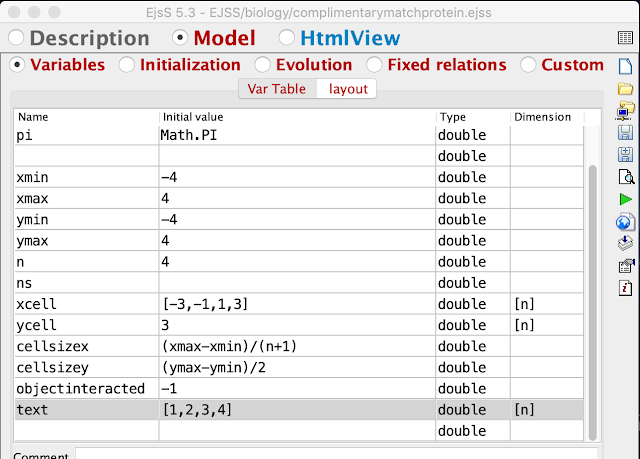
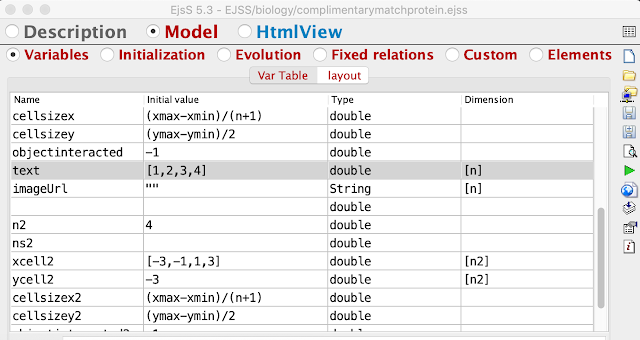
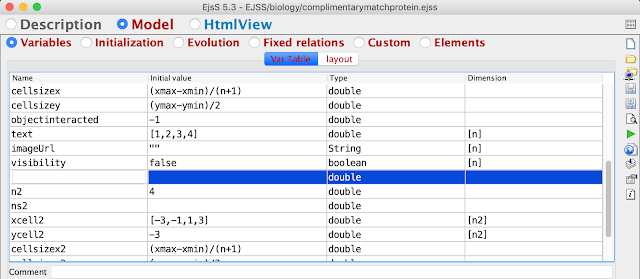
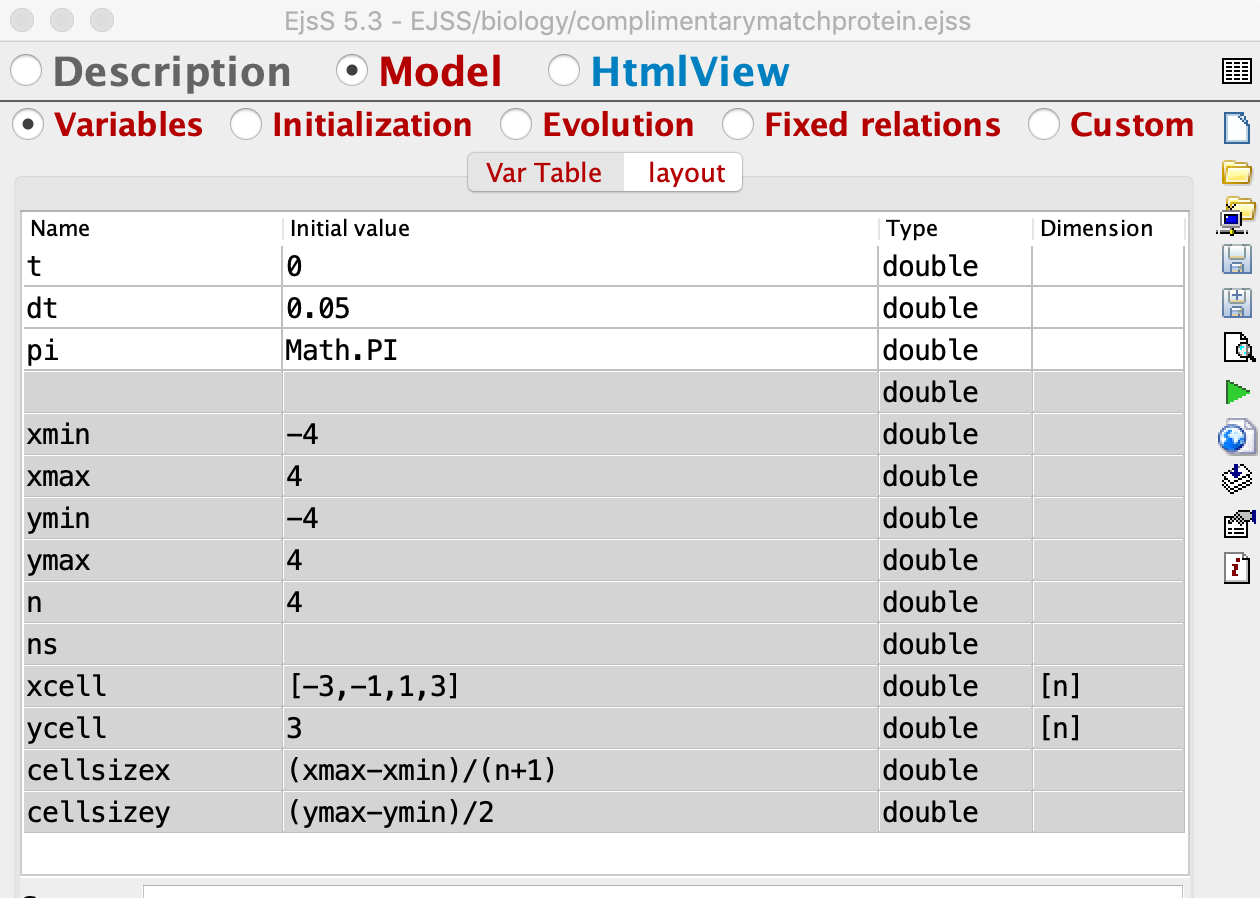
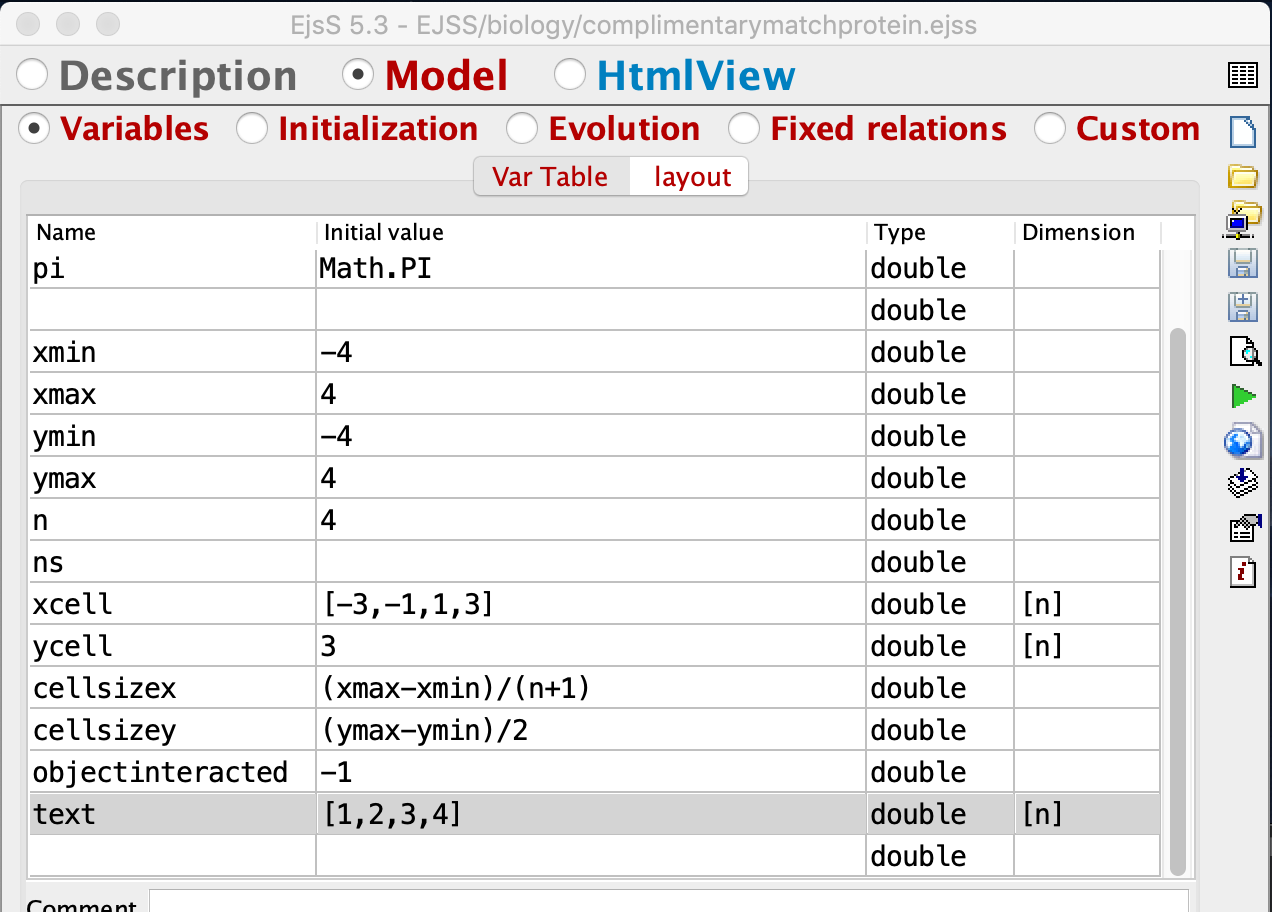
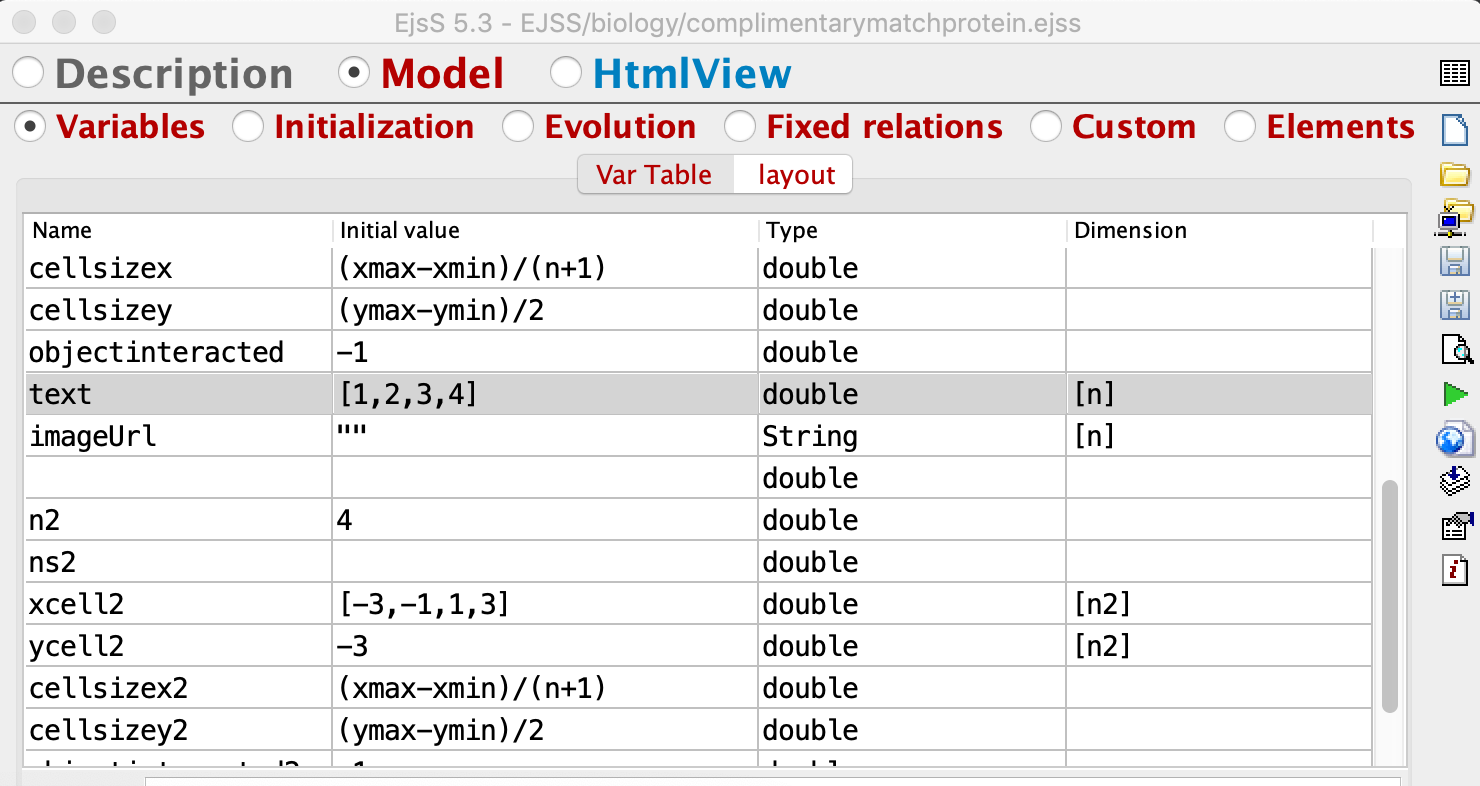
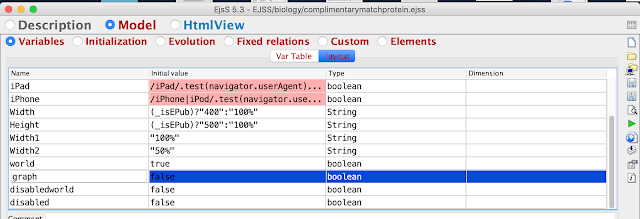
- create these variables need to make the first 4 cards at the top row, xmin, xmax,ymin and ymax are the screen size boundaries, n is a dimension, ns or n store is for storing n values initially in just i need to recall the n initial value later on, xcell y cell are position of cards, cellsizex and cellsizey and sizes of cards
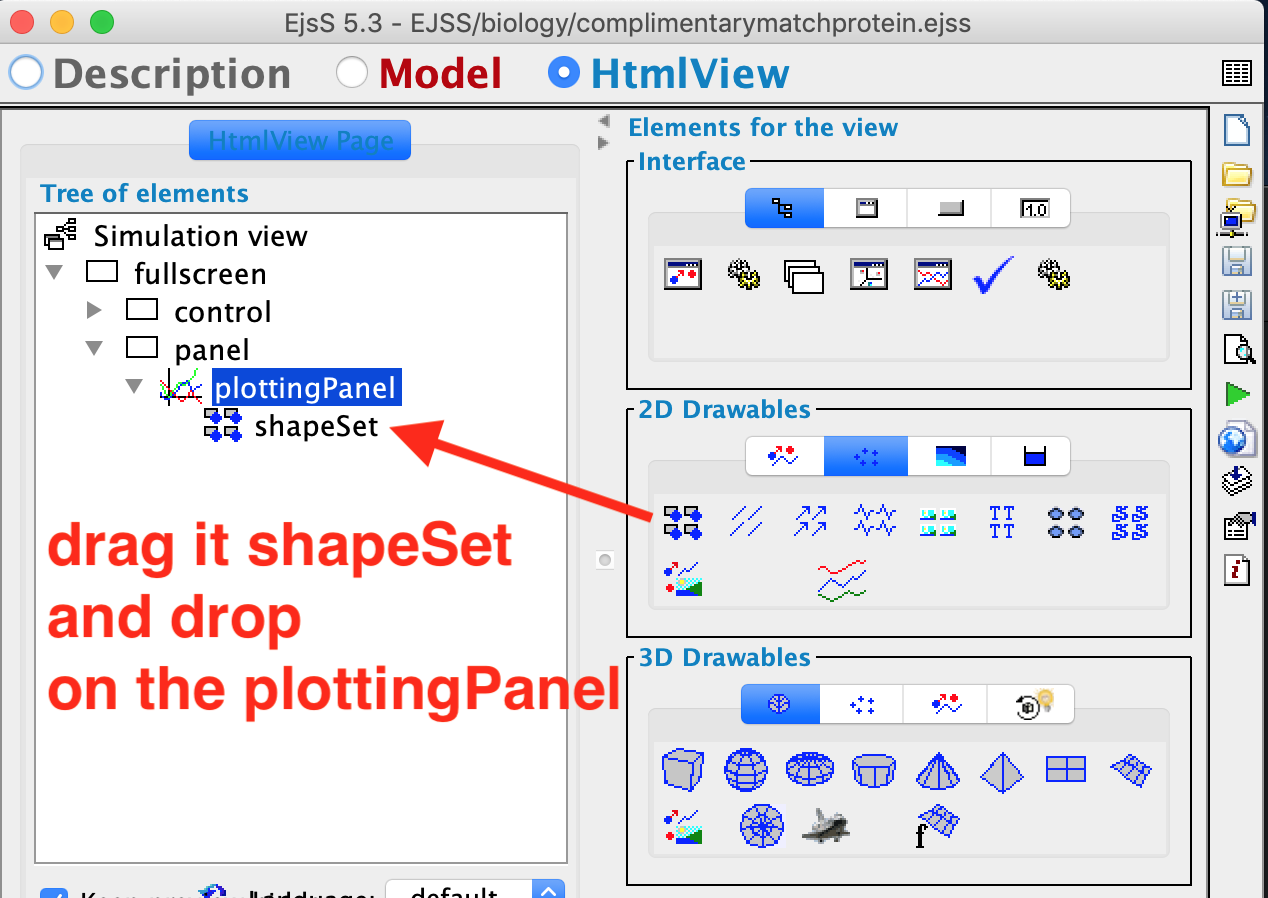
- go to HtmlView -2D Drawables - Sets - ShapeSets
and drag and drop onto the plottingPanel
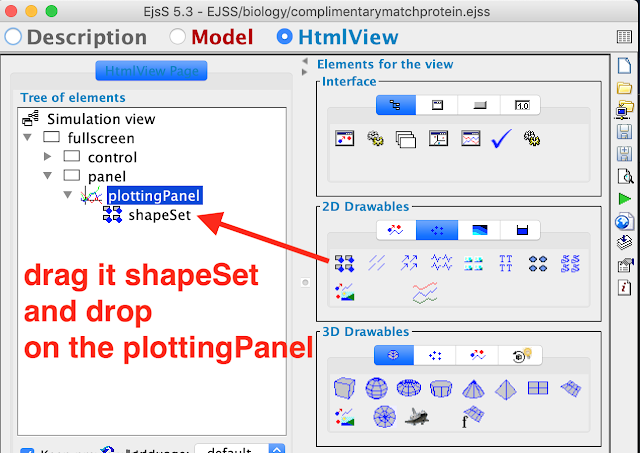
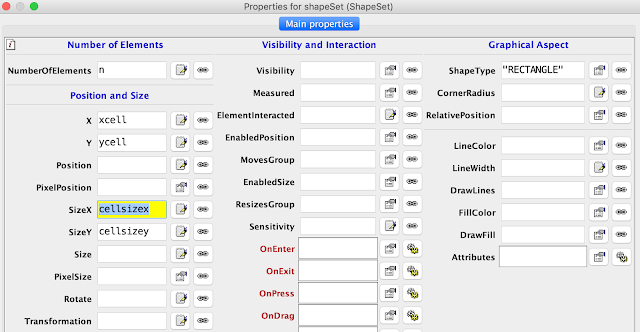
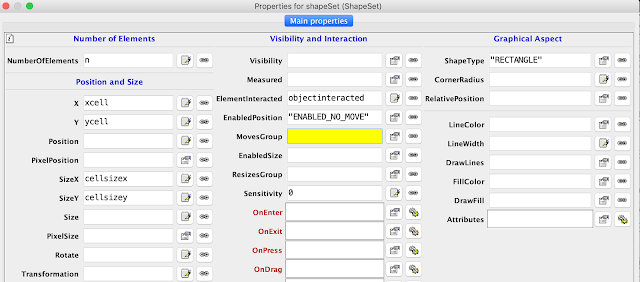
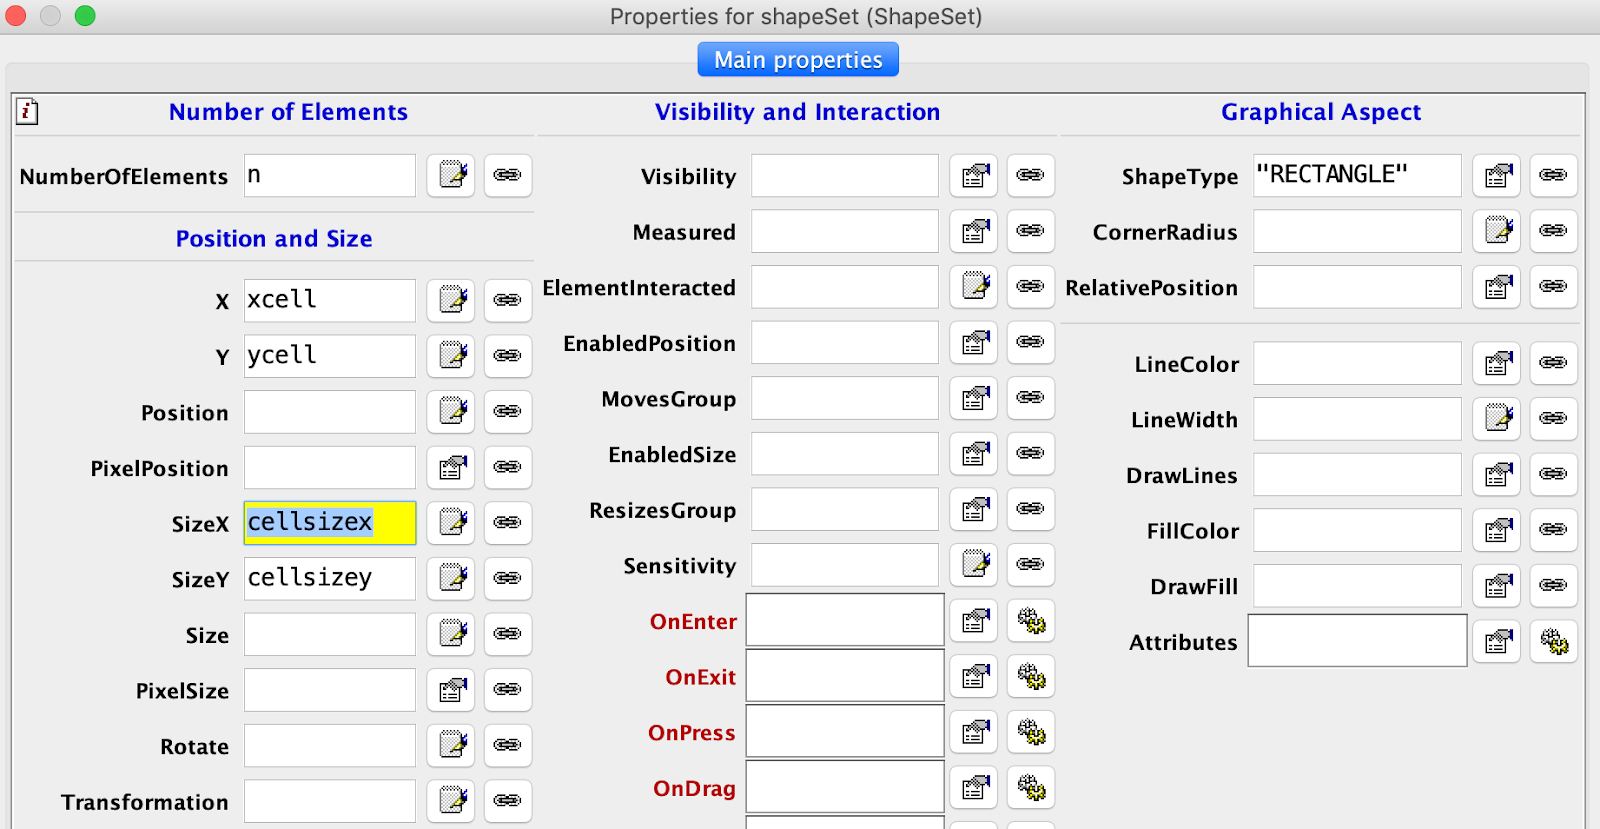
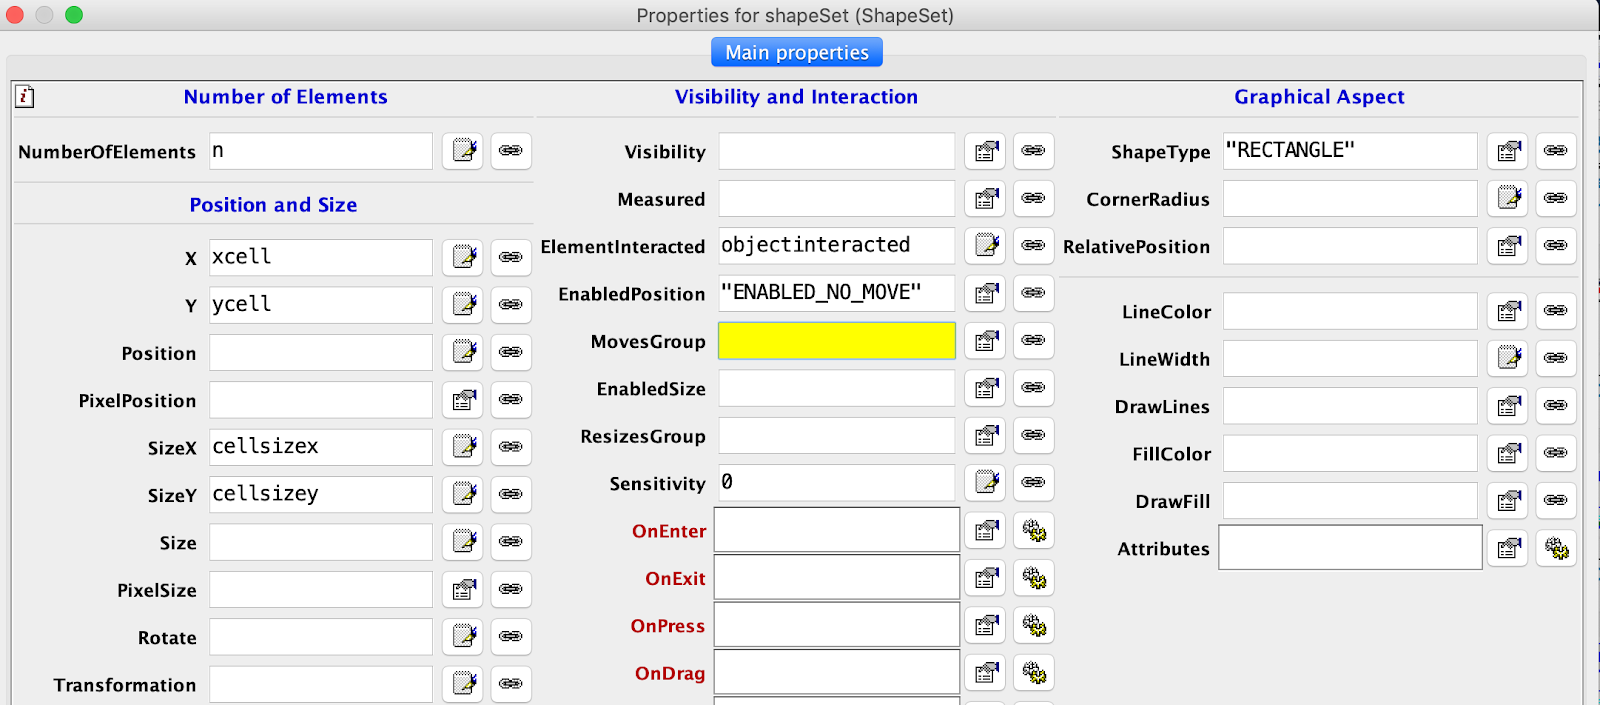
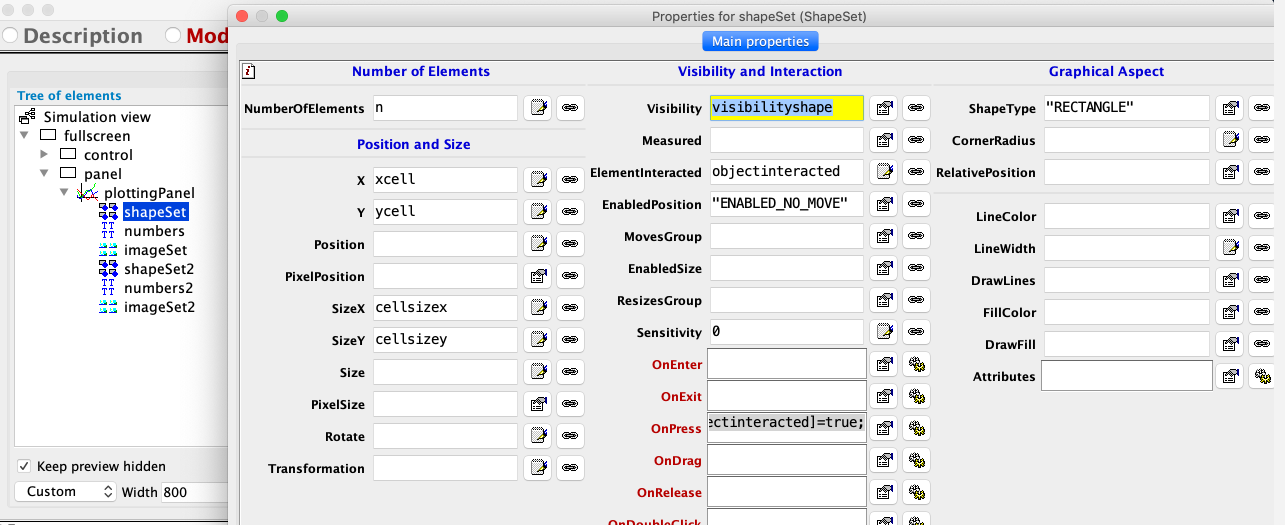
- double click on the shapeSet and add the properties into the respective fields
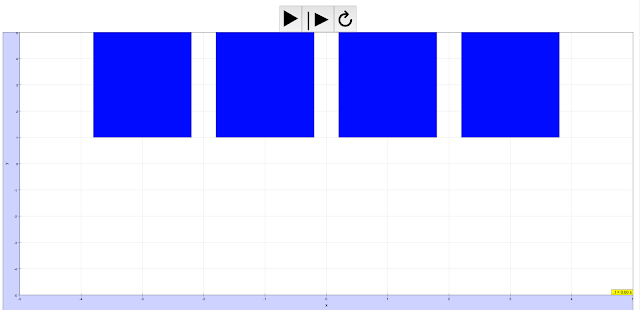
- click on the green button run Simulation
to generate the simulation, previewing on Chrome is recommended
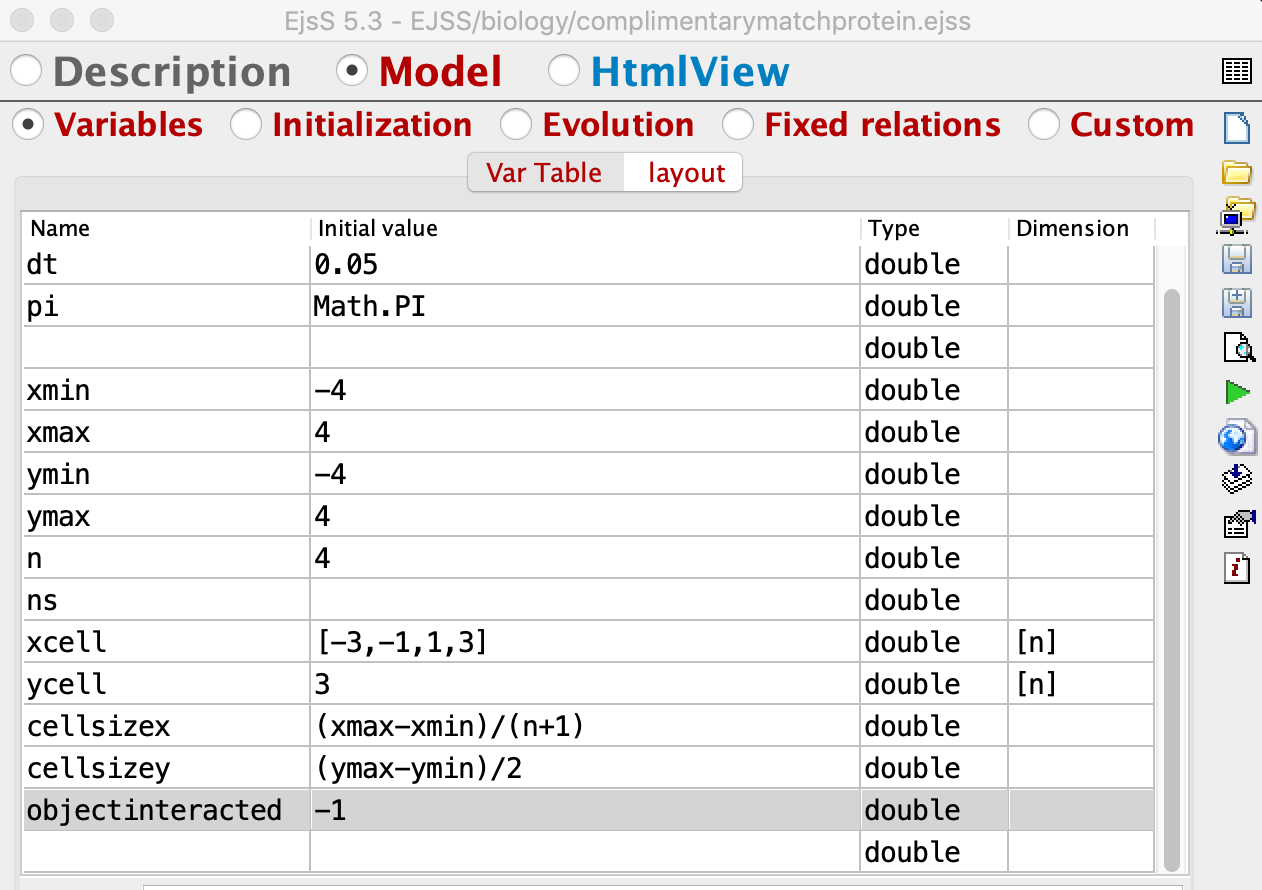
- as the simulation is interactive via touch on screen, and EJSS provides a way to know what variable or card is selected, go to Model - Variables - and add objectinteracted
- go to HtmlView - shapeSet - elementInteracted and add objectinteracted to the field and Sensitivity add 0 to hotspot the whole shapeSet SizeX and SizeY. adding a normal number will be understood as pixel size. EnabledPosition set to "ENABLED_NO_MOVE" to turn on the interactivity but don't allow them to be reposition
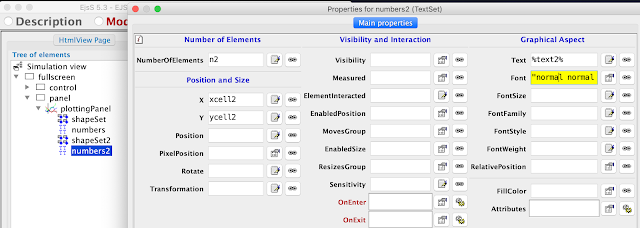
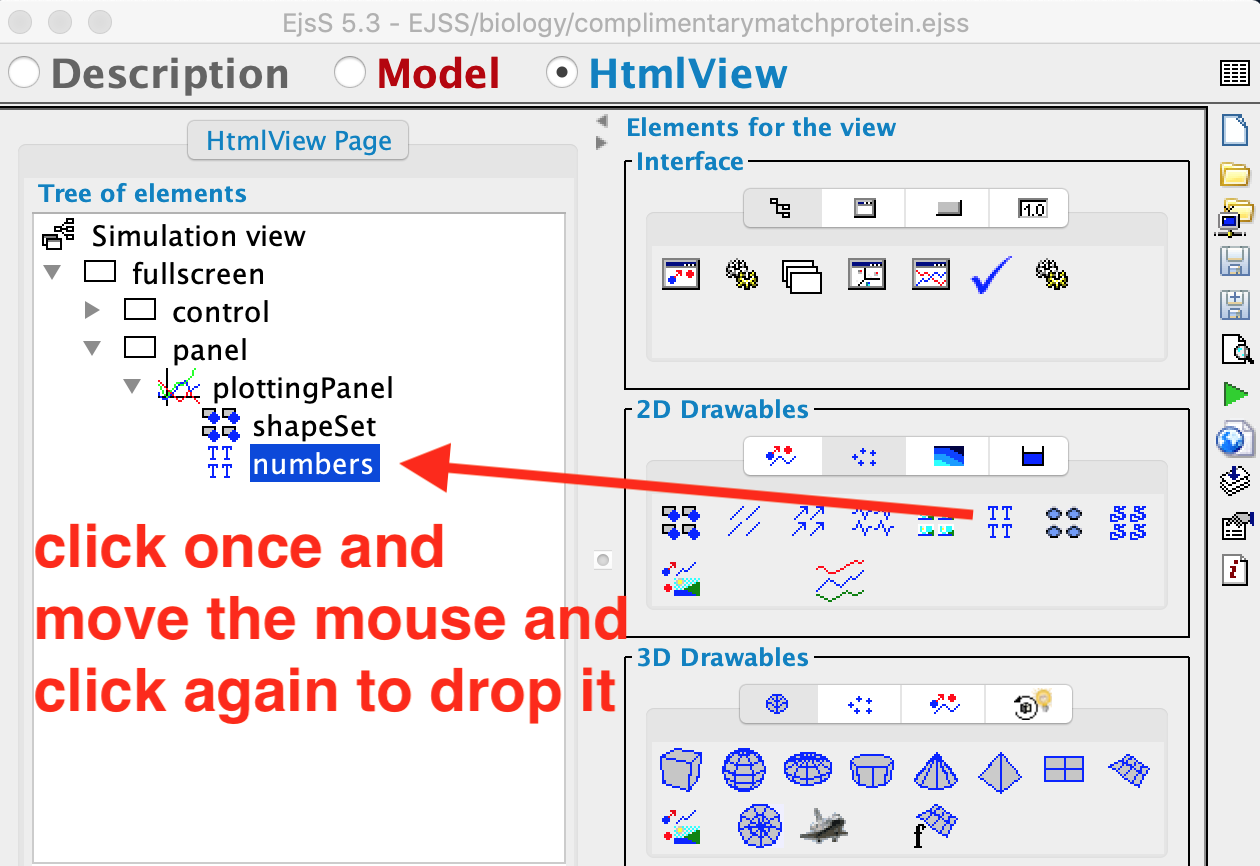
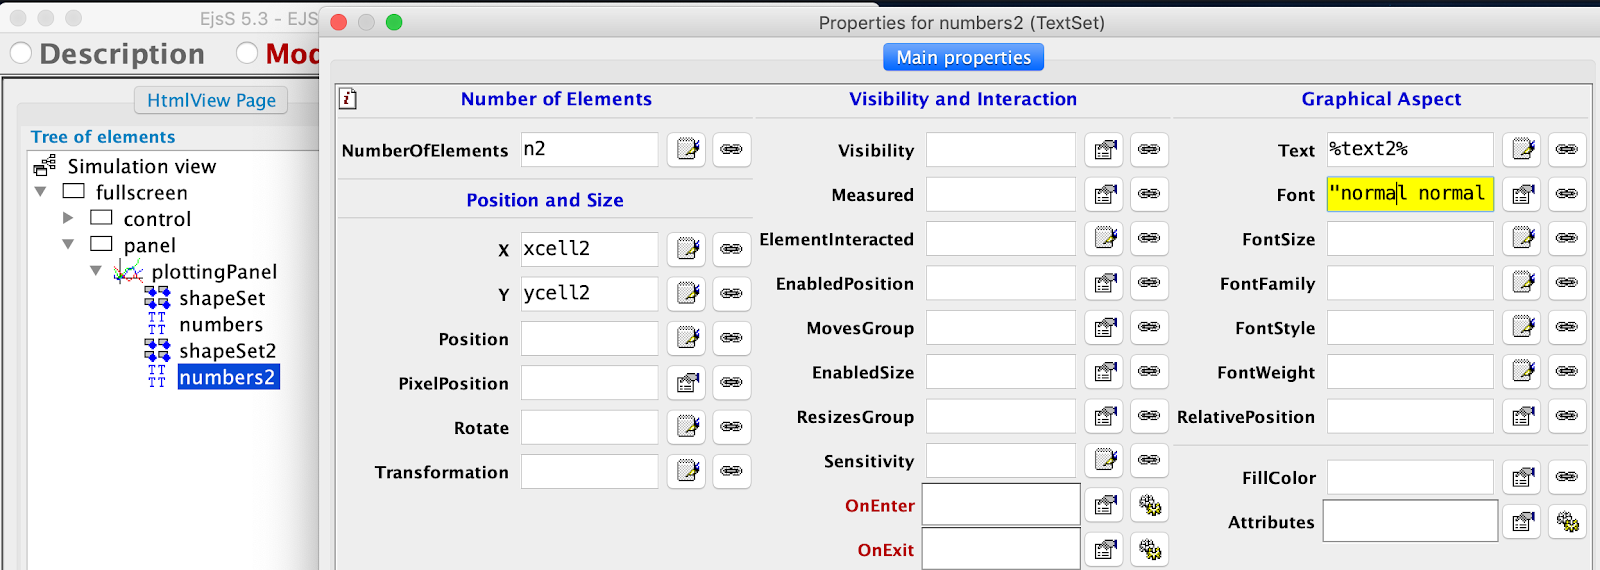
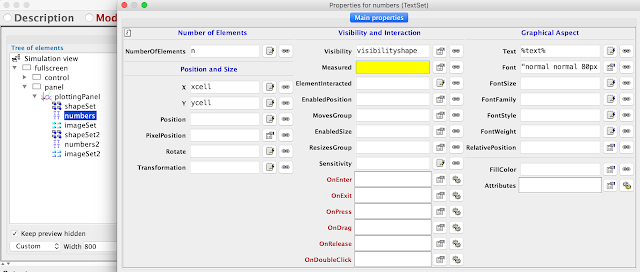
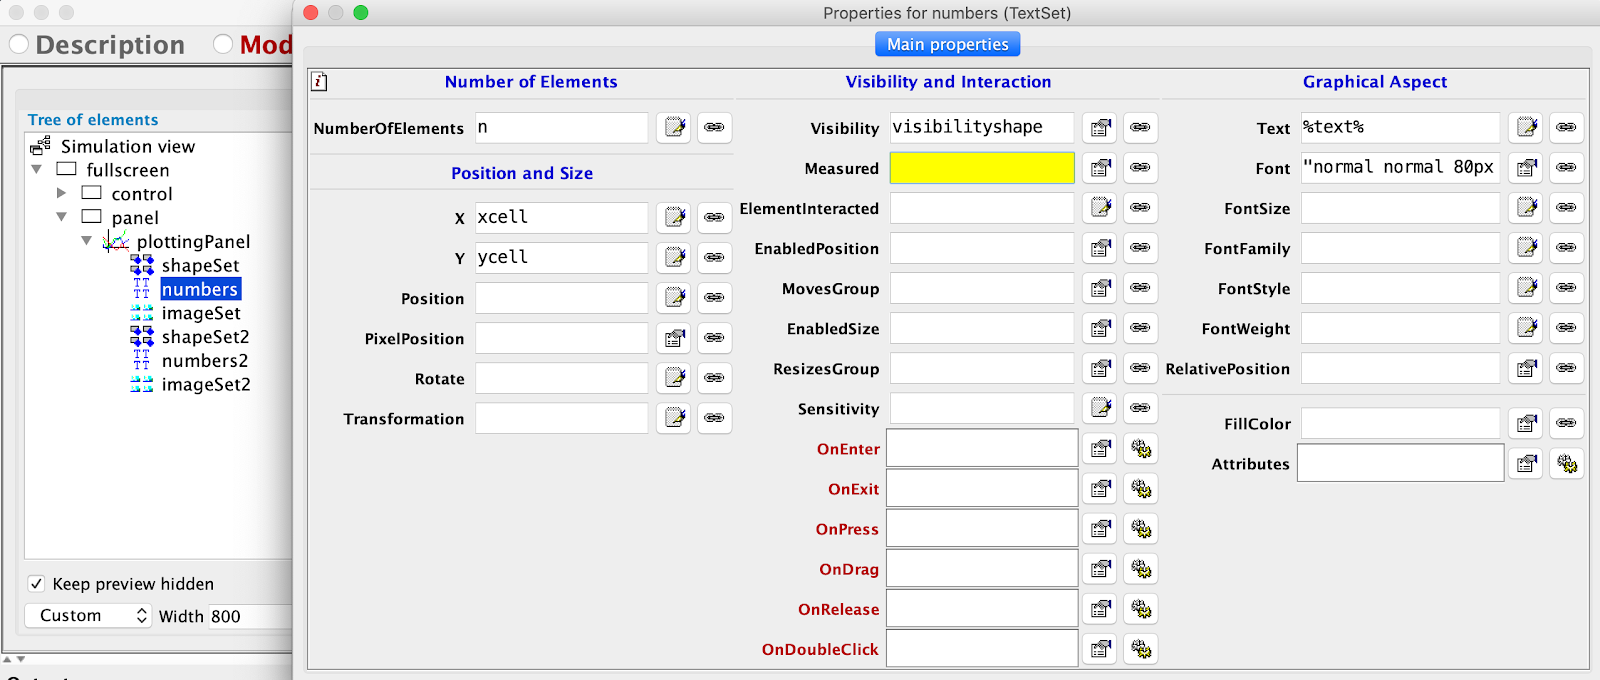
- for debugging purposes add a textSet, rename it as numbers,
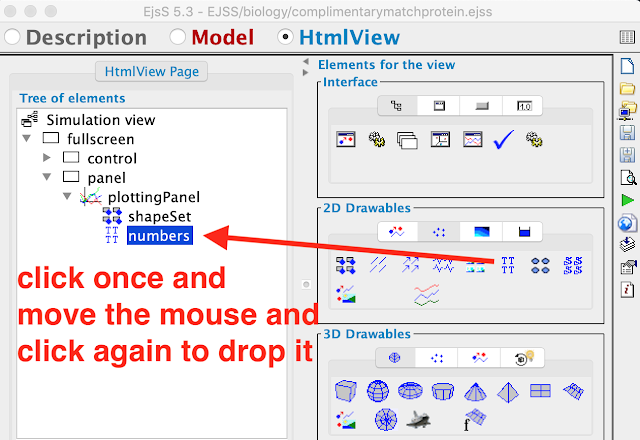
- go to Model -Variables - and add text
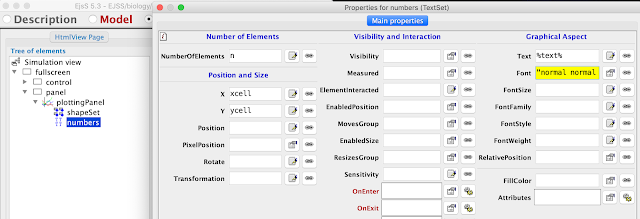
- go to HtmlView - numbers and double click to pop up the properties and add Text as %text% and Font as "normal normal 80px " to make the numbers really big
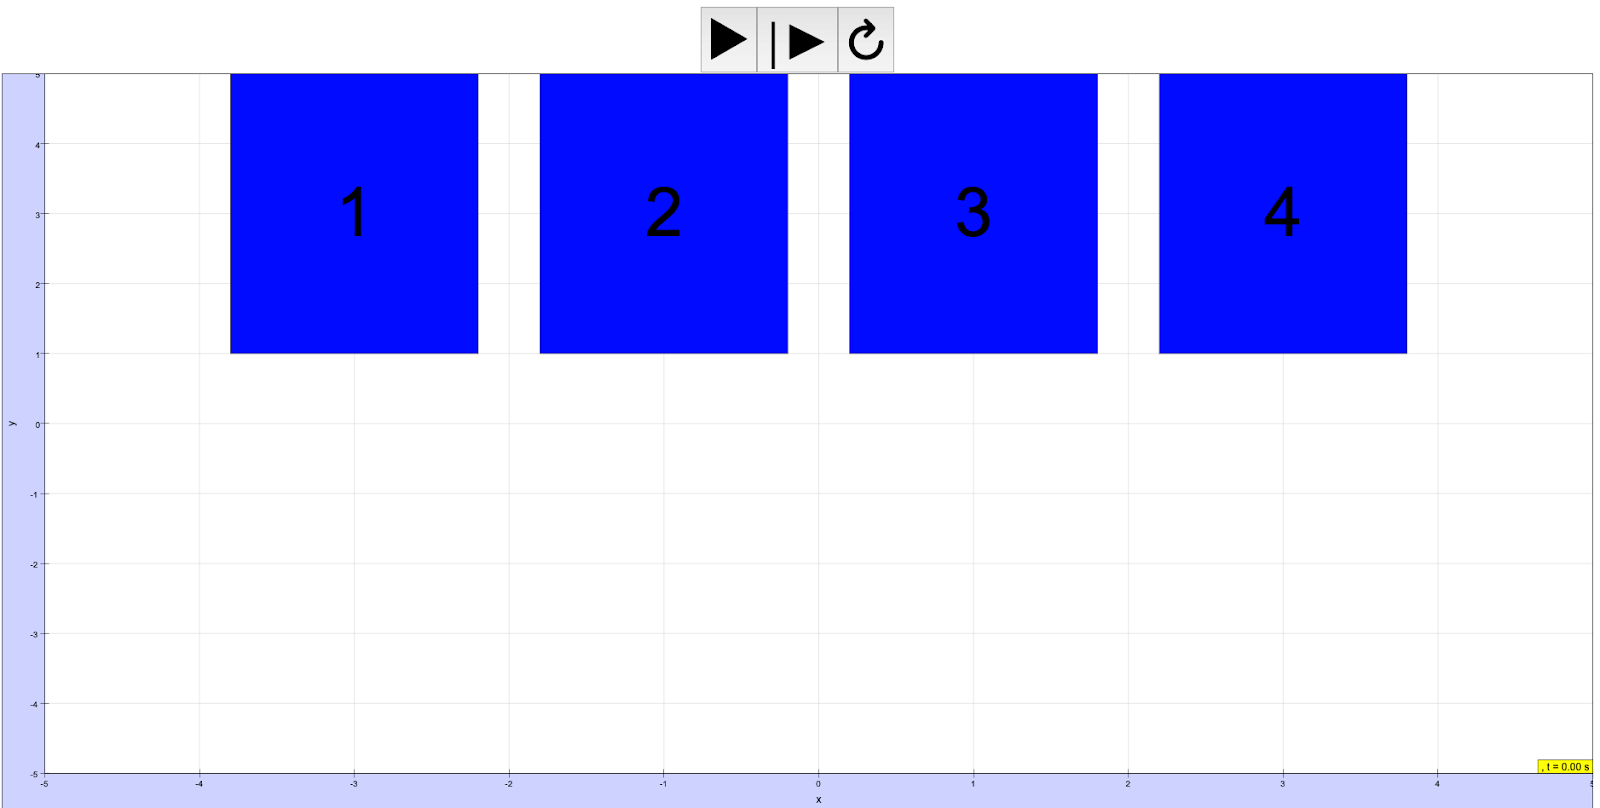
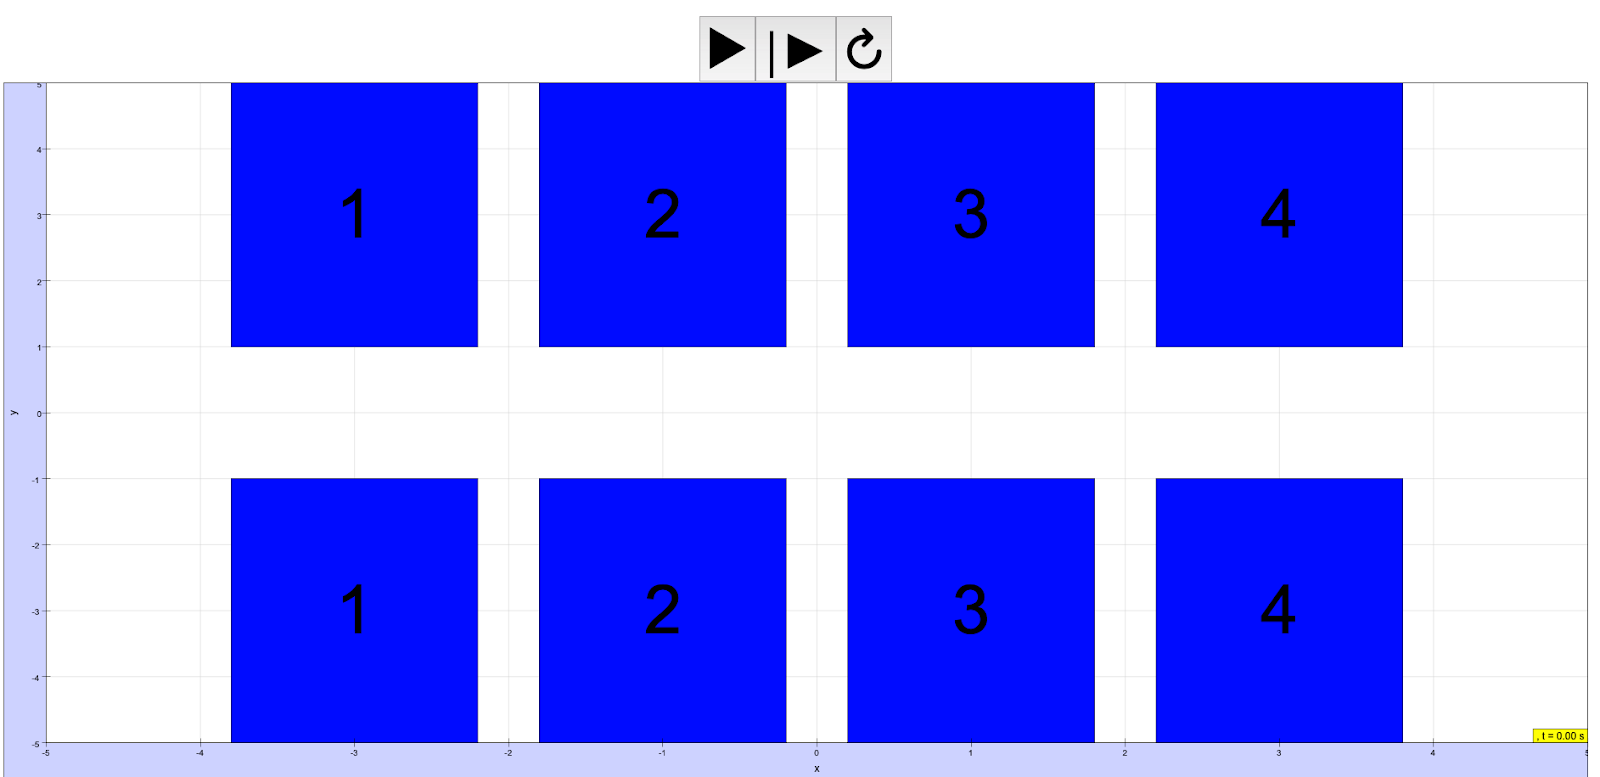
- run the simulation and Chrome will show this

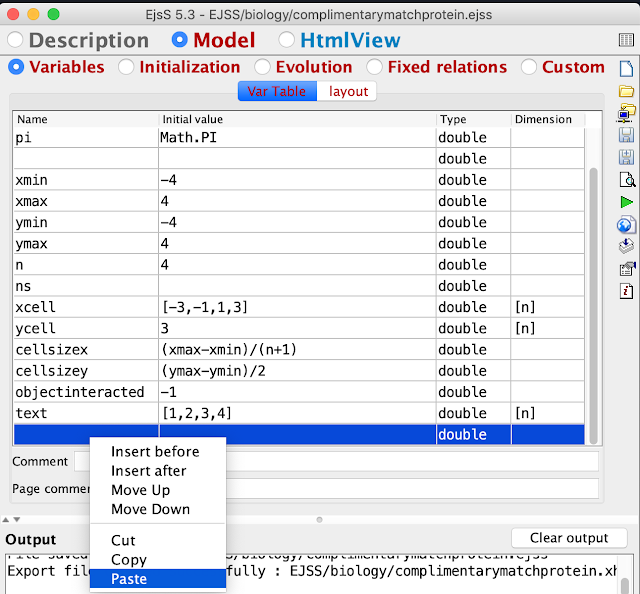
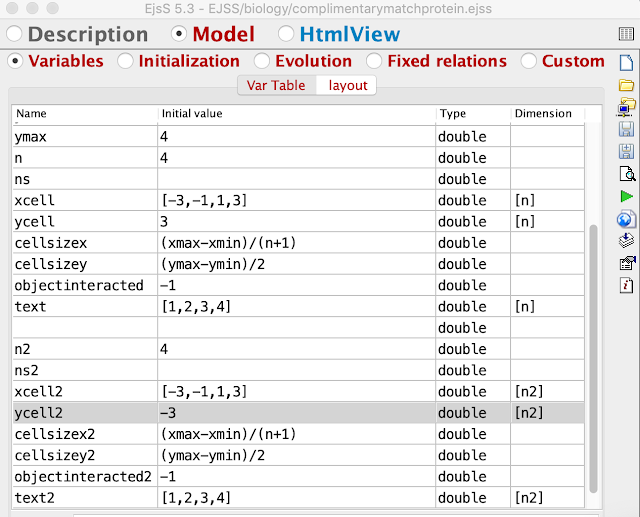
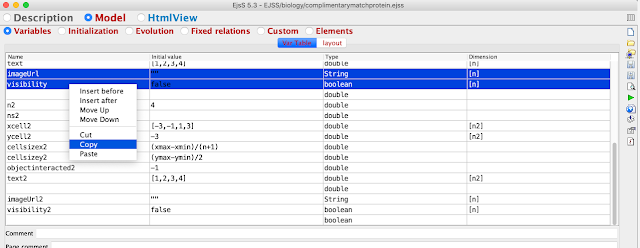
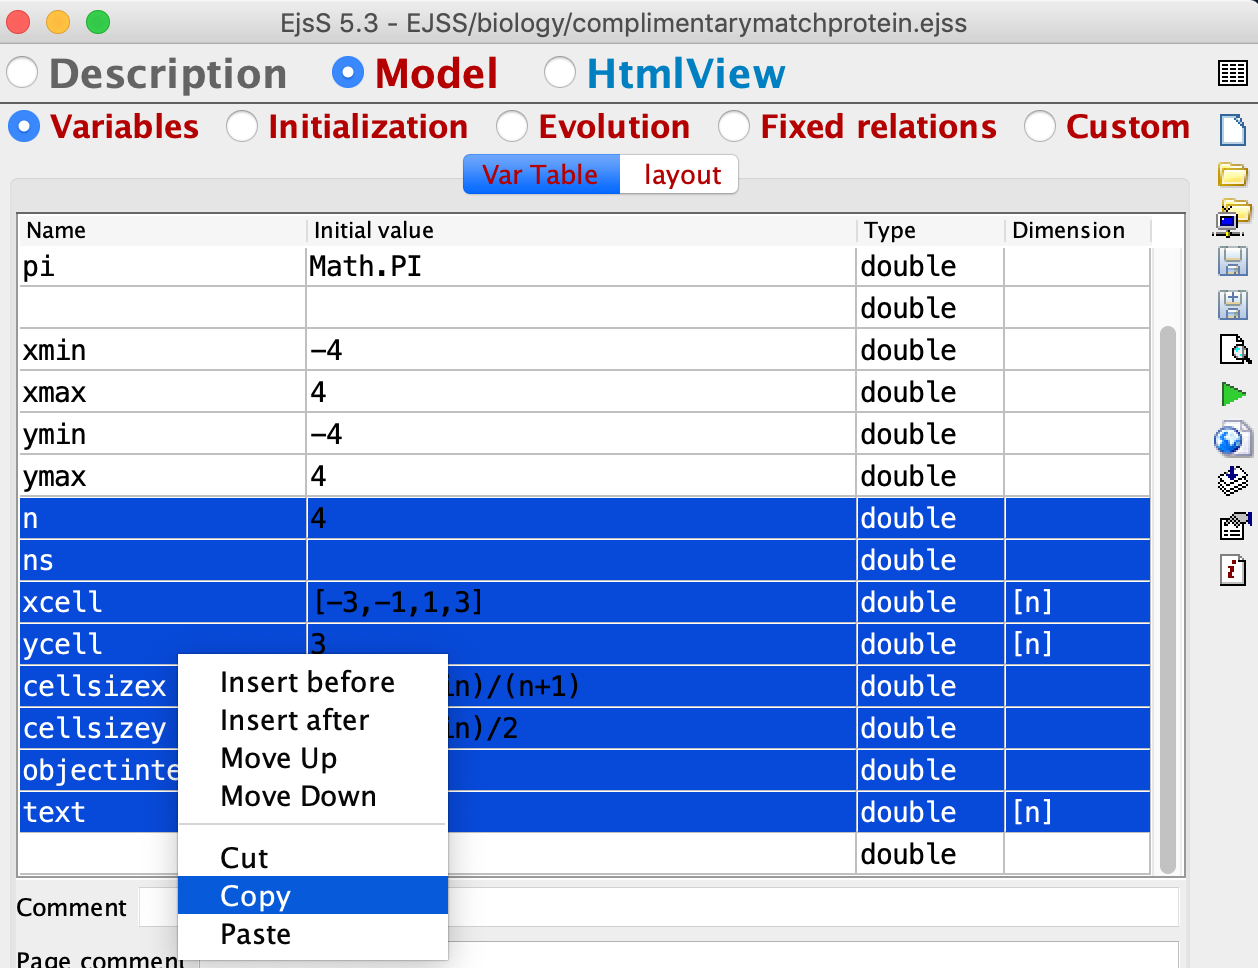
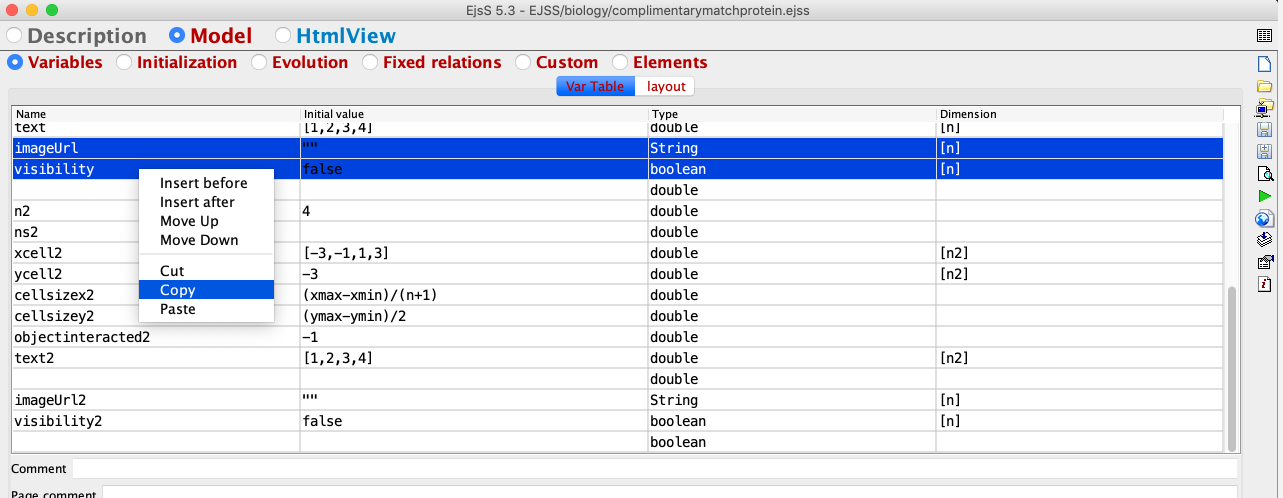
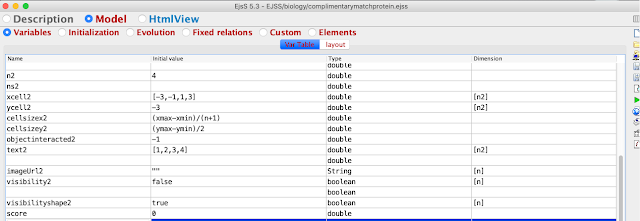
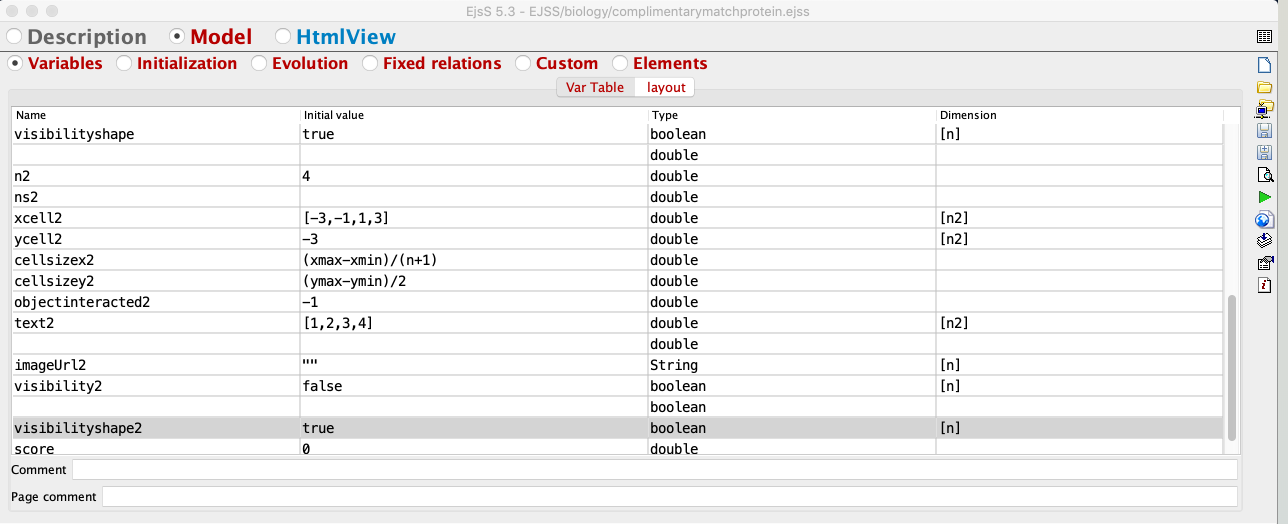
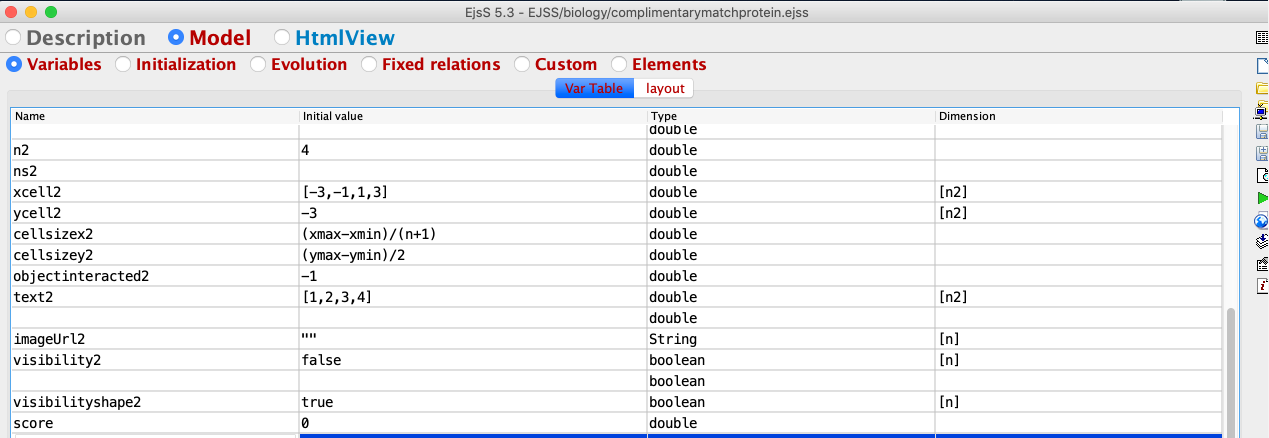
- to duplicate the cards for the lower set, need to intelligently duplicate the variables and shapSets, on the Model - Variables -Var Table right click and select copy

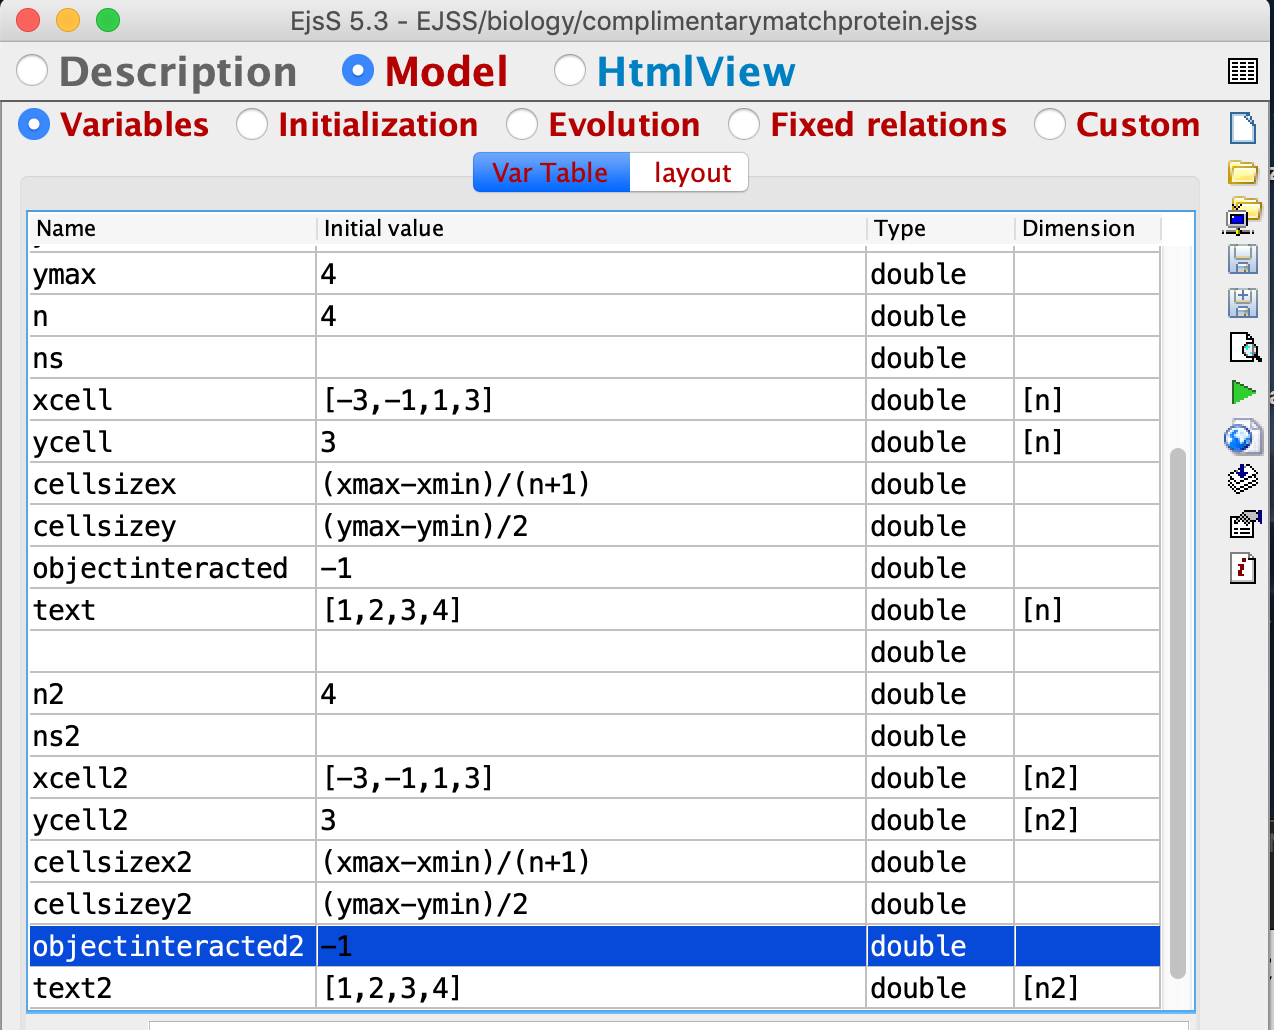
- and paste
- the pink background suggest EJSS editor detects a potential problem
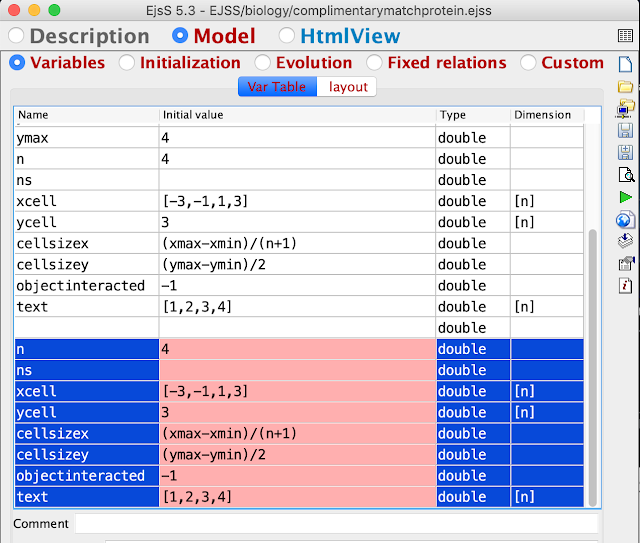
- and rename the new variables by adding a 2
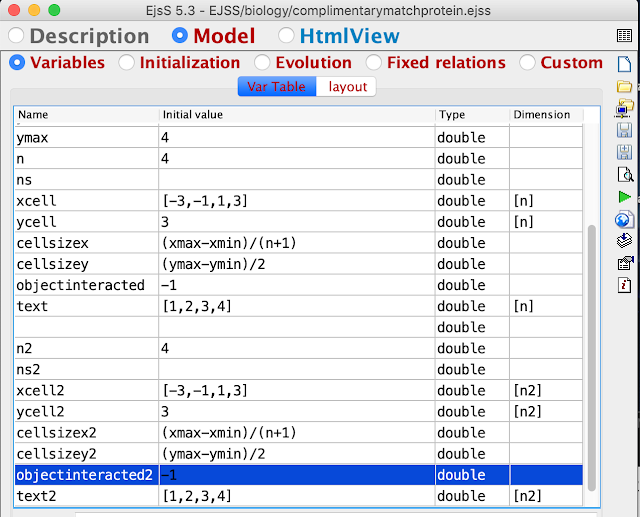
- run the simulation to check and there should be no problem
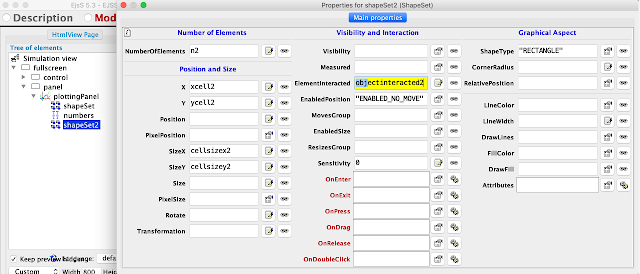
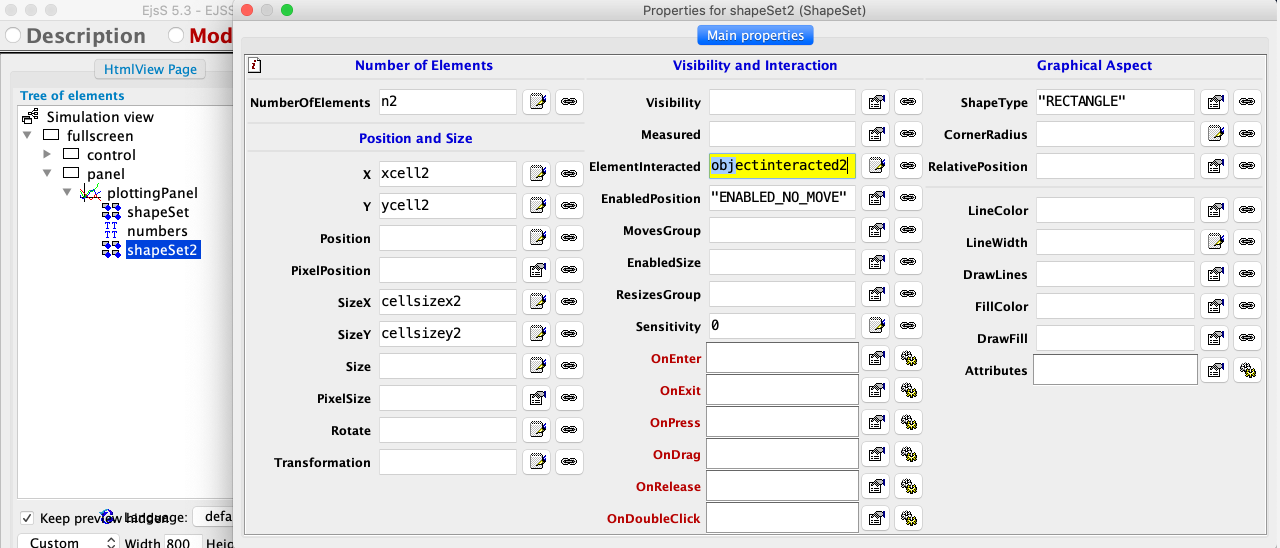
- go to HtmlView - shapeSet and right click and select copy
and paste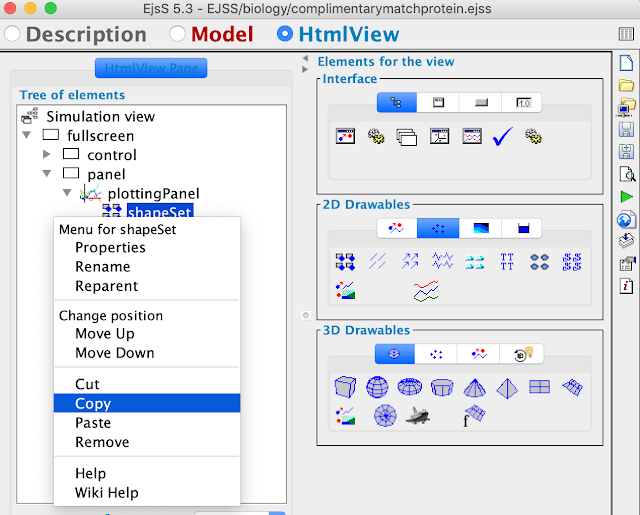
- double click on the new shapeSet2 and add 2 to all the relevant fields
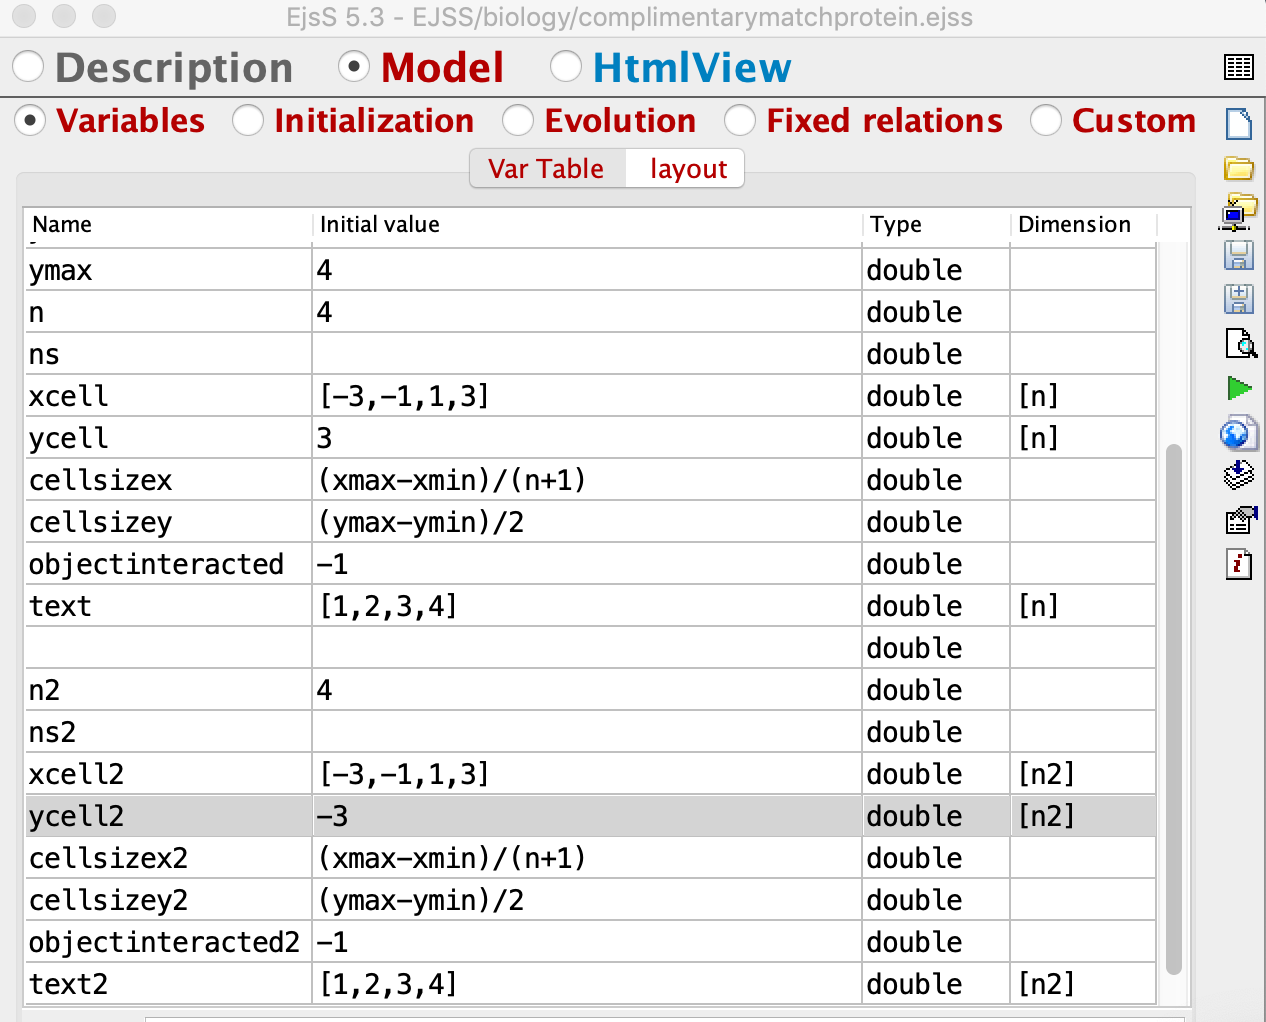
- go to Model - Variables - Var Table ycell2 and add -3 to lower the position
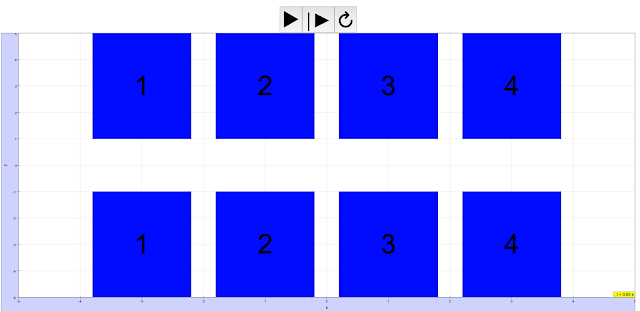
- run the simulation

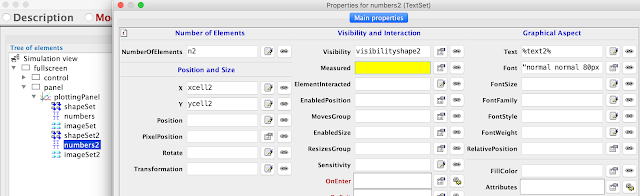
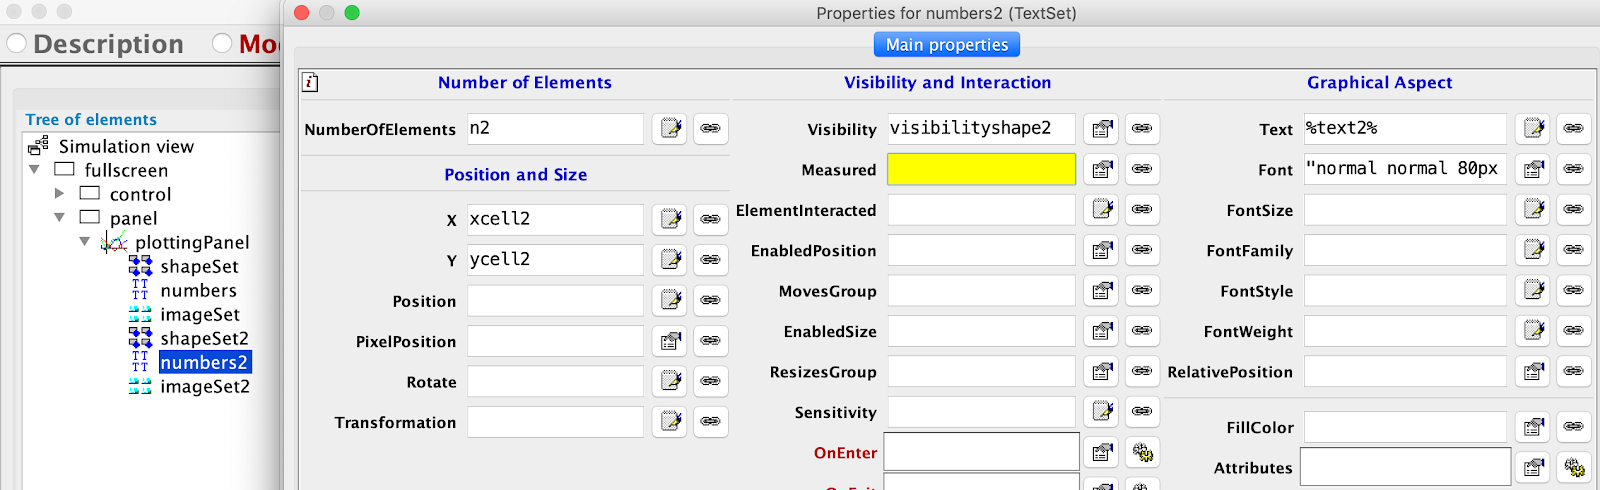
- duplicate the same for numbers2
- run the simulation
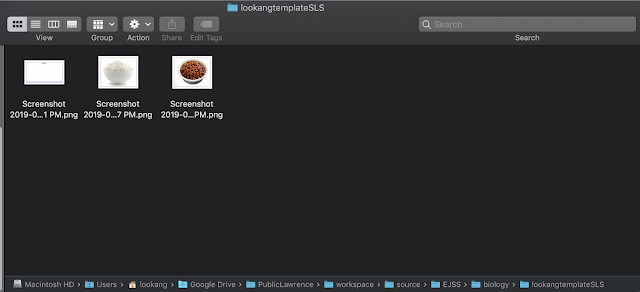
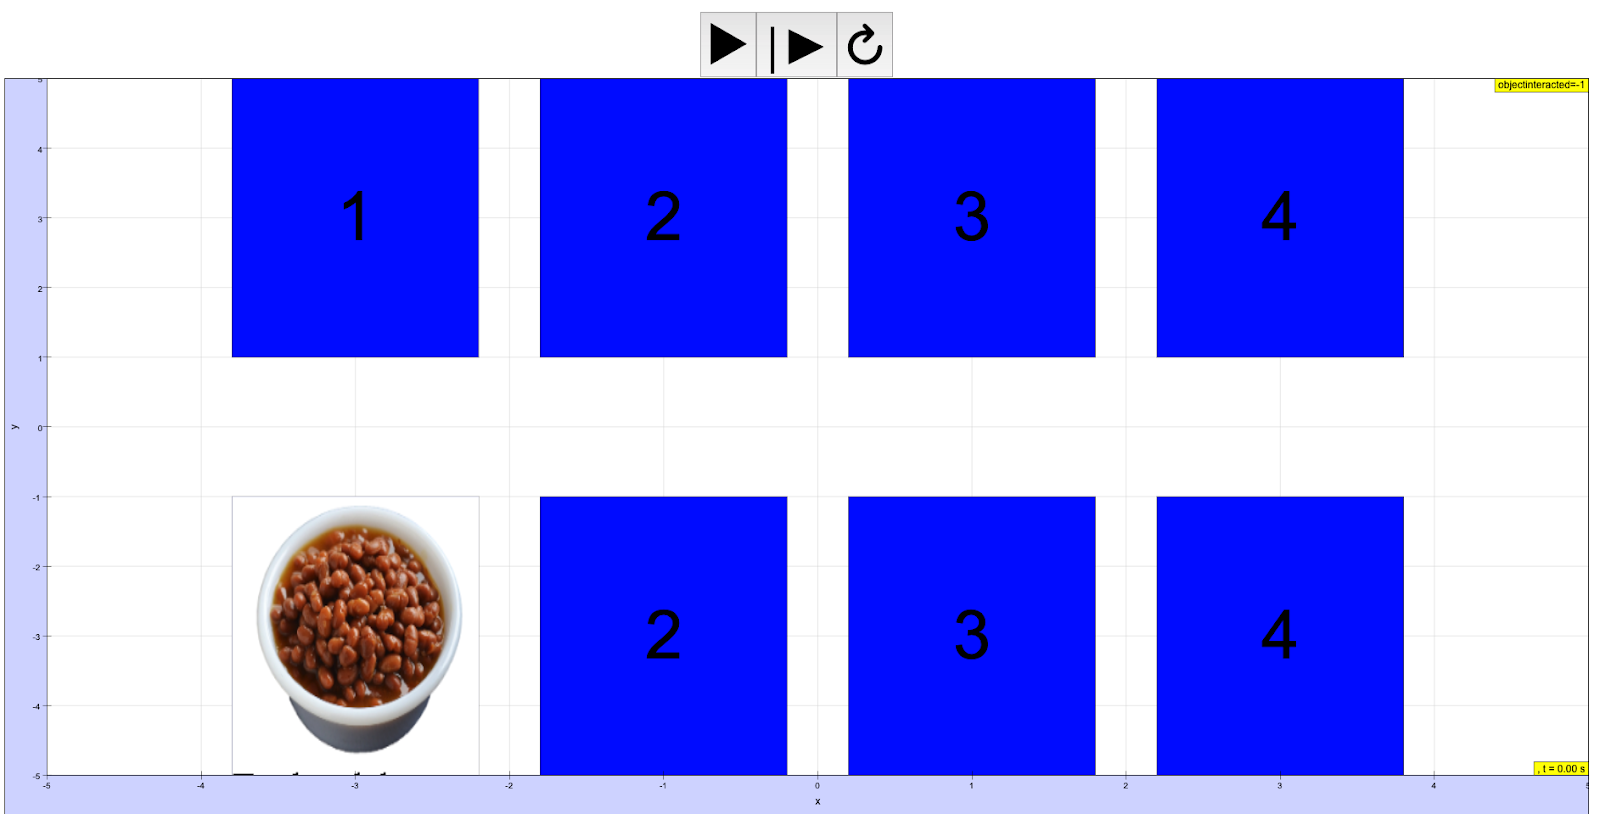
- let say rice and baked beans picture as set to 1 and when clicked on the picture will overlap on top of the card space. go google and look for pictures of rice and baked beans https://www.google.com/search?q=rice&tbm=isch&source=lnt&tbs=sur:fmc&sa=X&ved=0ahUKEwiLpOiRx7jhAhXo7XMBHWodBCgQpwUIIQ&biw=1745&bih=836&dpr=1.1
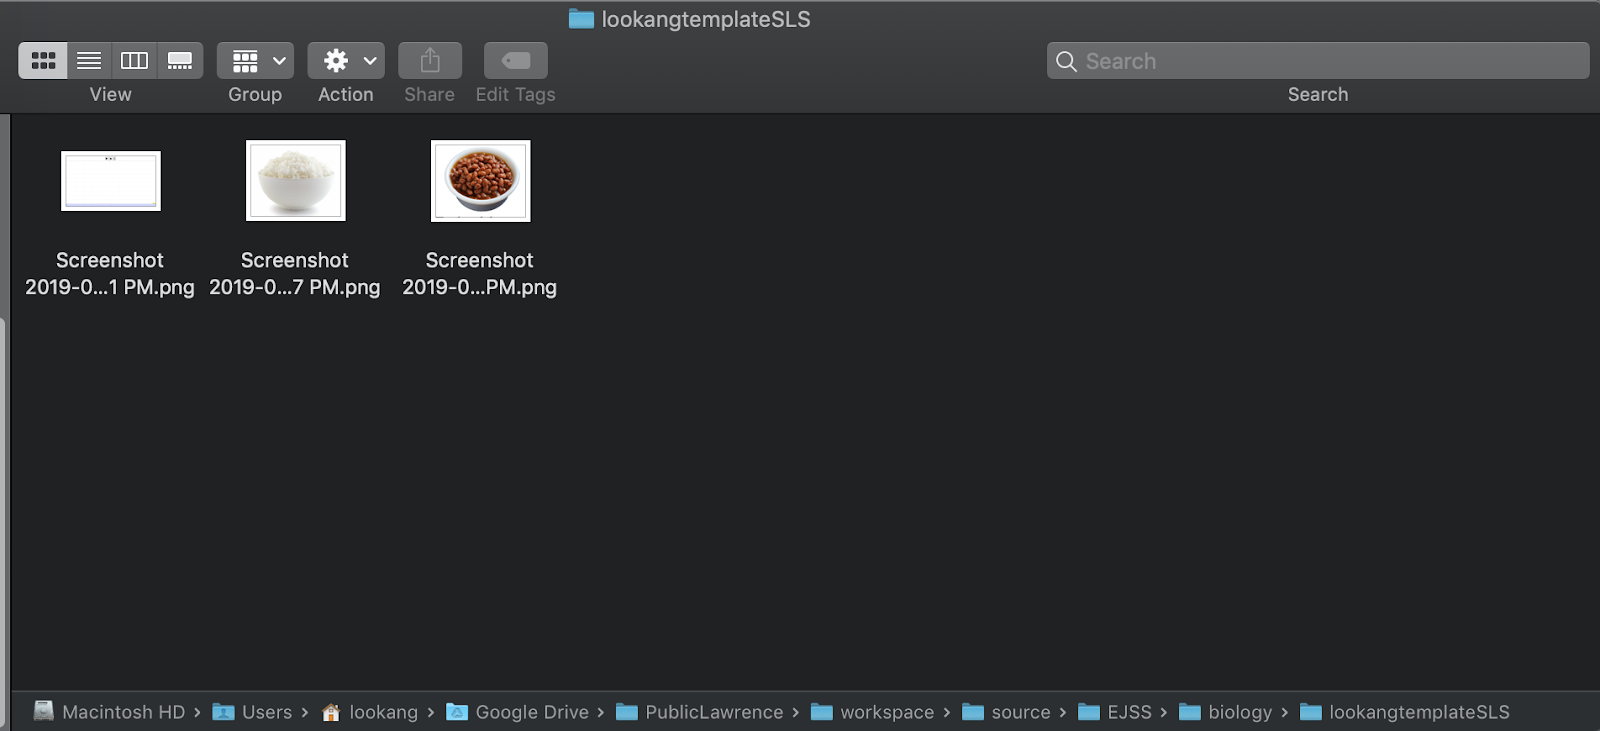
- or you can just download this and copy into the workspace folder associated with the source file

rice

baked beans
- for me, the path is /Users/lookang/Google Drive/PublicLawrence/workspace/source/EJSS/biology/lookangtemplateSLS
- go to Model - Variables - Var Table and add imageUrl , initial value as "" of n dimensions
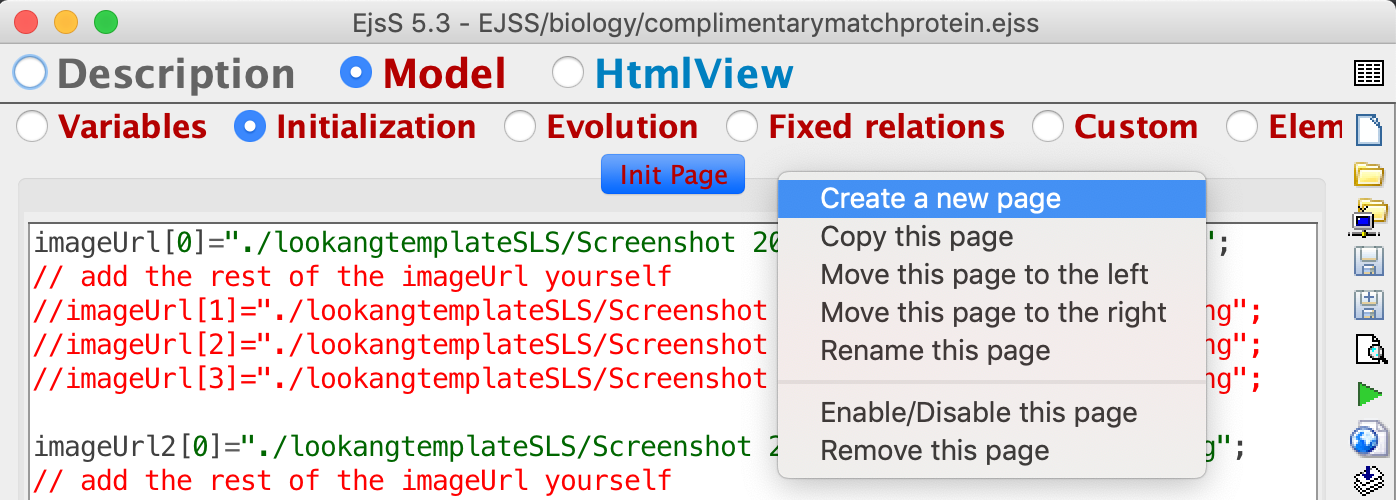
- at Model - Initialization create a new page and add the following code. As a test of the code, i just want to turn on imageUrl[0] on the first card.
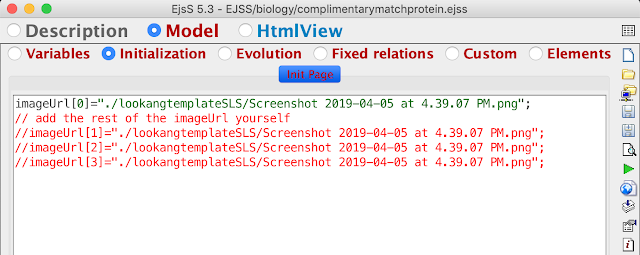
- imageUrl[0]="./lookangtemplateSLS/Screenshot 2019-04-05 at 4.39.07 PM.png";
- // add the rest of the imageUrl yourself
- //imageUrl[1]="./lookangtemplateSLS/Screenshot 2019-04-05 at 4.39.07 PM.png";
- //imageUrl[2]="./lookangtemplateSLS/Screenshot 2019-04-05 at 4.39.07 PM.png";
- //imageUrl[3]="./lookangtemplateSLS/Screenshot 2019-04-05 at 4.39.07 PM.png";
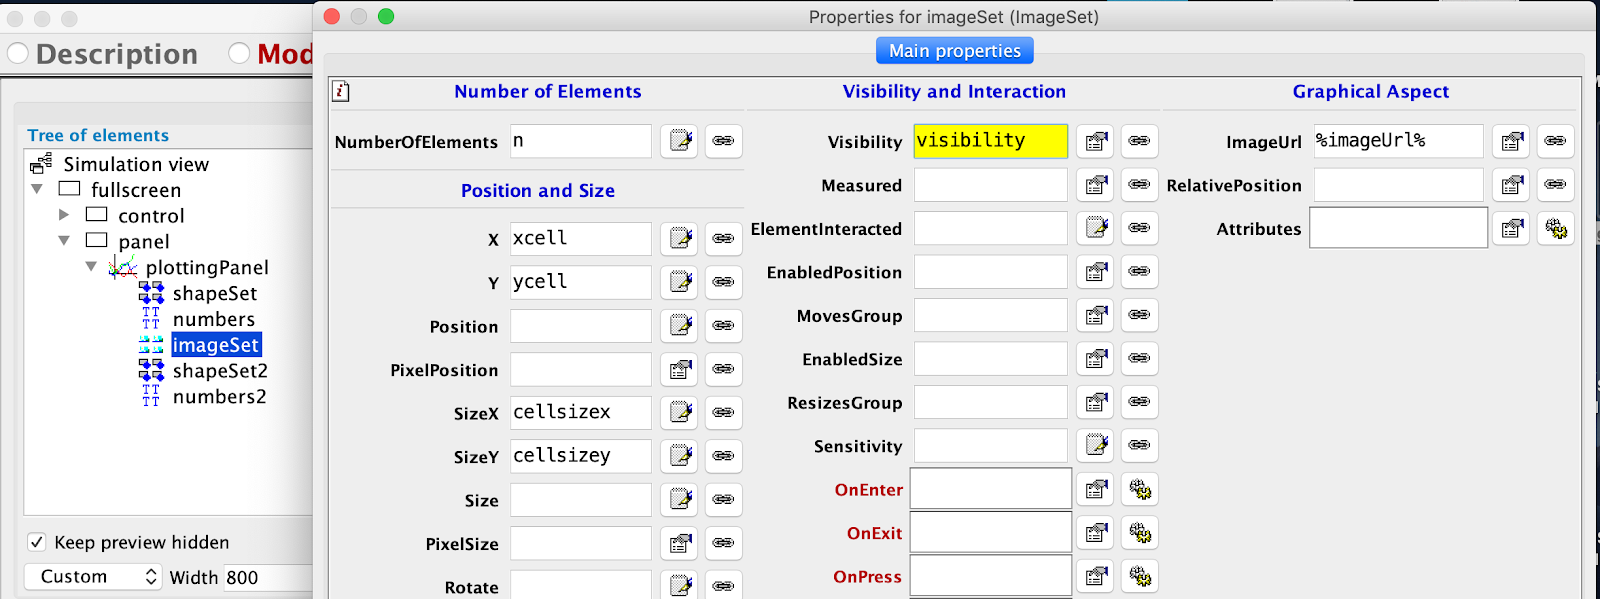
- go to HtmlView - add a new imageSet from the 2D drawables and add these properties

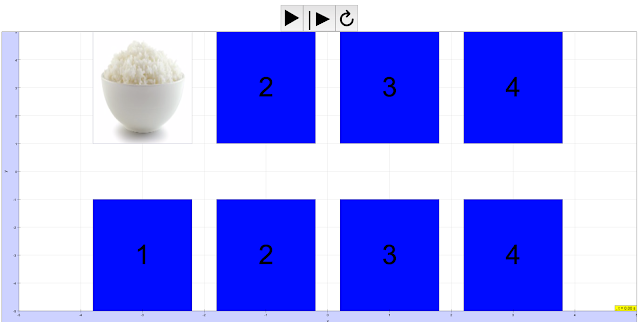
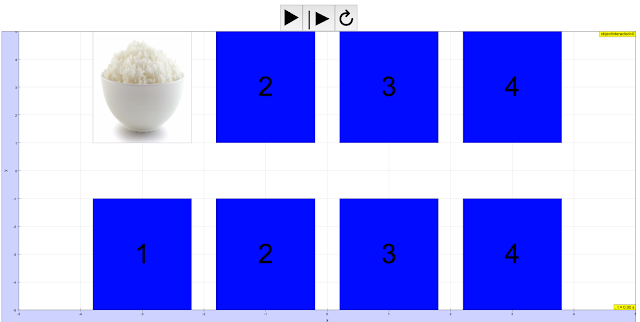
- run the simulation to test the new effects, the new rice picture should appear
- the idea here is to click on the box 1 and it turns the visibility of the imageSet to true. go to Model - Variables - Var Table and add visibility and initial value as false and on n dimensions
- go to HtmlView - imageSet and double click on it to pop up the properties and add Visibility as visibility which controls what to show up

- next go to HtmlView - shapeSet and double click on it and edit the properties onPress using this code
- visibility[objectinteracted]=true;
- run the simulation to test, the rice should appear only after the box 1 is press on.
- duplicate the variables for the bottom box 1 baked beans, Model - Variables - copy and add 2 to the back on the names for ease of creation.
- Htmlview - copy and paste the imageSet and rename all the variables with the postfix 2
This document provides a briefing on a tutorial for creating a simple matching card game using HTML5 within the Easy JavaScript Simulations (EJSS) environment, specifically targeted towards the Singapore Student Learning Space (SLS) Hackathon in 2019. The tutorial guides users through the process of building a game where the player needs to match pairs of cards, with scoring and basic game flow. The content emphasizes leveraging existing EJSS features and templates for rapid development.


- do the same for shapeSet2 by adding this code on the OnPress
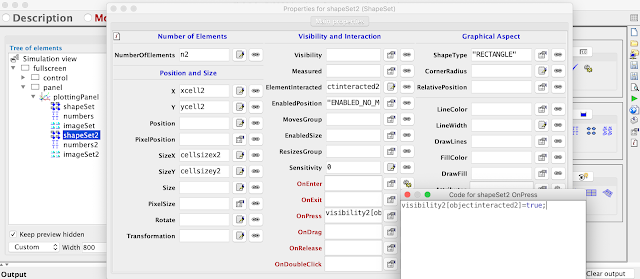
- visibility2[objectinteracted2]=true;
- run the simulation and click on the bottom box 1

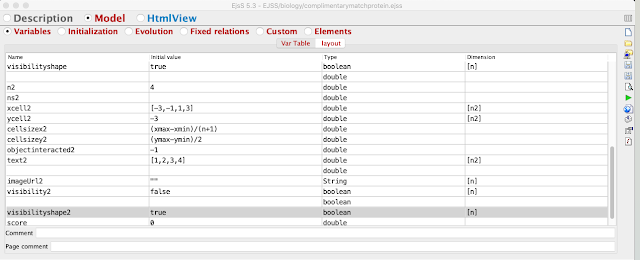
- after getting the correct set box 1 top and box 1 bottom, make the box and image disappear after checking for accuracy. create visibilityshape and visibilityshape2 as shown
- go to HtmlView- shapeSet - properties - Visibility as set it as visibilityshape
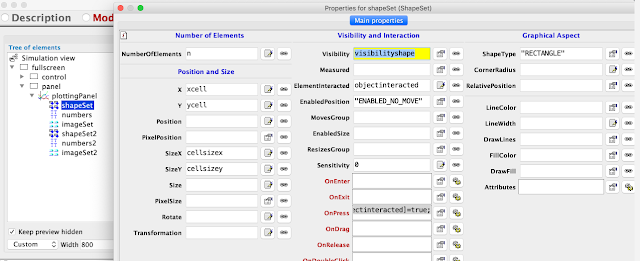
- go to HtmlView- numbers - properties - Visibility as set it as visibilityshape
- go to HtmlView- shapeSet - properties - Visibility as set it as visibilityshape2
- go to HtmlView- numbers2 - properties - Visibility as set it as visibilityshape2
- the above should prepare the boolean to control the true/false of the visibility state of the shapeSet, textSet and imageSet.
- let introduce a variable called score, do you still remember how to do that? hint below in picture
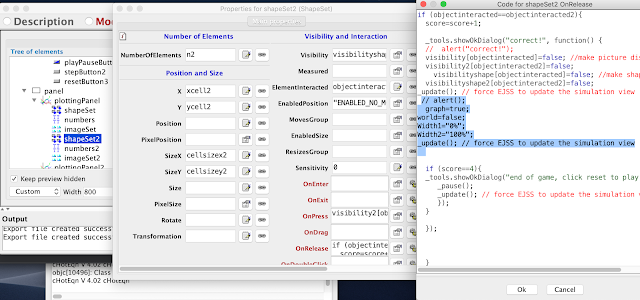
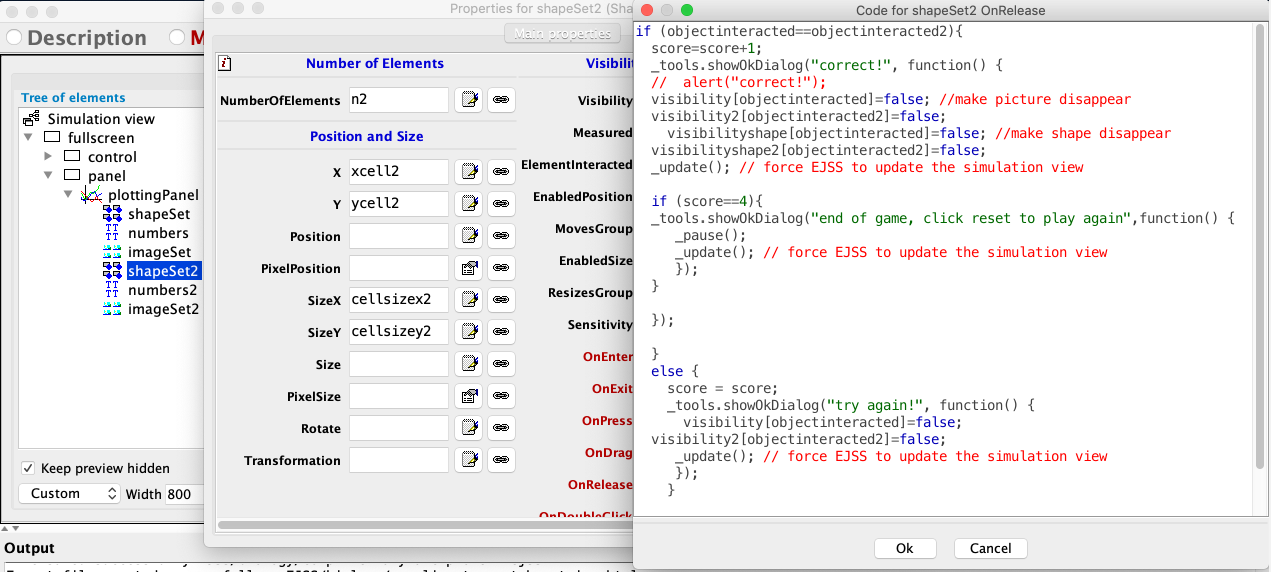
- the code template is below copy and paste into the HtmlView - shapeSet2 - OnRelease
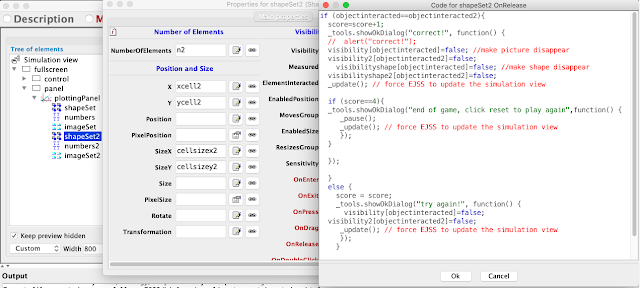
- if (objectinteracted==objectinteracted2){
- score=score+1;
- _tools.showOkDialog("correct!", function() {
- // alert("correct!");
- visibility[objectinteracted]=false; //make picture disappear
- visibility2[objectinteracted2]=false;
- visibilityshape[objectinteracted]=false; //make shape disappear
- visibilityshape2[objectinteracted2]=false;
- _update(); // force EJSS to update the simulation view
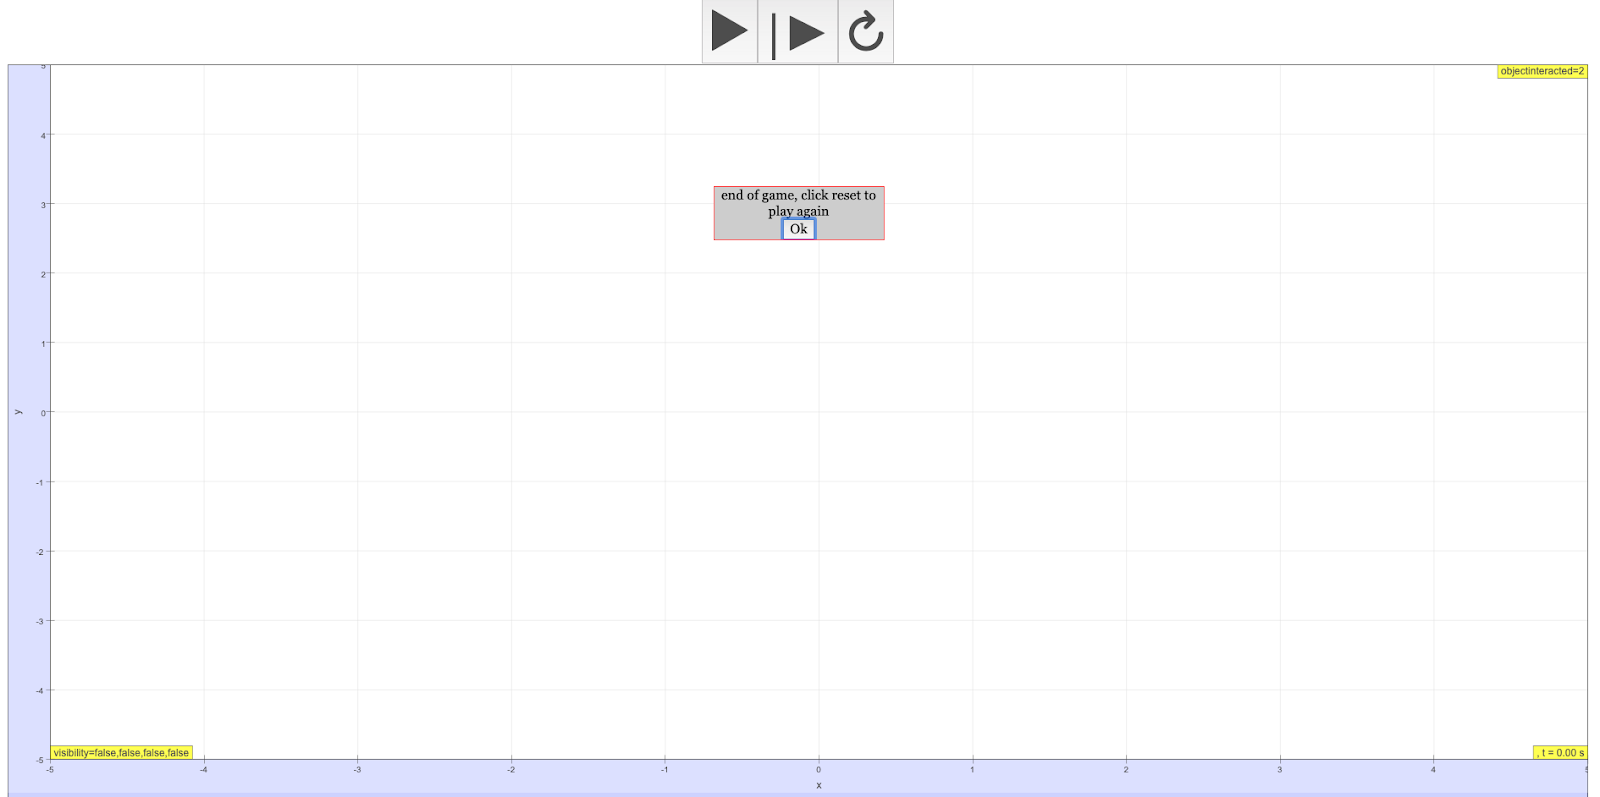
- if (score==4){
- _tools.showOkDialog("end of game, click reset to play again",function() {
- _pause();
- _update(); // force EJSS to update the simulation view
- });
- }
- });
- }
- else {
- score = score;
- _tools.showOkDialog("try again!", function() {
- visibility[objectinteracted]=false;
- visibility2[objectinteracted2]=false;
- _update(); // force EJSS to update the simulation view
- });
- }
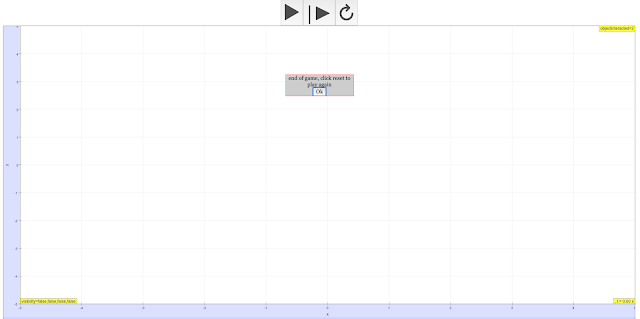
- the run simulation at the clicking on box 1 and 1

- when score==4
- adding instruction at the beginning can be achieve, go to Model - Initialization - create a new page
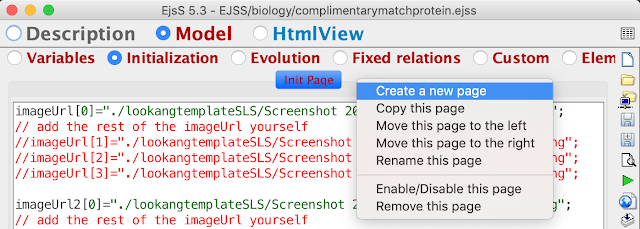
- name it introduction

- right click on the field and select Methods - Tool methods -
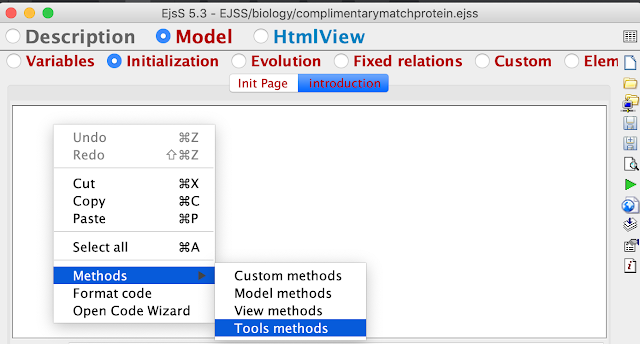
- select _tools.showOkDialog();

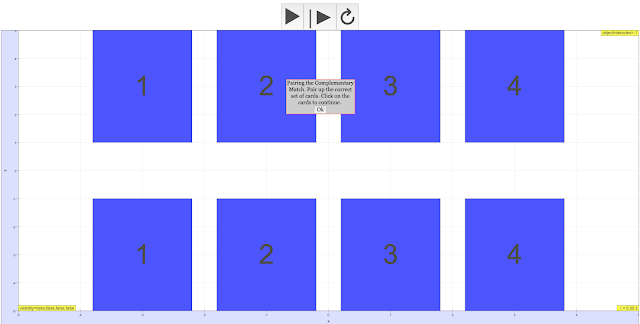
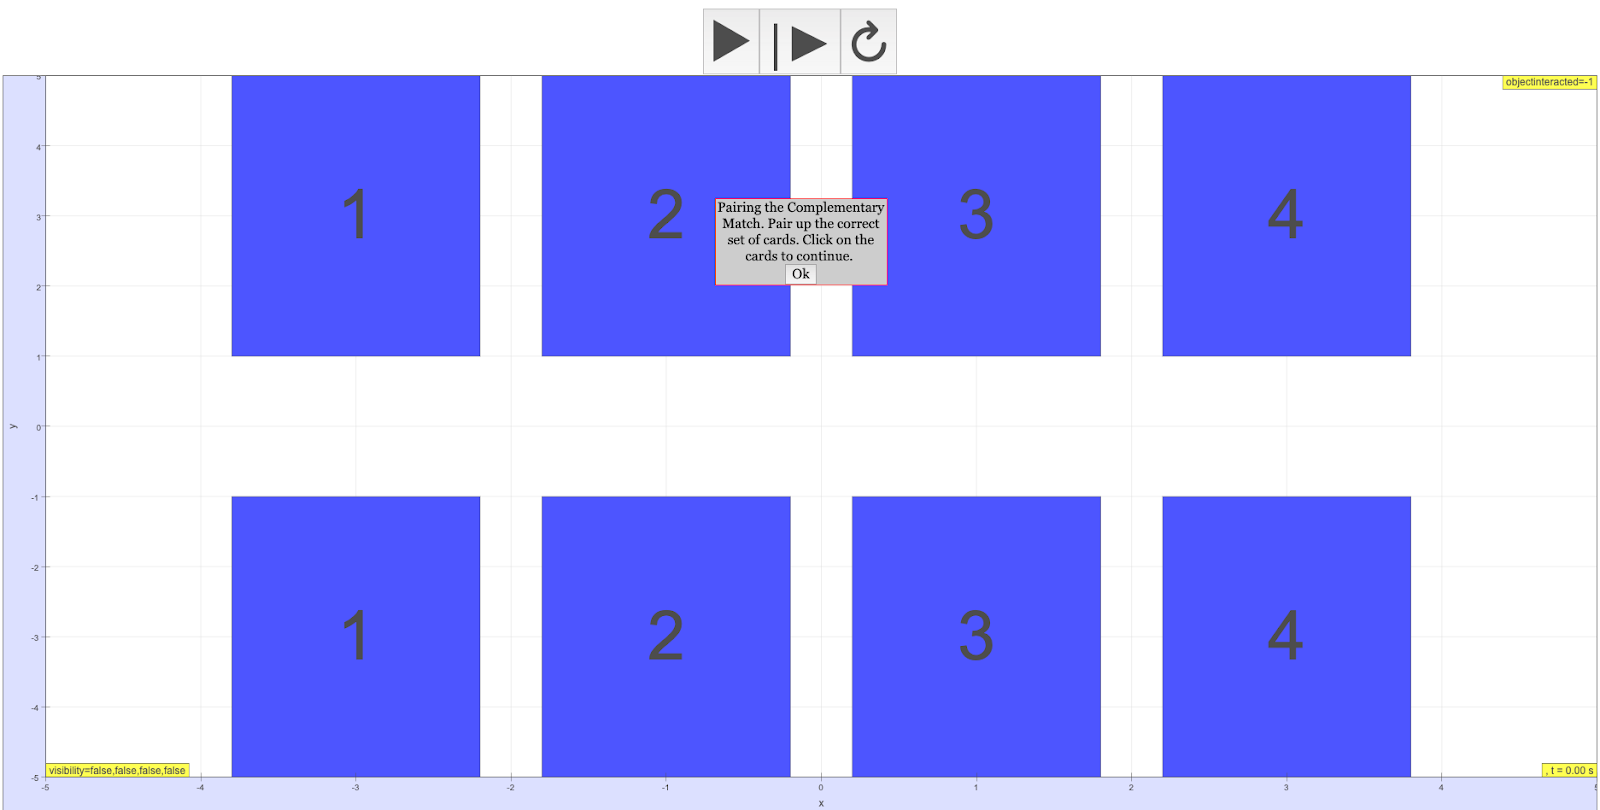
- add your text inside the ()

- _tools.showOkDialog("Pairing the Complementary Match. Pair up the correct set of cards. Click on the cards to continue. ");
- the run simulation will look like this
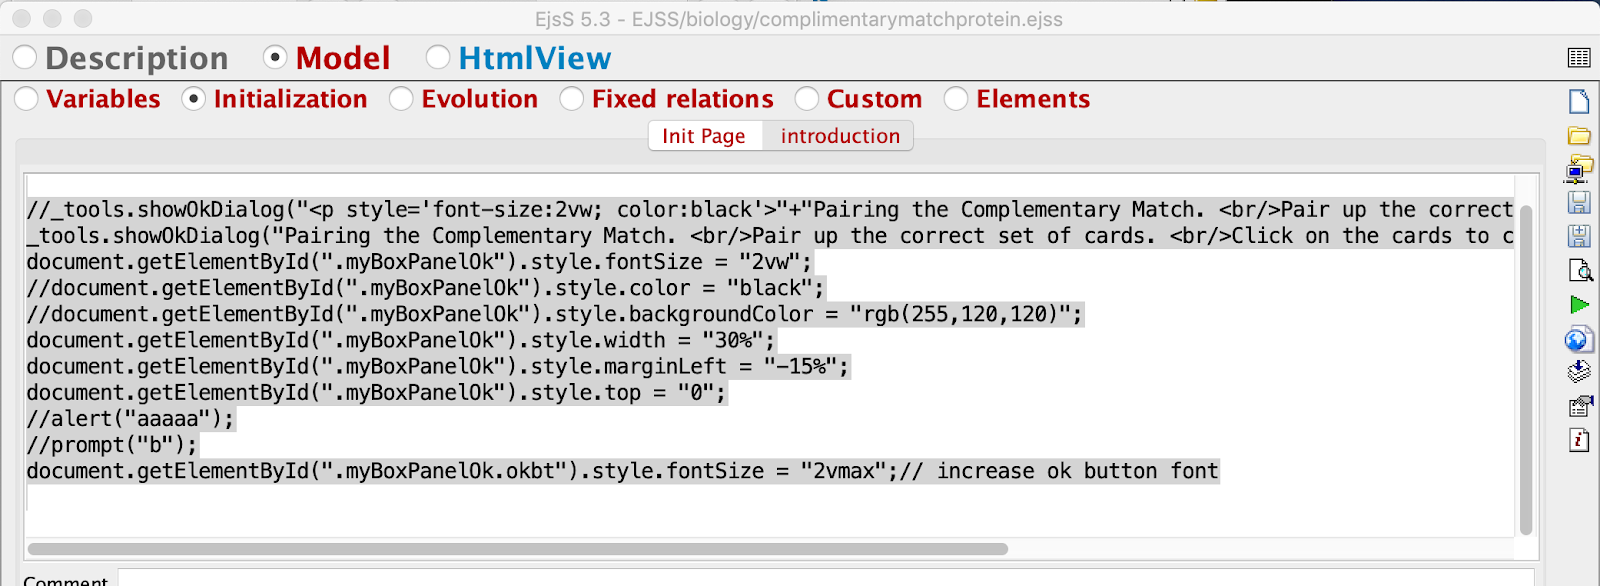
- sometimes, you might want to change the style of this myBoxPanelOk, and copy this and edit it to suit your preference

- // read more about https://www.w3schools.com/JS/js_conventions.asp
- //_tools.showOkDialog("<p style='font-size:2vw; color:black'>"+"Pairing the Complementary Match. <br/>Pair up the correct set of cards. <br/>Click on the cards to continue. "+"</p>");
- _tools.showOkDialog("Pairing the Complementary Match. <br/>Pair up the correct set of cards. <br/>Click on the cards to continue. ");
- document.getElementById(".myBoxPanelOk").style.fontSize = "2vw";
- //document.getElementById(".myBoxPanelOk").style.color = "black";
- //document.getElementById(".myBoxPanelOk").style.backgroundColor = "rgb(255,120,120)";
- document.getElementById(".myBoxPanelOk").style.width = "30%";
- document.getElementById(".myBoxPanelOk").style.marginLeft = "-15%";
- document.getElementById(".myBoxPanelOk").style.top = "0";
- //alert("aaaaa");
- //prompt("b");
- document.getElementById(".myBoxPanelOk.okbt").style.fontSize = "2vmax";// increase ok button font
- run the simulation to check

- sometimes, you may want a new panel with pictures that it would be difficult to do with myBoxPanelOk.
- let do another plottingPanel2 and use Display to control whether is is "inline" and "none"
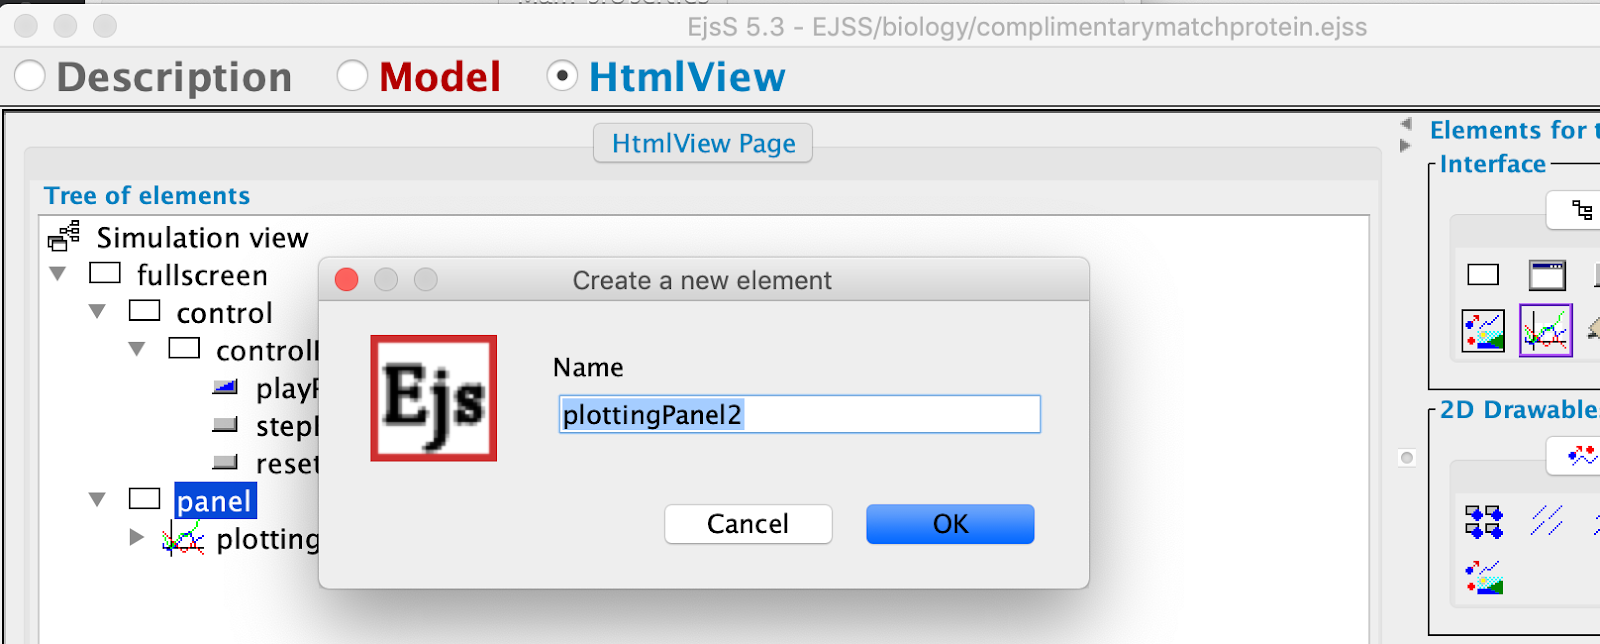
- go to HtmlView - Interface - second tab look for
 plottingPanel and add it to the panel below the first plottingPanel
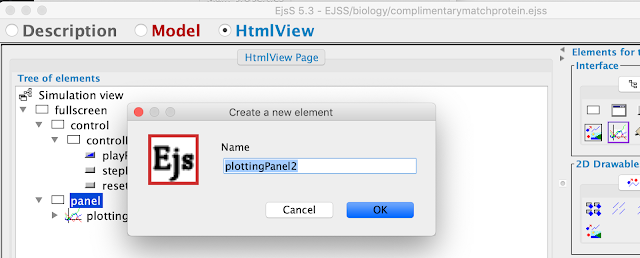
- a new plottingPanel2 is now added
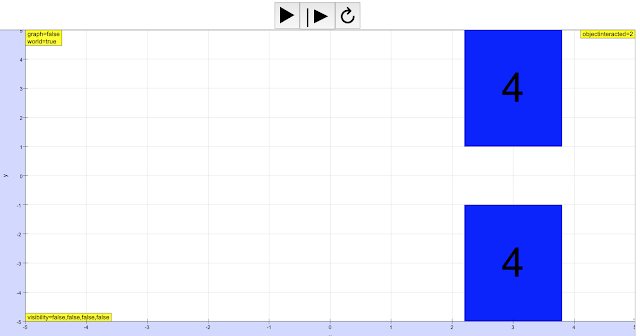
- so let say immediately after clicking the correct set, we Display "none" for plottingPanel and Display "inline" for plottingPanel2 to create the illusion of moving to a new slide.
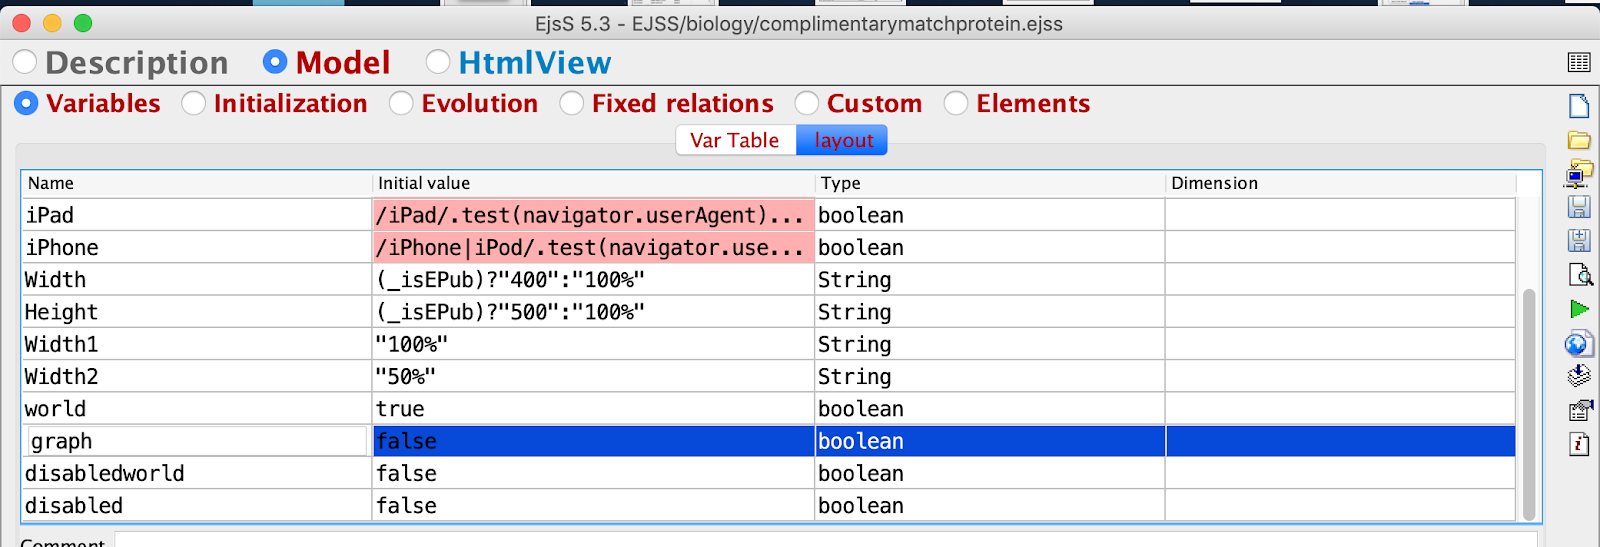
- in the template, i already have added world and graph boolean that can served as states to control when to display which plottingPanels
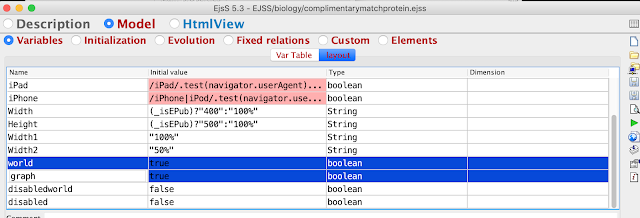
- change the initial value of graph to false
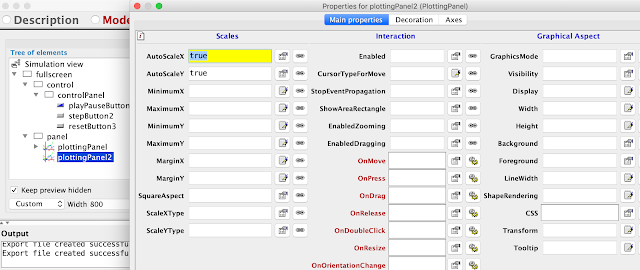
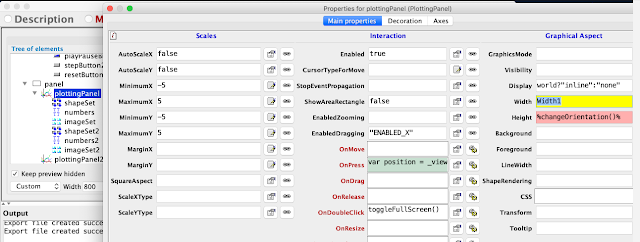
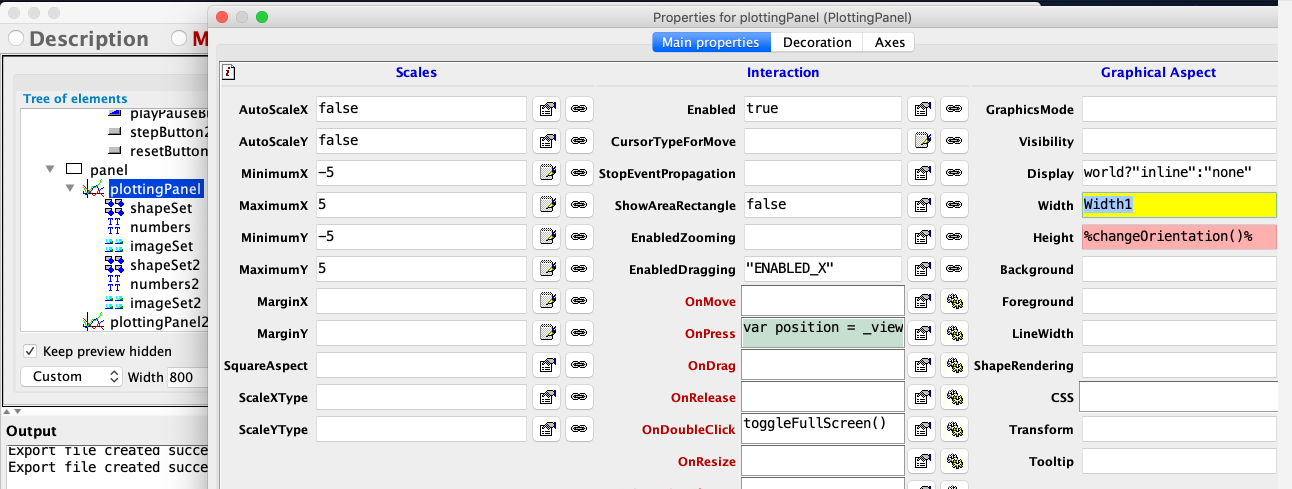
- in HtmlView - plottingPanel - Properties - Display and Width and add these code. the first code check the state of variable world if true do "inline" if false do "none". These are CSS syntax to control the display of the plottingPanel

- world?"inline":"none"
- Width1
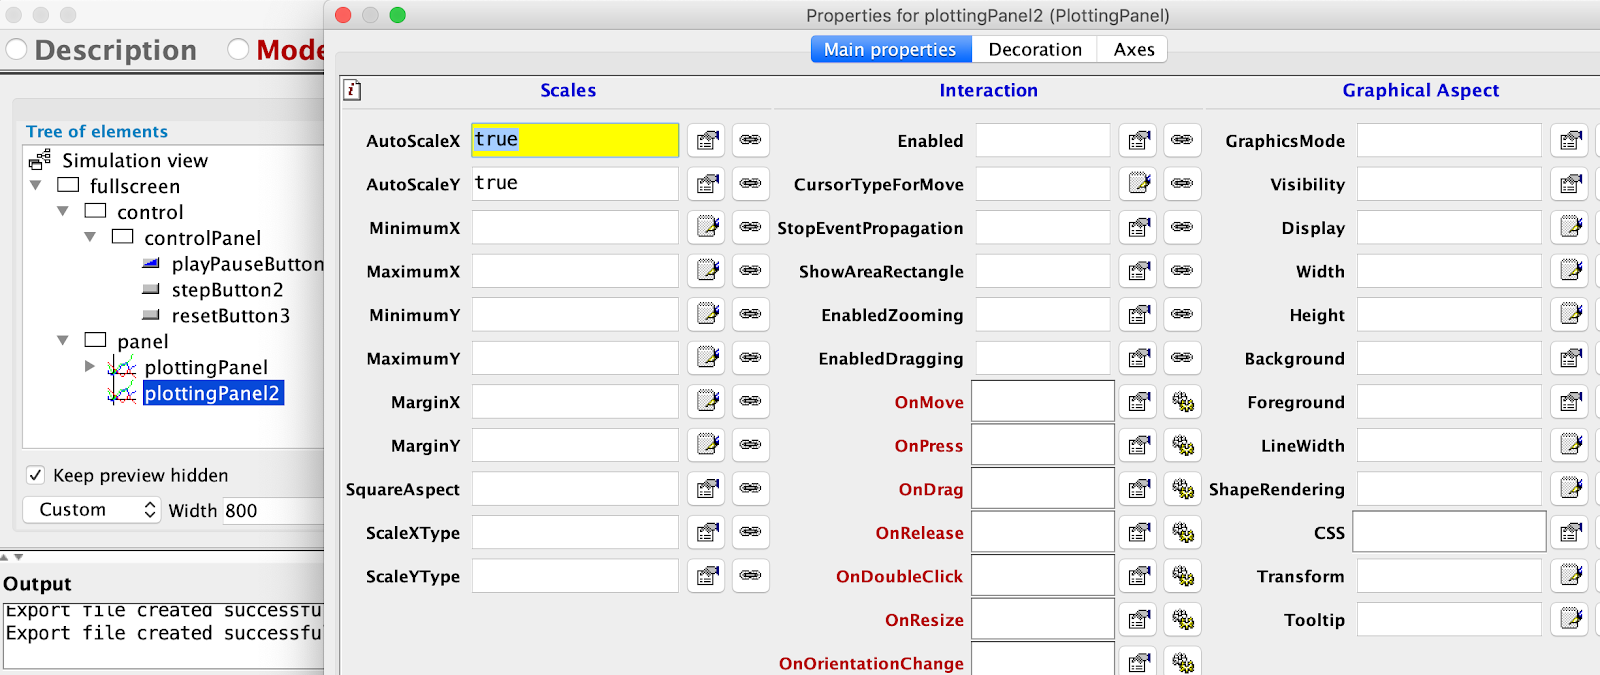
- similarly, HtmlView - plottingPanel2 - Properties - Display and Width and Height and add these code. The height is added with %% to force EJSS editor to accept this as variable and changeOrientation() is a custom function to make the Height as big as possible dynamically on different platforms
- graph?"inline":"none"
- Width2
- %changeOrientation()%
- i will use the step button as a way to go back to card game plottingPanel , go to HtmlView - stepButton - OnClick. the variables graph control display of plottingPanel2 and world plottingPanel and Width1 as plottingPanel and Width2 as plottingPanel2
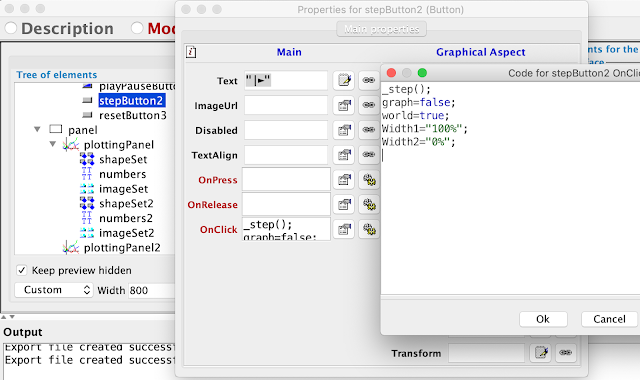
- graph=false;
- world=true;
- Width1="100%";
- Width2="0%";
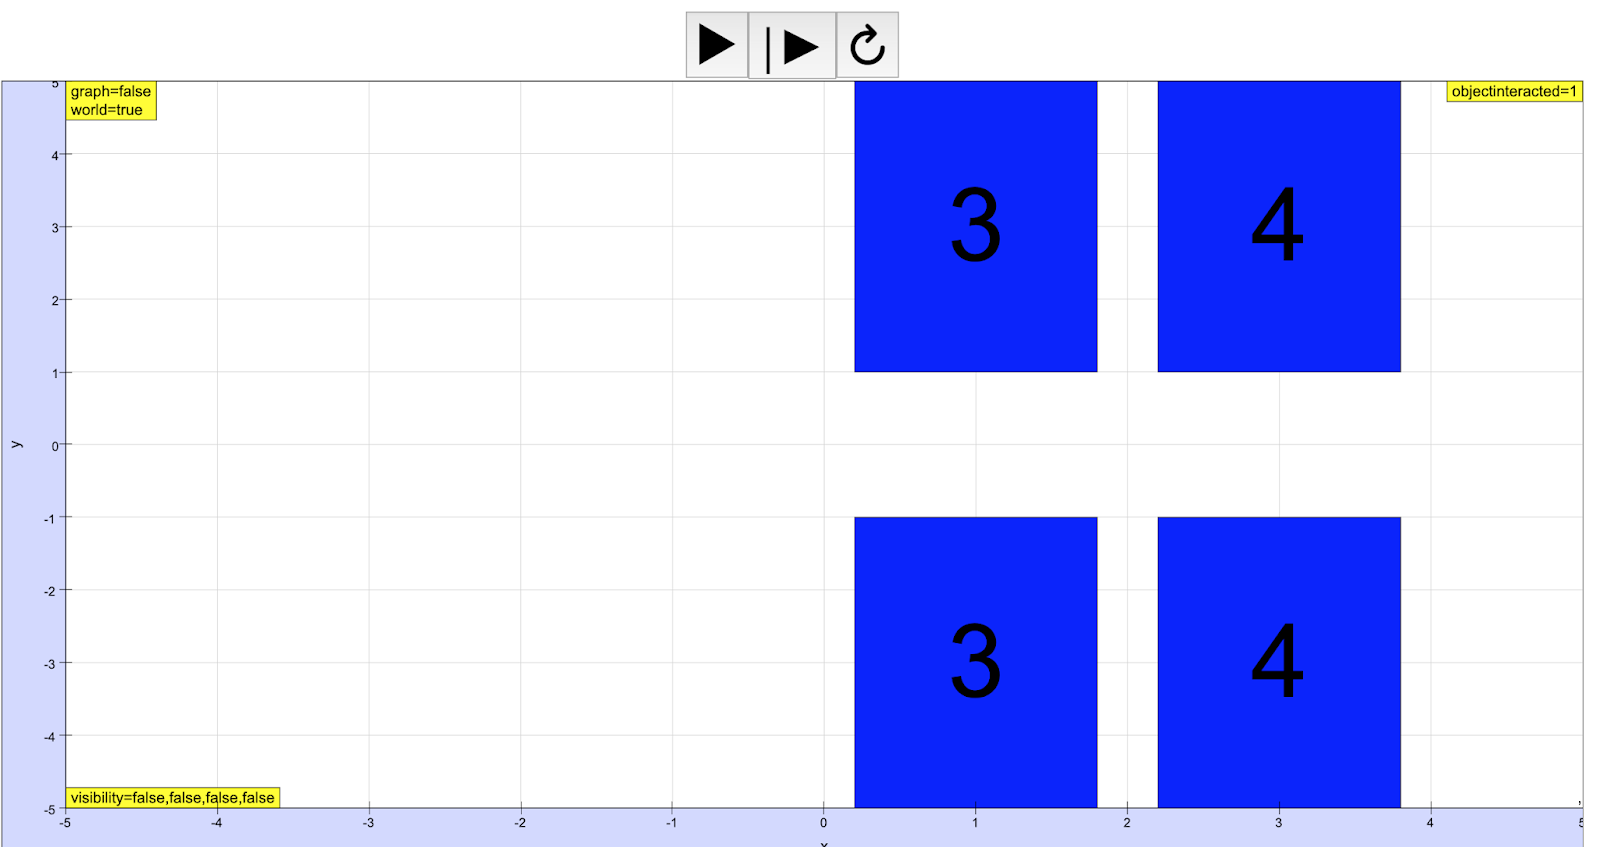
- also go to HtmlView - shapeSet2 - properties - OnRelease add the same code as the position on the screenshot. so that immediately after getting the same number boxes correctly, the display changing to just plottingPanel2 and hide plottingPanel
- run the simulation to test

- after clicking 3 n 3, the plottingPanel2 should appear in the main view

- click step the plottingPanel is the main view
- this template should help anyone interested to continue to work on it as it has the basic function of a matching card game
- https://sg.iwant2study.org/ospsg/index.php/interactive-resources/biology/859-complimentarymatchproteinv2 get the source code there
- embed code


For Teachers
[text]
Research
[text]
Video
[text]
Version:
Other Resources
[text]
Frequently Asked Questions about Creating a Matching Card Game with EJSS
- What is the purpose of this tutorial? This tutorial provides a step-by-step guide on how to create a simple matching card game using the Easy JavaScript Simulations (EJSS) editor, specifically for the Singapore Student Learning Space (SLS) Hackathon. It focuses on the fundamental steps involved in setting up the game interface, defining interactive elements, and implementing basic game logic such as scoring and win conditions.
- What are the basic steps to create the card game structure in EJSS? The initial steps involve downloading a basic EJSS template, defining variables for screen boundaries and card dimensions, and creating visual representations of the cards using ShapeSets in the HTMLView. Properties such as position and size are configured for these shapes. Enabling interactivity without movement is achieved by adjusting the elementInteracted and Sensitivity properties, and setting EnabledPosition to "ENABLED_NO_MOVE".
- How are the pairs of cards and their corresponding images implemented? To create matching pairs, variables and ShapeSets are duplicated and renamed with a numerical suffix (e.g., xmin2, shapeSet2). Their positions are adjusted to create a second set of cards. Images are added using ImageSets, and their visibility is initially set to false. A variable like imageUrl stores the paths to the image files. The onPress event of the top cards is programmed to set the visibility of the corresponding image to true, revealing the picture when a card is clicked.
- How is the scoring system implemented in this game? A variable named score is introduced. The game logic to increase the score for a correct match and potentially decrease it for an incorrect match is implemented within the onRelease event of the second set of cards. An if condition checks if the objectinteracted (the first clicked card) is the same as objectinteracted2 (the second clicked card). If they match, the score increases, and a "correct!" dialog appears, followed by the disappearance of the matched cards.
- How does the game indicate a correct or incorrect match to the user? Upon releasing the click on a card in the second set, the onRelease event code compares the objectinteracted and objectinteracted2 variables. If they are equal, a dialog box appears displaying "correct!". If they are not equal, a "try again!" dialog is shown. In both cases, the visibility of the revealed images is set back to false after the dialog is acknowledged, effectively hiding them again for the next attempt.
- How is the end of the game and the reset functionality handled? Within the scoring logic, another if condition checks if the score reaches a predetermined value (e.g., 4 for four matching pairs). If the score equals this value, an "end of game" dialog is displayed, and the game is paused using _pause(). A reset button (part of the basic template) would typically be used to reset the score and the visibility of all cards and images to their initial states, allowing the user to play again.
- How can introductory instructions or additional panels be added to the game? Introductory instructions can be added by creating a new initialization page in the Model section and using the _tools.showOkDialog() method to display a message at the start of the simulation. Additional panels can be created in the HTMLView using plottingPanel elements. The visibility of these panels can be controlled using boolean variables (e.g., world, graph) and their Display property, allowing for transitions between different views within the simulation.
- Where can I find the source code for this matching card game template and other EJSS resources? The source code for the complementary matching protein game template can be downloaded from the provided link: https://sg.iwant2study.org/ospsg/index.php/interactive-resources/biology/859-complimentarymatchproteinv2. The Open Educational Resources / Open Source Physics @ Singapore digital library contains over 500 simulations and games, with source code available for download and modification using the EJSS editor.
- Details
- Written by Loo Kang Wee
- Parent Category: Interactive Resources
- Category: Biology
- Hits: 7115