Translations
| Code | Language | Translator | Run | |
|---|---|---|---|---|
 |
||||
Credits
lookang
SLS Hackathon Tutorial 2 Study Guide: Catch Correct Chinese Phrase Game
Overview
This study guide is designed to help you review the concepts and steps involved in creating the "Catch Correct Chinese Phrase" game using Easy JavaScript Simulations (EJSS), as outlined in the provided tutorial. It covers the project's goals, required tools, step-by-step development process, and considerations for enhancing the game for learning within the Singapore Student Learning Space (SLS).
Key Concepts
- EJSS Authoring Tool: Software used to create interactive simulations and games using Java and JavaScript.
- HTML5: Markup language used to structure and present content on the web, enabling cross-platform compatibility.
- SLS (Student Learning Space): Singapore's national online learning platform.
- Simulations and Games in Education: Using interactive elements to engage students and facilitate learning.
- JavaScript: Programming language used to add interactivity and dynamic behavior to web pages and EJSS simulations.
- Variables: Named storage locations in a program that hold data (e.g., time, position, speed, score).
- Arrays: Ordered collections of data elements that can be accessed using an index.
- Initialization: Setting the initial values of variables and the state of the simulation at the start.
- Evolution (ODE): Defining how the simulation changes over time, often using ordinary differential equations.
- Events: Specific conditions within the simulation that trigger actions (e.g., apple reaching the bottom, collision).
- HTML View: The visual representation of the simulation, including interface elements and 2D/3D graphics.
- 2D Drawables (ImageSet, Image, TextSet): Elements used to display graphics and text within the simulation view.
- Interaction: Enabling user input, such as clicking or dragging, to interact with the simulation.
- Collision Detection: Determining when two or more objects in the simulation come into contact.
- Scorekeeping: Implementing a system to track and display the user's progress.
- Randomization: Introducing random elements, such as apple falling speeds and positions, to enhance replayability.
- Sound Integration: Adding audio cues to provide feedback to the user.
- Text-to-Speech Synthesis (Web API): Using browser capabilities to convert text into spoken words.
- Game Mechanics: The rules and procedures that govern how the game is played.
- Data Analytics (Logging): Recording user interactions and game events for analysis.
- User Interface (UI): The elements that allow users to interact with the simulation (e.g., buttons, combo boxes).
- Packaging and Deployment: Preparing the simulation for sharing and uploading to platforms like SLS.
Quiz
Answer the following questions in 2-3 sentences each.
- What is the primary goal of the SLS Hackathon mentioned in the tutorial?
- Name two essential tools required to follow Tutorial 2 and briefly describe their purpose.
- What programming language is the EJSS editor primarily defaulted to for creating interactives for SLS and mobile phones since April 2019?
- Explain the role of "Variables" and "Evolution (ODE)" in creating the falling apple game.
- Describe how the tutorial explains making the apples fall at different random speeds.
- What is the purpose of using "ImageSet" and how is an apple image added to the game?
- Explain how collision detection is implemented between the basket and the apples in the tutorial.
- What is the function of the shuffleArray() function introduced in the tutorial, and when is it called?
- How is sound added to the game when the basket catches the correct apple?
- What steps are involved in packaging the EJSS simulation for uploading and sharing, particularly on the SLS platform?
Quiz Answer Key
- The primary goal of the SLS Hackathon is for teachers to form teams and create SLS HTML5 resources, such as simulations or games, by doing their own coding using tools like EJSS. These resources are intended to be uploaded into SLS for use within at least one lesson.
- Two essential tools are the EJSS authoring tool (for creating the simulation) and a Chrome Browser (for testing and utilizing JavaScript features). The EJSS tool allows users to design the game logic and visual elements, while Chrome provides a compatible environment for running and debugging the HTML5 output.
- Since April 2019, the EJSS editor has been primarily defaulted to JavaScript for creating interactives. This shift allows for the development of resources that can run seamlessly on SLS, mobile phones, and other web-compatible platforms.
- Variables are used to store and manage the data within the game, such as the time (t), time increment (dt), apple positions (x, y), and falling speeds (vy). The Evolution (ODE) section defines how these variables change over time, specifically controlling the falling motion of the apples based on the defined independent variable and increment.
- To make the apples fall at different random speeds, the tutorial introduces the use of JavaScript's Math.random() function. This function generates a random number between 0 (inclusive) and 1 (exclusive), which is then used to determine the falling speed (vy) of each individual apple, ensuring variability.
- The "ImageSet" drawable is used to display multiple instances of the same image, in this case, the four apples. To add an apple image, the user needs to create a folder for the project, save an apple image (preferably in PNG format for transparency) within that folder, and then specify the path to this image in the "ImageUrl" property of the ImageSet.
- Collision detection between the basket and an apple is implemented by using the Pythagorean theorem to calculate the distance between their centers. An "Event" is created with a "Zero condition" that checks if this distance is less than a определенное threshold (e.g., 0.5), indicating a collision.
- The shuffleArray() function is a custom JavaScript function used to randomly rearrange the elements within an array. In the context of the game, it is used to shuffle the horizontal positions (x) of the apples, making the correct answer (apple with the number 1) appear in a different location each round. This function is called in the "Initialization" section at the start of the simulation and after a correct collision.
- Sound is added to the game by first adding an Audio element to the HTML View interface. Then, the path to a sound file (e.g., "Ding Sound Effect.m4a") is specified in the "audioUrl" property of this Audio element. Finally, the _view.audio.play(); code is added to the "Action" section of the "collisioncorrect" Event to play the sound when the correct apple is caught.
- Packaging the simulation for sharing involves first saving the EJSS project file (.ejss). Then, to create a distributable package, the user needs to zip the model, which bundles all necessary files (including the .ejss file, images, and sounds) into a single archive. This zipped file can then be uploaded to platforms like SLS.
Essay Format Questions
- Discuss the pedagogical benefits of using interactive simulations and games, like the "Catch Correct Chinese Phrase" game, within the context of language learning in the SLS environment. Consider factors such as student engagement, active learning, and immediate feedback.
- Analyze the step-by-step development process of the "Catch Correct Chinese Phrase" game using EJSS, highlighting the iterative nature of game design and the importance of testing and debugging at each stage.
- Evaluate the role of JavaScript in enhancing the functionality and interactivity of EJSS simulations. Provide specific examples from the tutorial where JavaScript code is used to implement game mechanics, randomization, and user feedback.
- Explain the significance of incorporating user interface elements, such as the plotting panel, buttons, and combo boxes, in creating an effective and user-friendly educational game within EJSS. Discuss how these elements contribute to the overall learning experience.
- Discuss the potential for expanding and adapting the "Catch Correct Chinese Phrase" game for different subjects or learning objectives within SLS. Consider modifications to the game mechanics, content, and feedback mechanisms.
Glossary of Key Terms
- Algorithm: A step-by-step procedure for solving a problem or accomplishing a task.
- API (Application Programming Interface): A set of rules and specifications that allow different software components to communicate and interact with each other.
- Attribute: A property or characteristic of an object or element (e.g., the width of a plotting panel).
- Bug: An error or flaw in the design, code, or operation of a software program that causes it to produce an incorrect or unexpected result.
- Debugging: The process of identifying and removing errors (bugs) from a software program.
- Dimension (of an array): The number of indices required to identify each element in an array (e.g., a one-dimensional array has one index).
- Embed: To integrate content (like a simulation) from one source into another (like a webpage).
- Framework: A reusable design or structure that provides a foundation for developing software applications.
- Function (in programming): A block of organized, reusable code that performs a specific task.
- Increment: A small, fixed amount by which a variable is increased (e.g., dt for time).
- Metadata: Data that provides information about other data (e.g., title, author, description of a simulation).
- Object: A fundamental concept in object-oriented programming, representing an entity with data (attributes) and behavior (methods).
- Open Educational Resources (OER): Teaching, learning, and research materials that are freely available for use, adaptation, and sharing.
- Open Source: Software for which the original source code is made freely available and may be redistributed and modified.
- Parameter (in programming): A value that is passed to a function to customize its behavior.
- Syntax: The set of rules that define the structure of a programming language.
- Workspace (in EJSS): A directory where EJSS saves project files and related resources.
Tutorial
TRAISI CODE: 31275 https://traisi.moe.gov.sg/Utility/UT_Default.asp
|
(31275) |
||||||
|
Course Description |
Org Agency |
Duration |
Classes Available(Please Click on a Date) |
Max Class Size |
Course/ Class Fee |
Comments |
|
Objective: |
Technologies for Learning, ETD, MOE |
32 Hr(s) |
|
|
|
undefined |
Traisi
Creating Interactive Electronic Textbook Overview: This 4-day workshop provides a bootstrapping experience to ComPADRE Open Source Physics project and the Easy Java/JavaScript Simulations tool. Objective: Basic how to and explore the Easy Java/JavaScript Simulations (EjsS) modeling and authoring tool.
Create brand new simple mathematical and physics computational model
remix existing models in the digital libraries, especially the Singapore Library.
create or remix one model based on an existing example in the library
export 1 to 2 existing model with supporting text into an epub file as an electronic interactive textbook-chapter. Content: Introduction to the workshop
Exploration of the OSP-EJS-ComPADRE Platform
Exploration of EjsS
Independent work and consultations on curriculum design
Creating simple models with EJS
Creating models with EJS part 2
Remixing one model
Exporting as epub
Reflecting/presenting teacher performance task sharing
Target Audience: Level: All Levels Mathematics and Physics Primary, Secondary & JC/CI
SDF: DG: \) 0
Pre-Requisite: N.A
Date & Venue: Begin Date/time:End Date/time:Application Closing Date:Venue:07/11/2016 09:00 - 17:3010/11/2016 09:00 - 17:3023/10/2016edulab@AST, Blk J, Level 4, No: 2, Malan Road, Singapore 109433, Academy of Singapore Teachers, Tel: 66641450Frequency:
Please bring your SSOE Notebooks with fully charged Battery.
Course Administrator: Organising Agency: Name: Neo Chin Heng Technologies for Learning, ETD, MOE Phone: 66641450 Email:
Trainer: Training Agency: Prof Francisco, Prof Wolfgang University of Murcia (Spain), Davidson College USA, Educational Technology Division (MOE)
Assessment Mode: Nil
No. of Applications: Max. Class Size: 3 30
Date: 7-Nov to 10-Nov Title: Creating Interactive Electronic Textbook http://www.compadre.org/osp/features/NewsDetail.cfm?ID=549
Time: 0900 - 1730 hours
Loo Kang
University of Murcia, Spain
Davidson College USA
Prof Francisco Esquembre
Prof Wolfgang Christian
ETD
Lawrence WEE
Installation and Tools required, Day 0
- Recommended to bring and use a personal laptop with admin rights to install software, edulab has 18 windows laptop to be shared. Software needed for the workshop include another list from Prof. Wolfgang
- Windows/Mac Laptop need these
- EJSS authoring tool Direct Download recommended EjsS_5.2_161103.zip official
- Bluegriffon XHTML and HTML editor for page creation for epub
- Chrome Browser
- Java Development Kit, needed to create apps for the iTunes and Google Play stores. Note that the JDK also installs the latest JRE.
- No installation required https://www.mathtowebonline.com/ for equation conversion from LaTeX to MathML supported by epub
- eCanCrusher is a simple drag/drop utility to recompress and decompress EPUB folders/directory structures. It converts the folder into an .epub file and vice versa. Both Mac and Windows versions are available
- IDPF ePub 3 Validator or download this http://www.pagina-online.de/produkte/epub-checker/ The International Digital Publishing Forum (IDPF) site to provide validation information for EPUB 2 and 3 documents. Validate your ePub documents before you release them!
- On your iOS devices need iBook App to open epub
- On your Android devices need Gitden EPub Reader for Android A good Android reader that supports ePub 3 and JavaScript simulations
Proposed Programme
7 Nov 2016
30 pax Beginners’ Workshop edulab@AST by Loo Kang and Tze Kwang
– provide 30 pax beginners’ workshop (model simple physical systems such as constant speed (maybe day2) spring mass with damping using EjSS) in eduLab@AST>
09h00 - 10h30: Introduction to the workshop, Create a brand new simulation Step-by-step EJSS tutorial
- Unzip the EJSS modeling tool
- Open the EJSS modeling tool by double-clicking on the icon EjsConsole.jar depending on where you unzip, typically it could be the D Drive for edulab laptops.

-
- the console appears and shortly the editor appears, accept any pop-up and click through any info like author and email, you can do later in your free time.

- If you don't get this page, go to the console and change Programming language to Javascript as epub only runs with JavaScript

- Close the tool click on top right corner X and relaunch it, it should be open as JavaScript in the future as it remembers your preferences

- to create a simulation go to - Model - Evolution - Click to create a page of ODEs Ordinary Differential Equations, after clicking that area, accept the default name Evol Page, you can change the name later if desired
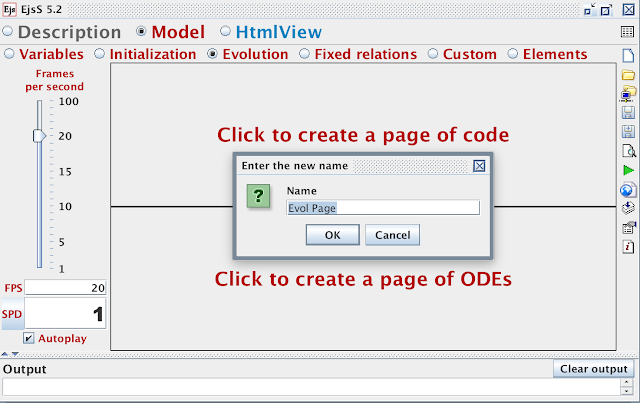
- By now, the Evolution page will look like this

- to move a simple object coordinate (x,y) move to the right with time with velocities (vx,vy), t and time step dt, double click to edit and key in the variables into the inputs fields as shown

- click the green arrow button to generate the simulation, it will prompt to save, choose the default location and give it name or accept the default name Unnamed.ejss

- after File saved successfully Unnamed.ejss, click on the green run button again, EJSS will prompt there is no HTML view, click OK to create the view

- Click to the top radio button, HtmlView and Click on the Left panel to create the VIEW as suggested

- to create a 2D PlottingPanel view, click the icon from the right Interface Compound Element and release the button, move the mouse to the position of the Simulation view to drop the correct layer to the view

- the EJSS will automatically create several displayPanel containing a topPanel with a trail and controlPanel with play, init and reset buttons, time label and a blank input field as a startup kit.

- to create an object, select the first object and click and release and move the mouse over to the position of the plottingPanel and click again to drop the 2D object into this position

- accept the default name by clicking OK

- observe the shape is inserted into the plotting Panel

- to edit any element, double click and a pop up appear with more details about the element shape can be controlled via variables assigned later. in key the variables x and y, sizex and sizey, shapetype "ellipse for circle" line and fill color for determining properties of the shape

- notice the pink color indicates EJSS does not understand what they are, so go to the Variables radio button to create these new variables you define, accept the default names when prompted

- double click on the Name and key in the variables for this simulation, t, dt, x, y, vx, vy etc

- trying to run the simulation and the simulation is still not rendering correctly.

- now, key in Initial value for the variables, t = 0, dt = 0.05, x =0, y =0, vx =0.1, vy = 0 for example to create an object to move to the left at velocity vx =0.1

- Time to think, reflect with your neighbor how to make an object move to the
- test out whether your simulation can do what you discussed, then click on the picture hints to expand the pictures
- 10h30 - 11h00 Networking and Tea Break
- Controlling the view of the plottingPanel using variables xmin, xmax, ymin, ymax
- notice the simulation you may want to control to make the view bigger say xmin = -2, xmax =2, ymin= -2, ymax =2, to do that, create a new tab (for ease of making your work understandable) by right click and declare these variables in the variable page

- in the new tab, create the variables as shown

- click on the radio button HtmlView and double click on the plottingPanel

- the inputs field control the properties of the plottingPanel, key in as shown

- to test your simulation, click green button run to generate the model, the output view should look something like this

- Create a trail that shows where the object was before above the object
- to move the layering position of elements right click and select the desired move, for this case, select move down
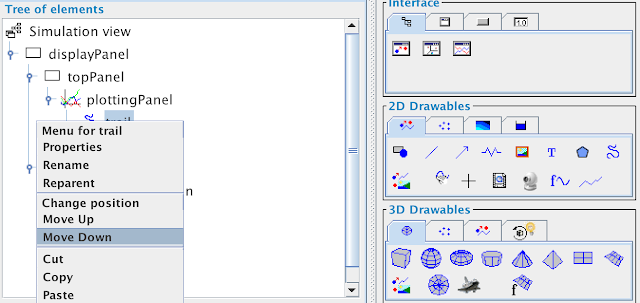
- to create a trail that follows the coordinates (x,y), key in a show and add
- that creates a dotted line effect. run the simulation to test the result and it should look something like this
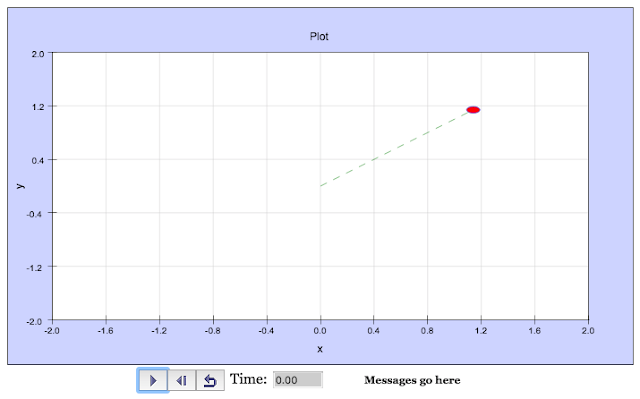
- Simulation do not autostart by default
- to disable auto , go to Evolution, uncheck the autoplay checkbox

- Create a slider to allow inquiry
- go to HtmlView, Interface last tab, first icon for slider, click and release the mouse move your cursor and click on the playPauseButton

- the slider should be create above the playPauseButton as show

- double click on the slider to edit the input field of the slider to control what variables you have, for example x position or vx velocity etc

- run the simulation to test your changes. so i change the slider, did the simulation behave as you designed?
vx slider after dragging left and right a few times
- Create a checkbox for turning off and on the visual of the trail
- goto radio HtmlView Interface 3 tab top, 4 icon checkbox and click to select, release the mouse and move to the position of the slider and click to drop the checkbox, accept the default name

- double click on the checkbox just created and insert the following variable showv and text to show

- again, the Checked field is pink suggesting EJSS cannot understand it, so go to the Variables radio button and key in Variable name showv Type is boolean
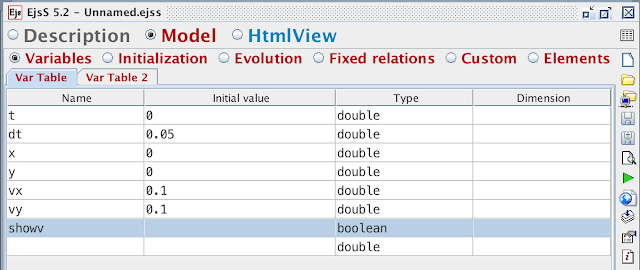
- run the simulation to test the results

- Creating numbers to show in simulation
- one easy way to create numbers to show is Field, goto HtmlView, Interface 4 tab 4 icon and click to select release the mouse and move over to the position to place the Field say after the slider, right click to move down if need

- double click on the just created field, key in the Value vx, Format "0.0" Width 30 , Background "Magenta" and Tooltip "velocity in x direction"

- the run of the simulation will be something like this

- Remove messagesLabel
- right click on the view element you want to remove, select the option Cut or Remove

- practice removing the timeLabel and timeField as well on your own

- run simulation to check

- Calculate velocity from vx and vy
- at every time step of the simulation, you want the magnitude of velocity to be computed and displayed, we use the Fixed relations to compute, click to create a page of fixed relations

- type in an equation say
- v = Math.sqrt(vx*vx+vy*vy);
- notice EJSS will help you with prompts after the function Math.

- completed the equation and trying the compiler will result in an error or not, but goto Variable page to declare v

- Copying
- one of best time about EJSS is the ability to copy, so copy the Field and paste it onto the control panel
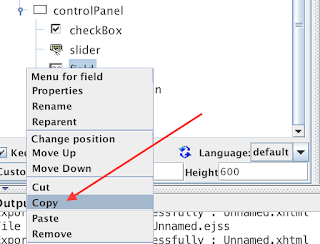
- paste into the controlPanel, it will go all the way to the bottom
- change the properties as shown

- Insert a Label on top of the newly created field2 which is variable v and add text v =

- key in v = into the Text as shown

- run your simulation to check does it look like this? if not, why?

- Insert pictures
- it is possible, i will show one best practice way if the simulation is called Unnamed.ejss, locate the workspace and create a folder to store pictures for the simulation, to find out what, look at your console, for me, it is /Users/lookang/Dropbox/Public/lookangEJSworkspace

- using your file explorer or otherwise, create a new folder of the same name as your *.ejss

- it should look like this

- to EJSS know the source file has auxiliary files, go to top right corner click on information and select the folder created and agree OK

- Cyberwellness find creative commons licenses pictures from Google
- using chrome, search for pictures you want to add
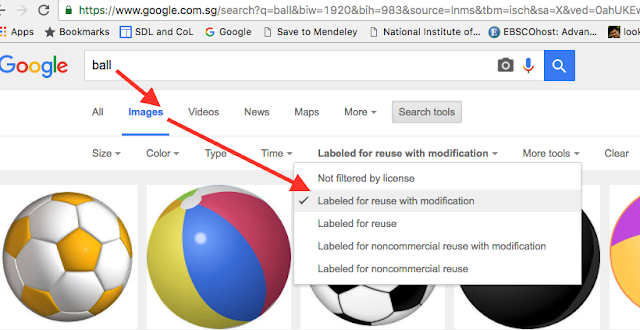
- download the picture and save it into that folder Unnamed, select png files are better with transparency

By Pumbaa80 (Self-published work by Pumbaa80) [GFDL (http://www.gnu.org/copyleft/fdl.html) or CC BY-SA 3.0 (http://creativecommons.org/licenses/by-sa/3.0)], via Wikimedia Commons
- select the image 2D and drop it onto the desired position on the plottingPanel

- make the image share property of the earlier element shape and in the ImageURL select the path of the picture for example "./Unnamed/256px-Soccer_ball.svg.png"

- run the simulation to check

- Increase size of Image
- go to image and change SizeX and SizeY to say 0.5 for both,

- run the sim

- Preparing for mobile deployment
- to maximise the size of the plottingPanel in the code into the plottingPanel

- run to check

- How to make the ball round?
- to create a round ball, set the square aspect to true

- run and sim to check

- Enable User Interaction
- go to plottingPanel Interaction Enable select True

- go to the image and select EnabledPosition to "ENABLED_ANY"

- run and check
- Axes that always align to XFixedTick, YFixedTick for graphing norms
- go to initialization radio button and create a page

- insert the follow code

- // double slashes are comments lines that computer will ignore, to help you read and understand
- //coordinates are absolute that assume xmin=0, xmax=1,ymin=0, ymax=1
- // set x axis referencing left corner of x-axis
- _view.plottingPanel.getAxisX().setPosition([0,0.5]);
- // set position of x-axis title
- _view.plottingPanel.getTitleX().setPosition([0.95,0.5]);
- // set y axis referencing left corner of y-axis
- _view.plottingPanel.getAxisY().setPosition([0.5,0]);
- // set position of y-axis title
- _view.plottingPanel.getTitleY().setPosition([0.5,0.95]);
- run and check the result

- Removing the gutter/border to increase view
- find this screen and insert [0,0,0,0] where the order of the number gutter width is [left,top,right,bottom]

- run the sim

- Making the axis nicely spaced
- go to plottingPanel and key in the values as shown

- run a sim to check

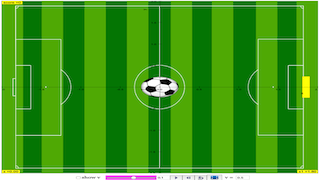
- Insert a picture to fill up the maximum plottingPanel view
https://pixabay.com/en/soccer-pitch-field-diagram-green-304171/
- to add a new tab and called it picturesize in the Initialization page

-
- orig_listener = _view.plottingPanel.getAxisX().panelChangeListener; _view.plottingPanel.getAxisX().panelChangeListener = function(e) { orig_listener(e); _view.backgroundsoccerfield.setSizeX(_view.plottingPanel.getRealWorldXMax()-_view.plottingPanel.getRealWorldXMin()); _view.backgroundsoccerfield.setSizeY(_view.plottingPanel.getRealWorldYMax()-_view.plottingPanel.getRealWorldYMin()); }
- add a picture of into the plottingPlanel using the screenshot as guide

- run sim to check

- Creating an goalpost for making the ball stop just at the collision
- in simulations, it is a good idea to make object stop at the moment of collision, for very precise calculations, which is difficult to achieve. In EJSS, it is simple.
- First create the goalpost by creating an object using the screenshots as a guide, now that you have done this before for the ball call it coordinates (x1, y1), size (0.5, 0.5), shapetype "RECTANGLE", RelativePosition "WEST" FillColor "Yellow"

- Declare the variables in the Variable page

- run and see the result

- Disabling codes using Tabs
- remember in the view, xmin, xmax ymin, ymax are -2 and 2 respectively but the computer view goes to -4 and 4 for x, because EJSS automatically shows the best view. it is great, but for this example, we want to restrict the view to exactly xmin, xmax ymin, ymax for precise placement of the goalpost so that the background is in sync with the yellow goalpost. EJSS allow very fast testing of codes so go to Initialization right click and choose disable and EJSS will not generate the codes inside this tab called picturesize

- run the sim to check the view

- in any modeling tool, everything needs to be precise if it is not, a lot of funny things can happen
- Using Math functions in any part of the simulation
- to restrict the simulation view of the plottingPanel, use a mathematical function called Math.min(one,two) that calculates the lower value
- +_view._format(Math.min(window.innerWidth*0.9,window.innerHeight*0.9),"0")
- +_view._format(Math.min(window.innerWidth*0.9,window.innerHeight*0.9),"0")
- put this line inside the plottingPanel Width and Height

- run and see

- got to Evolution click Events and create a page

- on the Event page, change the zero condition and action as follow

- you may need to change vy =0 to make the ball travel to the goalpost
- run and see the result

- Debugging and Seeing the results
- one way to quickly see the result is "x ="+_view._format(x,"0.00");
- "x1 ="+_view._format(x1,"0.00")
- "x ="+_view._format(x,"0.00")
- type this two lines inside plottingPanel Decoration the BRMessage and BLMessage respectively

- run and see

- Disabling to see effects of change
- how to know that the changes made is indeed the reason? try to disable that page and see

- run and see

- continuing with the rest of the activity, enable back the event page
- Creativity Practice to add score
- you may want to add a score after each successful event. Try it!
- hints are below
- Practice moving the ball back to the centre after scores, Falding Scaffolds
- run and see

- FullScreen on browsers using custom function
- After googling full screen, you may find this page and wonder how to use the codes there https://developer.mozilla.org/en-US/docs/Web/API/Fullscreen_API
- go to Custom and add this code to enable fullscreen

- copy this code into the custom page
- //https://developer.mozilla.org/en-US/docs/Web/Guide/API/DOM/Using_full_screen_mode
- // does not work for iOS
- /*jslint browser:true */
- function toggleFullScreen() {
- if (!document.fullscreenElement && // alternative standard method
- !document.mozFullScreenElement && !document.webkitFullscreenElement && !document.msFullscreenElement ) { // current working methods
- if (document.documentElement.requestFullscreen) {
- document.documentElement.requestFullscreen();
- } else if (document.documentElement.msRequestFullscreen) {
- document.documentElement.msRequestFullscreen();
- } else if (document.documentElement.mozRequestFullScreen) {
- document.documentElement.mozRequestFullScreen();
- } else if (document.documentElement.webkitRequestFullscreen) {
- document.documentElement.webkitRequestFullscreen();
- }
- } else {
- if (document.exitFullscreen) { //Standard
- document.exitFullscreen();
- } else if (document.msExitFullscreen) { //Internet Explorer 11
- document.msExitFullscreen();
- } else if (document.mozCancelFullScreen) { //Gecko (Firefox)
- document.mozCancelFullScreen();
- } else if (document.webkitExitFullscreen) { //Safari (WebKit)
- document.webkitExitFullscreen();
- }
- }
- }
- download this icon
 and add to the Unnamed folder
- create the button to toggleFullScreen custom function

- add Disabled _isPlaying ImageOnUrl to be "./Unnamed/full_screen.png" OnClick toggleFullScreen() ImageOffUrl "/org/opensourcephysics/resources/controls/images/close.gif" and OffClick toggleFullScreen()

- run and see

- Hitting the left border and stop
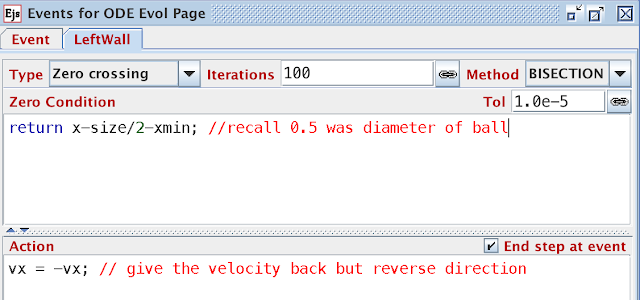
- to create precise time to stop, EJSS can do this easily using Event instead of FixedRelationship which will overshoot during the time step dt.
- goto Event, start a new tab and name it LeftWall

- in this LeftWall, think of a way to what is the condition needed for precise calculation of the event. your code should be something like this

- return x-0.5/2-xmin; //recall 0.5 was diameter of ball
- vx = -vx; // give the velocity back but reverse direction
- run and check

- Ease of change, name the variable size = 0.5 and add to the LeftWall event
- define size as 0.5

- change the LeftWall event
- the benefits of variabilization is ease of change later on
- continue to work on your simulation to include
- hint is available if need by clicking the images
- Creating model and source for sharing online
- right click the right package option and choose the first 2 options

- ejss_model_Unnamed.zip is the simulation, give it to your students, ask them to unzip it and launch the file that looks like the simulation, for example, Unnamed_Simulation.xhtml, test my copy on how it looks
- ejss_src_Unnamed.zip is the source code for which you want others to edit the simulations
- 12h15 - 12h30: Reflection, did we cover most of the EJSS simulation creation in a purposeful, just in time manner?
- Exploration of EjsS,EjsS workspace fundamentals
Structure of a model in EJS
Variables and their types.
Initialization, fixed relations, and custom functions
Introduction to the ODE editor and the Prelim code page
Binding model variables to view elements and controls
How to deploy simulation model and source
- Exploration of EjsS,EjsS workspace fundamentals
- lunch until 1400
Day 1 Afternoon
14h00 - 17h30: Load, inspect, and run a JavaScript simulation from within EjsS
Modify a simulation Pendulum 195 chosen to suit O level syllabus (assistance will be given to help with the modifications)
on OSP@SGExploration of the OSP-EJS-ComPADRE-OSP@SG Platform
ebook creation using OSP tools and Independent work and consultations on curriculum design referencing some of the teachers of eduLab project 40+ simulation in
- https://sg.iwant2study.org/ospsg/index.php/interactive-resources/physics/02-newtonian-mechanics/08-gravity
- https://sg.iwant2study.org/ospsg/index.php/interactive-resources/physics/02-newtonian-mechanics/09-oscillations
15h30 - 16h00: Break and Networking
1600-1730 ebook creation using OSP tools What is the UNESCO Singapore ICT mathematical pedagogical innovation about? open this source code to examine that additional codes added for this mathematically modeling approach with if statements. http://iwant2study.org/lookangejss/00workshop/2016WolfgangPacoFelixLookang/
Updated for Hackathon 2019
https://sg.iwant2study.org/ospsg/index.php/857-ejss-model-unnamed
For Teachers
[text]
Research
[text]
Video
[text]
Version:
Other Resources
[text]
Frequently Asked Questions: Interactive Physics Simulations with EjsS
1. What is the purpose of this tutorial and the Easy Java/JavaScript Simulations (EjsS) tool?
This tutorial provides a hands-on introduction to the Easy Java/JavaScript Simulations (EjsS) modeling and authoring tool. The primary objective is to empower educators and learners to create and modify interactive computational models, primarily for physics and mathematics. It focuses on utilizing the EjsS tool to develop simulations, remix existing ones from digital libraries (especially the Singapore Library), and export these models with supporting text as interactive electronic textbook chapters in the EPUB format.
2. Who is the target audience for the EjsS workshop and this tutorial?
The workshop and this tutorial are designed for individuals of all levels in mathematics and physics education, including primary, secondary, and junior college/centralized institute levels. No prior programming knowledge is explicitly required, making it accessible to beginners. The content caters to educators interested in incorporating interactive simulations into their teaching practices.
3. What are the key steps involved in creating a basic simulation using EjsS, as outlined in the tutorial?
The tutorial walks through the creation of a simple simulation involving an object moving in a 2D plane. Key steps include:
- Launching the EjsS editor and setting the programming language to JavaScript.
- Creating an "Evolution" page to define the mathematical model using Ordinary Differential Equations (ODEs) to govern the object's motion (e.g., position, velocity, time).
- Generating the simulation and creating an HTML view to visualize it.
- Adding a "PlottingPanel" to display the object's movement graphically.
- Inserting a 2D object (e.g., an ellipse to represent a ball) onto the plotting panel and associating its visual properties (position, size, color) with variables defined in the model.
- Declaring and initializing variables (e.g., time, time step, x and y coordinates, x and y velocities).
- Running the simulation to observe the object's motion.
4. How can users interact with and customize the simulations created with EjsS, according to the tutorial?
The tutorial introduces several ways to make simulations interactive and customizable:
- Controlling the View: Adjusting the visible range of the plotting panel using variables like xmin, xmax, ymin, and ymax.
- Adding Trails: Displaying the history of an object's path.
- Creating Sliders: Allowing users to manipulate variables (e.g., initial velocity) in real-time and observe the effects on the simulation.
- Implementing Checkboxes: Enabling users to toggle the visibility of elements like trails.
- Displaying Numerical Values: Showing the current values of variables (e.g., velocity) within the simulation view.
- Enabling User Interaction: Making objects draggable or responsive to user input on the plotting panel.
5. What is the significance of exporting simulations as EPUB files, and what tools are recommended for this process?
Exporting simulations as EPUB files allows for the creation of interactive electronic textbooks or chapters. This format enables the embedding of dynamic simulations within readable content, enhancing the learning experience. The tutorial recommends the following tools for this process:
- EJSS authoring tool: For creating and exporting the simulation.
- Bluegriffon: An XHTML and HTML editor for creating supporting pages.
- Chrome Browser with Readium plugin or Readiator EPUB Reader: For previewing and testing the exported EPUB files.
- eCanCrusher: A utility for compressing and decompressing EPUB folders.
- IDPF ePub 3 Validator or epub-checker: For validating the EPUB documents to ensure they meet standards.
- iBook App (iOS) and Gitden EPub Reader (Android): For viewing EPUB files on mobile devices.
6. How does EjsS facilitate the creation of more advanced simulation features, such as collisions and scoring?
The tutorial touches upon more advanced features through examples like:
- Collision Detection: Using "Events" within EjsS to define conditions under which specific actions should occur (e.g., when a ball hits a goalpost or a wall). These events can precisely halt or alter the motion of objects based on defined conditions.
- Implementing Scoring: Demonstrating how to create a "score" variable, increment it upon a successful event (like hitting a goalpost), and display it within the simulation.
- Using Math Functions: Integrating mathematical functions (e.g., Math.sqrt, Math.min) within the model and view to perform calculations and control simulation behavior.
7. What considerations are important for deploying EjsS simulations on different platforms, particularly mobile devices?
The tutorial provides a few key considerations for mobile deployment:
- Maximizing View Size: Suggesting code snippets to dynamically adjust the plotting panel size to a percentage of the browser window's width and height, optimizing the view on smaller screens.
- Using JavaScript: Emphasizing the importance of using JavaScript as the programming language within EjsS, as EPUB readers typically support JavaScript for interactivity.
- Testing on Mobile Devices: Recommending specific EPUB readers for iOS and Android to ensure the simulations function correctly on these platforms.
8. Beyond creating simple simulations, what are some other potential applications and resources highlighted in the broader context of the provided text?
The text highlights a wider ecosystem around EjsS and Open Source Physics (OSP) @ Singapore, suggesting applications beyond basic model creation:
- Remixing Existing Models: Encouraging users to leverage and adapt the vast library of existing simulations available online (e.g., the Singapore Library and resources from the Open Source Physics project).
- Creating Interactive Electronic Textbooks: Positioning EjsS as a tool for developing engaging educational materials that combine text and dynamic simulations.
- Exploring Various Physics and Mathematics Concepts: The extensive list of available simulations covers a wide range of topics in mechanics, oscillations, waves, electromagnetism, thermodynamics, quantum physics, mathematics, and even games, demonstrating the versatility of the platform.
- Teacher Professional Development: The mention of workshops and teacher work attachments indicates a focus on empowering educators to effectively use these tools in their classrooms.
- Research and Innovation: The inclusion of links to research and discussions on pedagogical innovation suggests an ongoing effort to explore and enhance teaching and learning through interactive simulations.


